
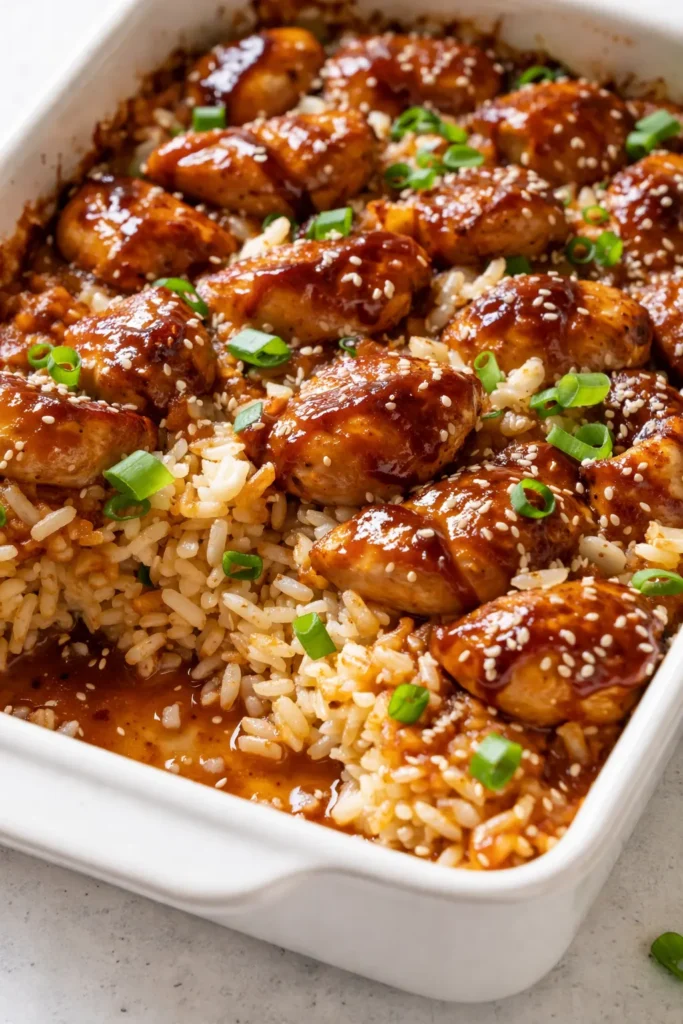
The first time the lid comes off and that glossy, caramelized teriyaki glaze catches the overhead light — that’s the moment. The chicken is dark in all the right places, the rice underneath has soaked up exactly enough sauce to be savory but not swimming, and the broccoli is still bright enough that you remember there are vegetables involved. This is not a brown pile. This is a dish that looks like you planned it, even though it came together on a Tuesday when you had approximately zero energy left.
The short version: One dish, 40 minutes, a sauce so good you’ll stop ordering takeout teriyaki forever.
I’ve made this for myself on a random Wednesday, for friends who showed up hungry, and for the kind of evening where you need dinner to feel like a small victory. It delivers every time. The trick is a homemade teriyaki that actually reduces into something thick enough to coat the chicken — not a watery soy situation that leaves you chasing flavor with more soy.
- Serves: 4 as a main
- Hands-On Time: 20 min | Total Time: 40 min
- Difficulty: Easy enough for a weekday — one pan, one baking dish
- Cost per serving: ~$4.50
- Calories: ~490 per serving
- Dietary Notes: Naturally dairy-free. Adaptable for gluten-free (tamari)
(Photo above: overhead shot of the casserole in a white ceramic baking dish, the top glistening with sauce, scattered black-and-white sesame seeds and sliced scallions in deliberate clusters, steam rising, a single chopstick resting on the rim for scale. Natural light from a west-facing window, right side.)
The Thing That Makes This Sauce Actually Cling to the Chicken
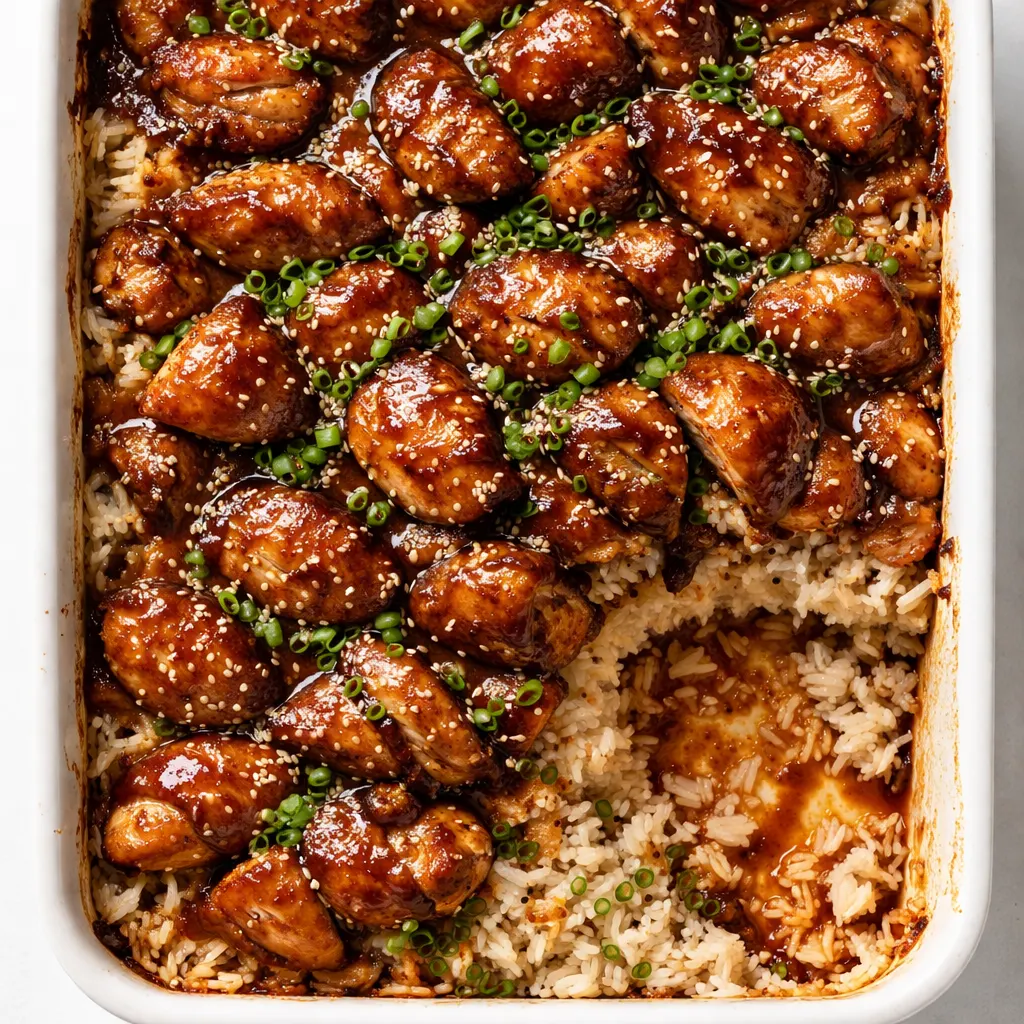
Most homemade teriyaki sauces taste fine but run off the protein the second you serve it. The fix is not more cornstarch. It’s the order of operations: you build the sauce in the pan after searing the chicken, let it bubble and reduce until it’s thick enough to coat a spoon — then you pour it over everything and let the oven do the rest. The heat caramelizes the sugars just enough to give you that glossy, almost lacquered finish.
I learned this after one too many watery casseroles that tasted fine but looked sad. The visual difference between a sauce that clings and one that puddles is exactly the difference between a dish you photograph and one you just eat. This one earns the photo.
One more thing: the rice stays separate from the sauce during assembly. You layer it, pour the sauce over the top, and let it soak down through the casserole as it bakes. That way every grain gets seasoned, but the bottom doesn’t turn into a soggy paste. My friend Sam called it “architecturally sound” which is the best compliment a food stylist can hear.
Everything You Need — and a Few Honest Notes
- 1 ½ lbs boneless skinless chicken thighs: Thighs stay juicy through the bake. Breasts work, but you’ll want to pull the casserole out of the oven five minutes earlier so they don’t dry out. I’ve used both and the thighs are always the version I send to people.
- 1 ½ cups jasmine rice: Long-grain jasmine stays separate and fluffy. Sushi rice gets too sticky. Basmati works, but jasmine has that slight floral note that plays well with the sweet-savory teriyaki. If you only have regular long-grain, add ¼ cup extra water to the par-cook step.
- ⅓ cup soy sauce: Use a good one — Kikkoman or a Japanese brand. The flavor is cleaner. I keep a bottle of low-sodium on hand too and use it here so I can control the salt.
- ¼ cup mirin: This is the sweetness that doesn’t taste like sugar. Don’t skip it. If you don’t have mirin, mix 2 tbsp honey with 2 tbsp sake or dry sherry.
- 2 tbsp sake or dry sherry: A splash of acidity that cuts through the richness. I’ve used both and sake gives the sauce a cleaner finish.
- 2 tbsp brown sugar + 1 tbsp honey: Two types of sweetener because the honey adds a different kind of gloss and the brown sugar gives depth. I tried it with just brown sugar once and the glaze didn’t look as shiny.
- 3 cloves garlic, minced + 1 tbsp fresh ginger, grated: Fresh, not powdered. The ginger especially makes a huge difference in how vibrant the sauce tastes. I grate it on a microplane right into the pan.
- 1 tbsp cornstarch + 2 tbsp cold water: The slurry. Add it at the end of the sauce cooking, not the beginning. This is the step that separates a glossy sauce from a watery one.
- 2 cups broccoli florets: Cut them small enough that they cook through in 20 minutes. Snap peas or green beans work too — just adjust the size so they cook at the same rate.
- Toasted sesame seeds and scallions for garnish: White and black sesame seeds together look intentional. Scallions sliced thin on a bias. Place them, don’t scatter. It matters.
What to Pull Out Before You Start
- A 12-inch or larger skillet — cast iron or stainless, something that can go on high heat without warping
- A 9×13 baking dish — ceramic or glass, something you’d be happy to bring to the table
- A medium saucepan with a lid for the rice
- A microplane for the ginger
- A small bowl for the cornstarch slurry
If you don’t have a 9×13, a 3-quart baking dish or even a deep 10-inch skillet works — just watch the bake time since a deeper dish takes longer.
Let’s Make It — Step by Step, No Fancy Skills Required
This goes faster than you think. Read through once so you know where you’re headed.
Preheat and Rice: Preheat your oven to 375°F. Rinse the jasmine rice in a fine-mesh strainer until the water runs clear — this keeps it from turning into a gluey mess. Combine the rice with 2 cups water and a pinch of salt in your saucepan. Bring to a boil, then reduce to low, cover, and cook for 10 minutes. It should still be slightly firm in the center — it’ll finish cooking in the oven. (📸 Photo tip: The rice should look fluffy and separate, not wet or clumpy. If you see standing water, let it sit off the heat for two more minutes before you fluff it.)
- Sear the chicken: Pat the chicken thighs dry with paper towels — really dry, because moisture is the enemy of a good sear. Season them lightly with salt. Heat a tablespoon of neutral oil in your skillet over medium-high until it shimmers. Place the thighs in the pan and leave them alone for 4 minutes. Flip and sear the other side for 3 minutes. They won’t be cooked through — that’s fine. They’re building color. (📸 Photo tip: Look for a deep golden-brown crust — not just pale tan. That color is flavor and it’ll make the final dish look like you spent way more time on it than you did.)
- Slice the chicken: Transfer the seared thighs to a cutting board and let them rest for 2 minutes. Slice each thigh crosswise into ½-inch strips. Don’t skip the rest — if you slice too soon, the juices run out and the chicken dries out in the oven.
- Build the teriyaki sauce: Pour off all but 1 tablespoon of fat from the skillet. Add the minced garlic and grated ginger and stir for 30 seconds until fragrant. Pour in the soy sauce, mirin, sake, brown sugar, and honey. Stir to dissolve the sugar and bring it to a simmer. Let it bubble for 3 minutes — it should reduce slightly and smell like the best thing you’ve made all week.
- Thicken the sauce: In your small bowl, whisk the cornstarch with the cold water until smooth. Pour it into the simmering sauce while stirring. Within 30 seconds, the sauce will go from thin and watery to thick and glossy. That’s your visual cue. Turn off the heat. This is the step I used to rush — don’t. Let the cornstarch cook for that full 30 seconds or the sauce will thin out again in the oven.
- Layer the casserole: Spread the par-cooked rice evenly across the bottom of your baking dish. Lay the sliced chicken strips over the rice in a single layer as much as possible — overlapped is fine, but a single layer gives more surface area for the sauce. Scatter the broccoli florets around the gaps. Pour the teriyaki sauce evenly over everything. Don’t stir it. Just let it find its way down.
- Bake, covered: Cover the dish tightly with foil and bake for 15 minutes. The steam will finish cooking the rice, tenderize the broccoli, and marry all the flavors.
- Uncover and caramelize: Remove the foil and bake for another 10 minutes. The sauce will bubble and reduce, the chicken edges will darken, and the whole thing will get that glossy, lacquered look that makes people lean in. Let it rest for 5 minutes before serving — the sauce needs a minute to settle into the rice so every bite is seasoned. 📸 Photo tip: After the rest, the sauce should look thick enough to cling to the chicken, not pool on the bottom. If it’s too thick, that’s fine — it’ll loosen slightly when you stir.
- Garnish and serve: Sprinkle the toasted sesame seeds and sliced scallions over the top — place them deliberately, not scattered from a height. Serve straight from the dish with extra sauce spooned over if you’re feeling generous.
How I Prep This for the Week (Because Yes, It Reheats Beautifully)
This is one of those rare casseroles that tastes as good on day three as it did on day one. I make a double batch on Sundays and we eat it for lunch through Wednesday. The key is storing the sauce separate if you’re freezing it — but if it’s just fridge storage, you can keep it all together.
- Fridge: Store in an airtight container for up to 4 days. Reheat in a 350°F oven for 10 minutes or microwave in 60-second bursts, stirring once. The microwave slightly softens the chicken’s caramelized edges, but it’s still excellent.
- Freezer: Yes, but freeze without the garnish. Portion into individual containers, press a piece of parchment against the surface to prevent freezer burn, and freeze for up to 3 months. Thaw overnight in the fridge before reheating.
- Reheat: The oven is better. 350°F, covered for the first 5 minutes, then uncovered for 5 more. The microwave works if you’re in a hurry — just expect the rice to be slightly softer.
Things I Wish I’d Known the First Time
- Dry the chicken until it’s almost alarming: A wet surface steams instead of searing. I pat the thighs dry, then wait 30 seconds and pat them again. The drier the surface, the darker the crust. Trust me on this one — my first version had pale chicken because I was too impatient to dry it properly.
- Don’t skip the cornstarch slurry: I know it feels like an extra step. Do it anyway. A sauce that’s thickened before baking stays glossy in the oven. A sauce that’s thin bakes into a watery mess. The difference is one minute and one bowl.
- The rice should still have a tiny bite when you layer it: If you fully cook the rice before baking, it’ll turn mushy in the oven. That par-cook for 10 minutes is intentional — the oven finishes it to the perfect texture. Even if you mess this up a little and the rice is a bit soft, it’ll still taste good. I’ve done it.
- Let the casserole rest before you dig in: That 5-minute rest after baking is non-negotiable. The sauce is still settling, the rice is still absorbing. If you serve it immediately, the sauce pools on the bottom and the top tastes dry. Wait. I know it’s hard. Do it anyway.
Swaps That Actually Work (for Every Situation)
- Gluten-Free: Swap the soy sauce for tamari or coconut aminos. Everything else is naturally gluten-free. I’ve tested this with tamari and it’s nearly identical — the flavor is slightly cleaner, which I actually prefer in this recipe.
- Sugar-Free / Lower Sugar: Use coconut sugar or a monk fruit-allulose blend in place of the brown sugar, and skip the honey. The sauce won’t get as glossy, but it’ll still taste great. My friend Jen does this and adds a splash of orange juice for brightness.
- Vegetarian Version: Swap the chicken for extra-firm tofu, pressed and seared in the same way. Use vegetable broth instead of chicken. Add an extra cup of broccoli or snap peas. I make this version for myself sometimes because it’s just as satisfying and the tofu soaks up the sauce beautifully.
- Spicy Version: Add 1 tablespoon of sriracha or gochujang to the teriyaki sauce when you add the sugar. Top with red pepper flakes before serving. This is what I make when it’s just me and I want a little heat.
- Kid Version: Skip the ginger (some kids find it too strong) and add an extra tablespoon of honey. My friend’s kids call it “sweet chicken rice” and ask for it every week.
- Brunch-for-a-Crowd Version: Make it in a big 9×13, double the recipe, and let people serve themselves from the dish. It holds well for 30 minutes in a warm oven.
Questions I Get About This One All the Time
Q: Why did my sauce turn out thin and watery?
A: Ugh, I’ve been there. Two things: either the cornstarch didn’t cook long enough before you added it to the sauce (it needs a full 30 seconds of simmer after you stir it in), or you didn’t let the sauce bubble long enough before adding the slurry — it needs to reduce a bit first. Next time, let the sauce simmer for 3 minutes before you add the slurry, then let the slurry cook for a full minute. You’ve got this.
Q: Can I make this with chicken breast instead of thighs?
A: Yes, but here’s the honest truth: breasts are leaner and more likely to dry out in the oven. If you want to use them, sear them whole, slice them thin, and bake the casserole for 5 minutes less total time. I’ve tested it and it works — you just have to be more careful about not over-baking. Thighs are more forgiving and stay juicier.
Q: How long does this last in the fridge? Can I freeze it?
A: It keeps in the fridge for up to 4 days in an airtight container. For the freezer, portion it out without the garnish and freeze for up to 3 months. Thaw overnight in the fridge and reheat in a 350°F oven for 10 minutes. The microwave works in a pinch but the oven keeps the texture better — the rice stays separate and the chicken keeps its caramelized edges.
Q: What do you serve with this?
A: Honestly, this is a complete meal in one dish — rice, protein, vegetables all together. If I want something on the side, I do a simple cucumber salad with rice vinegar and a pinch of salt, or some steamed edamame with flaky salt. My friend Sam always adds a side of pickled ginger for a fresh pop. For a bigger spread, start with a bowl of miso soup and finish with fresh orange slices.
More Recipes My Friends Keep Asking For
If this one hits the spot, here are a few others that get the same reaction — glossy, saucy, and exactly what you want on a weeknight:
- Sticky Ginger Soy Glazed Chicken — Same energy, fewer dishes, done in 30 minutes flat
- One-Pan Sesame Salmon with Broccoli — For the nights when you want something lighter but still want that glossy finish
- Garlic Butter Shrimp with Lemony Rice — The quickest weeknight dinner that still looks like you meant it
Set this on the table without explaining what’s in it. Let the gloss and the smell do the introduction. The first bite will answer every question.
If you try it, drop a comment below — I love hearing how it goes for your table, whether that’s a quiet Tuesday for one or a full house.
📌 Save this teriyaki chicken casserole recipe for the weeknight that needs a win — glossy, saucy, and on the table in 40 minutes, it’s the dinner you’ll come back to again and again.
Teriyaki Chicken Casserole That’s Glossier and Saucier Than Takeout — in 40 Minutes
Equipment
- 12-inch skillet (cast iron or stainless)
- 9×13 baking dish (ceramic or glass)
- Medium saucepan with lid
- Microplane
- Small Bowl
Ingredients
Chicken and Rice
- 1 ½ lbs boneless skinless chicken thighs
- 1 ½ cups jasmine rice
- 2 cups water
- 1 tbsp neutral oil
Teriyaki Sauce
- ⅓ cup soy sauce
- ¼ cup mirin
- 2 tbsp sake or dry sherry
- 2 tbsp brown sugar
- 1 tbsp honey
- 3 cloves garlic, minced
- 1 tbsp fresh ginger, grated
- 1 tbsp cornstarch
- 2 tbsp cold water
Vegetables and Garnish
- 2 cups broccoli florets
- toasted sesame seeds
- sliced scallions
- to taste salt
Instructions
- Preheat oven to 375°F. Rinse the jasmine rice in a fine-mesh strainer until the water runs clear. Combine the rice with 2 cups water and a pinch of salt in a saucepan. Bring to a boil, then reduce to low, cover, and cook for 10 minutes until slightly firm. Set aside.
- Pat the chicken thighs dry with paper towels and season lightly with salt. Heat 1 tablespoon of neutral oil in a skillet over medium-high until shimmering. Place the thighs in the pan and sear for 4 minutes on one side, then flip and sear for 3 minutes on the other side until deep golden brown. Transfer to a cutting board, rest for 2 minutes, then slice each thigh crosswise into ½-inch strips.
- Pour off all but 1 tablespoon of fat from the skillet. Add the minced garlic and grated ginger and stir for 30 seconds until fragrant. Pour in the soy sauce, mirin, sake, brown sugar, and honey. Stir to dissolve the sugar and bring to a simmer. Let it bubble for 3 minutes until reduced slightly.
- In a small bowl, whisk the cornstarch with the cold water until smooth. Pour the slurry into the simmering sauce while stirring. Cook for 30 seconds until the sauce thickens and becomes glossy. Turn off the heat.
- Spread the par-cooked rice evenly across the bottom of a 9×13 baking dish. Lay the sliced chicken strips over the rice in a single layer as much as possible. Scatter the broccoli florets around the gaps. Pour the teriyaki sauce evenly over everything. Do not stir.
- Cover the dish tightly with foil and bake for 15 minutes. The steam will finish cooking the rice and broccoli.
- Remove the foil and bake for another 10 minutes until the sauce is caramelized and bubbly, and the chicken edges are dark.
- Let the casserole rest for 5 minutes before serving. The sauce will settle into the rice.
- Garnish with toasted sesame seeds and sliced scallions placed deliberately on top. Serve directly from the baking dish.
Notes
Related Recipes:
 Cheesy Hamburger Casserole Bake That’s Ready in 40 Minutes (No Canned Soup Here)
 Creamy Garlic Tagliatelle That Looks Like a Restaurant Dish in 20 Minutes
 Texas Roadhouse Style Baked Salmon with Sweet and Savory Glaze — Ready in Under 30 Minutes
 Easy Italian Meatloaf That’s Actually Juicy (Not Dry) — in 1 Hour
 The Biscuits and Gravy Casserole That’s Actually Crispy on Top (And Ready in 40 Minutes)
 Air Fryer Chicken and Vegetables That Don’t Taste Like a Regret (30 Minutes, One Pan)