
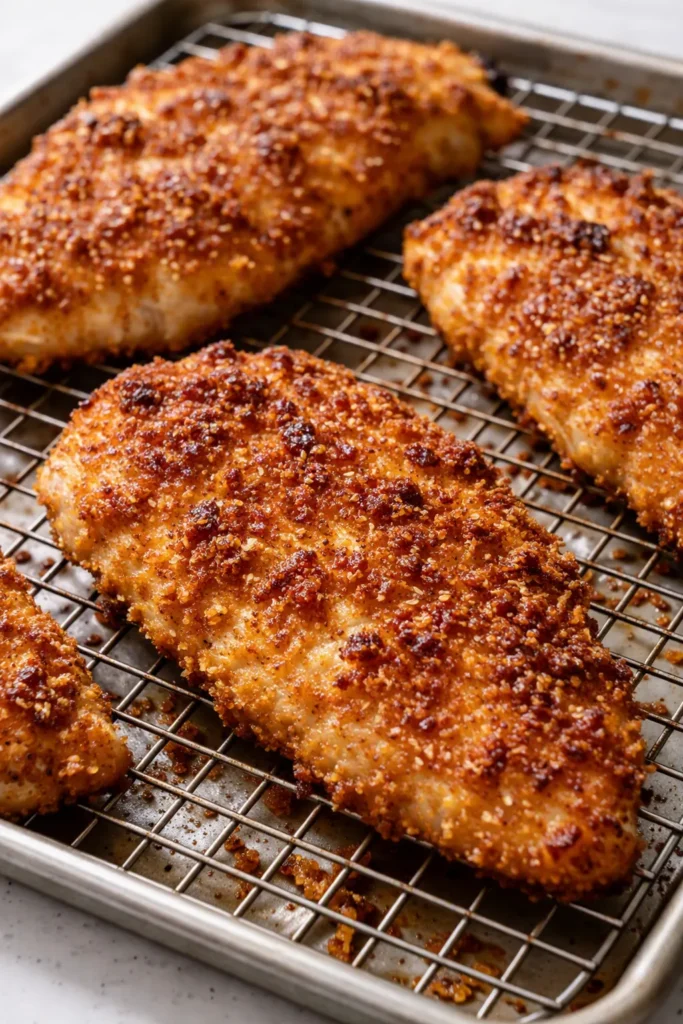
That first bite — the shatter of the crust, the juice running down your chin — that’s the moment you’ll forget these crispy baked chicken cutlets aren’t fried. I’ve made a lot of chicken in my day, and most of it was fine. This is the recipe I text my sister about at 9pm on a Tuesday, the one my kids have started requesting by name. “Can we have crackly chicken?” they ask. That’s the “crackly” — the golden, shatteringly crisp panko coating that stays crunchy even after it’s been sitting on the table for ten minutes.
The short version: Thin chicken cutlets, a seasoned panko crust, and a hot oven do all the work in 35 minutes — no deep fryer required.
I’ve tested this method at least thirty times, tweaking the oil-to-breadcrumb ratio, the oven temperature, the exact moment to pull it out. My picky nine-year-old, who once declared all chicken “too chickeny,” has asked for it three weeks in a row. That’s the endorsement that matters.
- Serves: 4 as a main
- Hands-On Time: 20 min | Total Time: 35 min
- Difficulty: Easy, even on a school night
- Cost per serving: ~$2.50
- Calories: ~340 per serving
- Dietary Notes: Naturally low-carb; adaptable for gluten-free and dairy-free
(Photo above: Golden chicken cutlets on a white platter, one cut in half to show the juicy interior, a small bowl of lemon wedges beside it, shot in natural light on my kitchen counter with a linen napkin underneath.)
The Thing That Makes These Actually Crispy (Not Soggy)
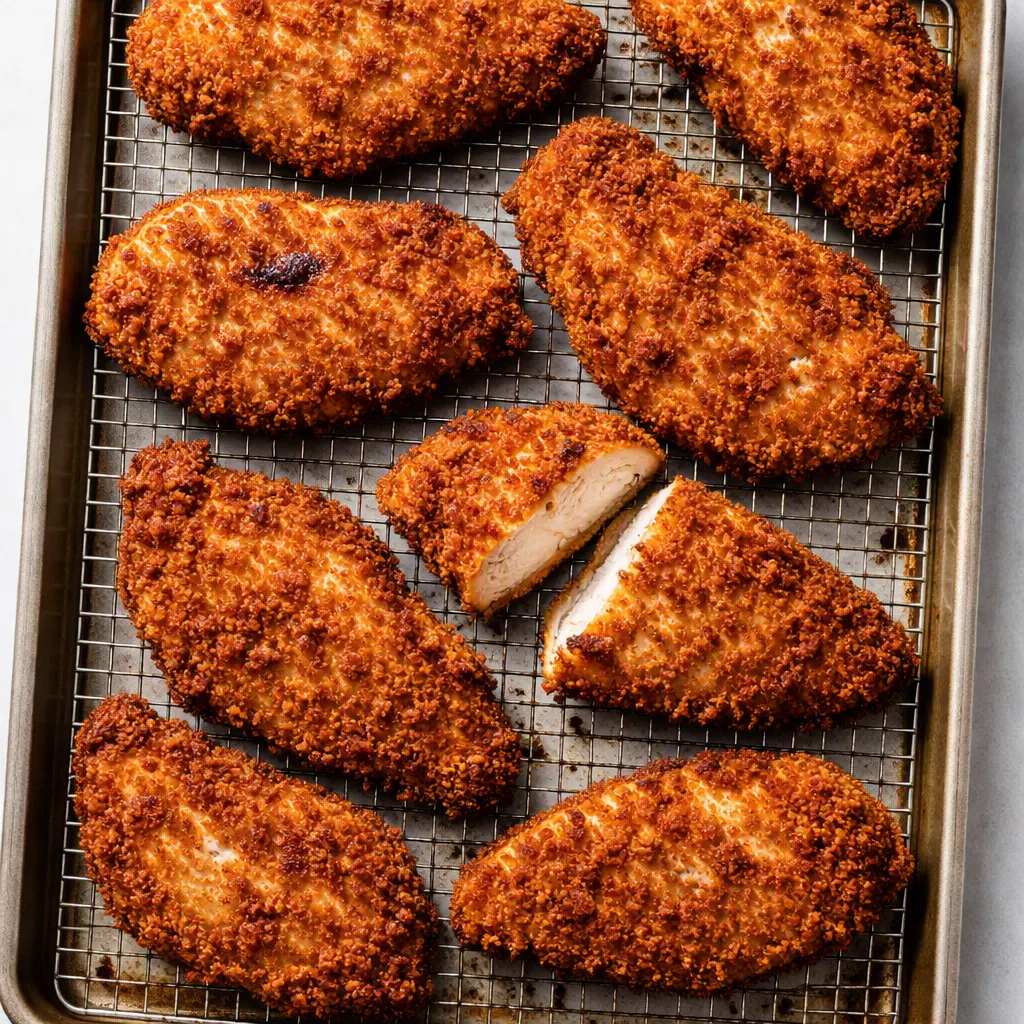
Every baked chicken recipe I tried before this one came out of the oven with a coating that was technically attached to the chicken but also… limp. You know the situation. The breadcrumbs are there in spirit, but they’re soft and pale, and you’re pretending that’s okay. It’s not okay.
The fix is two things, and neither one is complicated. First: you have to get a real crust on the chicken before it goes in the oven. A quick sear in a hot skillet gives the panko a head start — it browns and crisps up in a way that the oven alone just can’t replicate. It’s an extra five minutes and it’s the whole ballgame.
Second: don’t crowd the pan. When the cutlets are nestled too close together on the baking sheet, they steam each other. Steam is the enemy of crisp. Give them breathing room so the hot air can circulate and do its job. If you have to use two baking sheets, use two baking sheets. Your future self, biting into a genuinely crunchy cutlet, will thank you.
Everything You Need (And a Few Notes From Me)
- 1½ pounds chicken breast cutlets, pounded to ½-inch thickness: If your store doesn’t sell cutlets, just slice chicken breasts in half horizontally and give them a few whacks with a mallet. Even thickness is what matters — it means every piece cooks at the same speed and stays juicy. My kids think the pounding is hilarious. It’s a whole production in our kitchen.
- 1 cup panko breadcrumbs: Panko is the only breadcrumb I use for this. They’re flakier and lighter than regular crumbs, which means a crispier crust. I’ve tried making my own breadcrumbs from stale bread and it’s lovely, but panko from the box is the weeknight move.
- ½ cup freshly grated Parmesan: The green can kind is fine in a pinch, but freshly grated melts into the crust in a way that the shelf-stable stuff just doesn’t. It adds flavor and helps the coating brown evenly. This is one of the few things I actually buy pre-shredded sometimes — the fine kind, not the shredded strips.
- 2 large eggs: The glue that holds the crust on.
- 2 tablespoons mayonnaise or Greek yogurt: This is my little secret. Just a spoonful whisked into the eggs helps the crust adhere even better and adds a tiny bit of richness without making it heavy. I know it sounds weird. Just try it once and you’ll see.
- 1 teaspoon garlic powder:
- 1 teaspoon onion powder:
- ½ teaspoon smoked paprika: The smoky edge makes it taste like it came off a grill, not a baking sheet.
- Salt and black pepper: Don’t be shy. The crust needs seasoning, not just the chicken. I’ve forgotten to season the panko before and it’s a sad, bland situation. Learn from my mistakes.
- Olive oil spray: This is what makes the crust crisp up in the oven without deep frying. A light misting is all you need — too much and it gets greasy. I keep a dedicated spray bottle in my kitchen. It’s the most-used tool in the drawer.
- Lemon wedges, for serving: Non-negotiable. A squeeze of lemon at the end is not just brightness — it’s contrast. It makes the crispy coating taste even crispier on the palate. My husband thinks I’m overthinking it until he tries a bite with and a bite without. Then he nods and reaches for the lemon.
What to Pull Out Before You Start
- A 12-inch cast iron skillet or heavy stainless steel pan — if you don’t have one, a nonstick pan works too, just don’t get it as hot. My cast iron is my grandmother’s and I swear it makes everything taste better.
- A rimmed baking sheet — the rim matters, trust me.
- A wire rack that fits inside the baking sheet — this is the secret to a crisp bottom. It lets air circulate underneath the chicken so the coating doesn’t get soggy while it bakes. If you don’t have a rack, use a crumpled piece of foil to prop the cutlets up a bit.
- Three shallow bowls or pie plates — one for flour, one for the egg wash, one for the panko mixture.
- Kitchen tongs — you’ll thank me when your fingers aren’t covered in egg and breadcrumbs.
Let’s Make It (Step by Step)
This goes fast once you get going, so read through once before you start. The whole thing takes about 35 minutes, and most of that is oven time while you’re doing something else.
Prep: Heat your oven to 400°F. Place a wire rack inside a rimmed baking sheet and set it aside.
- Set up your dredging station: In one shallow dish, whisk the eggs with the mayonnaise or yogurt until smooth. In a second dish, combine the panko, Parmesan, garlic powder, onion powder, smoked paprika, and a good pinch of salt and black pepper. Mix it with your fingers so the cheese is evenly distributed. (📸 Photo tip: This is a great overhead shot — the golden panko mixture in a white bowl, the egg wash beside it, nice light from the window.)
- Preheat your skillet: Place the cast iron skillet over medium-high heat and let it get hot. You want it shimmering, not smoking. While it heats up, pound your chicken to an even ½-inch thickness if you haven’t already.
- Dredge the chicken: Pat the cutlets dry with paper towels — this is important, the coating sticks better on dry chicken. Dip each cutlet into the egg mixture, letting the excess drip off, then press it firmly into the panko mixture. Make sure both sides are well coated. Press, don’t just sprinkle. My kids love this part. They call it “giving the chicken a blanket.”
- Sear the cutlets: Carefully lay the coated cutlets into the hot skillet in a single layer. Let them cook undisturbed for 2 minutes, until the underside is golden and crisp. Flip and cook for another 2 minutes on the second side. Don’t crowd the pan — if your skillet is smaller than 12 inches, do this in batches. You’re looking for a deep golden brown here, not just light brown. (📸 Photo tip: This is the money shot — the cutlets sizzling in the skillet, that golden crust just starting to form. It’s the moment that makes the whole house smell amazing.)
- Transfer to the rack: Move the seared cutlets onto the wire rack on the baking sheet, leaving a little space between each piece. Spray the tops lightly with olive oil. This is the step that keeps the bottom of the cutlet crispy instead of soggy. Worth the extra second.
- Bake until cooked through: Place the baking sheet in the oven and bake for 10–12 minutes, until the chicken is cooked through and the crust is deep golden brown and very crisp. If you have a meat thermometer, you’re looking for 165°F in the thickest part. But honestly, at ½-inch thickness, 12 minutes is almost always spot on. When I’m really tired, I set a timer and trust it — I’ve done this enough times to know.
- Rest before you eat: Let the cutlets rest on the rack for exactly 3 minutes. This lets the juices redistribute so they don’t run out when you cut into them. I know it’s hard to wait. You will be rewarded.
How I Meal Prep These for the Week
This is one of those recipes that’s just as good cold the next day as it is hot out of the oven, which makes it perfect for my Sunday prep situation. I make the full batch (sometimes a double batch if I’m feeling ambitious) and we’re set for lunches until Wednesday. The key is to store the chicken separate from any sides — the crispy crust needs to stay dry or it’ll soften.
- Fridge: Store in an airtight container for up to 4 days. I put a paper towel in the container to absorb any extra moisture. Reheat in the oven or toaster oven at 375°F for 5–7 minutes to bring back the crisp. The microwave works in a pinch, but it will soften the crust — just so you know what you’re getting.
- Freezer: Yes, you can freeze them. Freeze the cooked cutlets in a single layer on a baking sheet, then transfer to a freezer bag for up to 2 months. Reheat straight from frozen in a 400°F oven for about 12 minutes. I’ve done this when I make a triple batch on a Sunday and we’ve got a busy week ahead.
- Reheat: The oven is the only way to get the crisp back. I don’t love the microwave for this one — it turns the crust soggy. Toaster oven is perfect if you’ve got one. My toaster oven gets more use than my actual oven during the week.
Things I Wish I’d Known the First Time
- Pat the chicken dry before dredging: This makes a huge difference. Wet chicken makes the egg wash slide off and the panko won’t stick properly. I learned this the hard way after making a batch with a sad, patchy crust. Dry chicken, well-dredged chicken, happy crust.
- Press the breadcrumbs on, don’t just sprinkle them: You want an even layer that’s really adhered to the chicken. I press firmly on both sides and then pat any loose spots. This is the difference between a crust that stays on and a crust that falls off in the pan. Trust me on this one — my first few attempts were a mess of scattered crumbs.
- Don’t move the chicken while it’s searing: Leave it alone for the full 2 minutes. If you try to flip it before the crust is set, you’ll pull off layers of the coating. When it’s ready, it’ll release easily from the pan. My husband thought I was overthinking it until he saw me flip a piece too early and lose half the crust. He gets it now.
- Even a “mess-up” of this recipe is still delicious: If the crust is a little patchy or the chicken is a hair overdone, it’s still going to be a good dinner. The lemon juice fixes a lot of sins. I’ve made this recipe so many times that I know exactly how it should look, but even my worst versions have disappeared from the plate. Don’t stress the perfection.
Swaps That Actually Work (Because We’re All Human)
- Dairy-Free: Skip the Parmesan and add an extra ¼ cup of panko plus a pinch of salt to compensate. You won’t get the exact same nutty flavor, but it’ll still be crispy and delicious. This is the version I make for my nephew who can’t do dairy — he loves it and doesn’t miss the cheese at all.
- Gluten-Free: Use gluten-free panko (they make it now, it’s surprisingly good) — the rest of the recipe stays the same. My neighbor with celiac has made this version and says it’s just as crispy as the regular one. He’s not a liar.
- Spicy Honey Mustard Version (for adults): Whisk a tablespoon of honey and a teaspoon of Dijon into the egg wash and add a pinch of cayenne to the panko mixture. It gives a sweet-heat kick that’s incredible with the crispy crust. My kids need the milder version, so I make this one after bedtime when we’re having a date night in.
- Chicken Tenders version: Cut the chicken into strips before pounding. They’ll cook a little faster — check them at 8 minutes in the oven. This is my “I’m so tired” version. It takes a little longer to prep but the kids think they’re getting something special.
Questions I Get About This Recipe All the Time
Q: Why did my crust turn out soggy?
A: Ugh, I’ve been there. The most common culprit is crowding the baking sheet — if the cutlets are touching, they steam each other. The second is skipping the wire rack, which traps steam underneath. Give them space, use that rack, and spray a light mist of oil on top. You’ve got this next time.
Q: Can I make this with chicken thighs instead of breasts?
A: Yes, you absolutely can! Chicken thighs are even more forgiving and juicy. Just pound them to the same ½-inch thickness and add a couple of minutes to the oven time. They’re a little more forgiving, so a slightly higher oven temp — 425°F — will help crisp the crust without drying them out.
Q: How long do these last in the fridge? Can I freeze them?
A: In the fridge, they’ll last up to 3–4 days in an airtight container. Reheat them in the oven or toaster oven at 375°F for about 5–7 minutes to get the crisp back. And yes, they freeze beautifully! Freeze in a single layer on a baking sheet, then transfer to a bag. Reheat from frozen in a 400°F oven for about 12–15 minutes. My kids have frozen-crispy chicken sandwiches for lunch sometimes. They think it’s a treat.
Q: What do you serve with these?
A: My go-to is a simple green salad with lemon vinaigrette — the acid cuts through the crispy richness perfectly. And honestly, they make the best chicken sandwiches the next day with some pickles and a smear of mayo on a soft bun. My kids love them with pasta and a little marinara, like chicken parm bites. We also do them on top of a Caesar salad for a lazy version of my favorite restaurant meal. All good. Very, very good.
More Recipes My Family Makes on Repeat
If you liked this one, here are a few others that get the same reaction at our table. All tested, all loved, all worth the repeat:
- Oven-Fried Chicken Tenders with Honey Mustard — The kid-favorite version that disappears before I’ve even sat down.
- One-Pan Lemon And Herb Salmon — The 20-minute dinner I make on nights when I just can’t.
- Easy Parmesan Roasted Vegetables — The side dish that makes regular vegetables taste like they’re from a fancy brunch place.
This is the one. The crispy, juicy, just-as-good-as-fried chicken that actually makes weeknights feel like a little bit of a win. My kids ask for it by name, I’ve got it memorized down to the last pinch of paprika, and I think you’re going to feel the same way after the first bite. Every time I make this, the whole apartment smells like something special — sweet from the butter, toasty from the bread, a little bit like Sunday mornings.
If you try it, drop a comment below — I love hearing how it goes for you! And tag me on Pinterest or Instagram so I can see your dinner. There’s nothing better than seeing that golden crust in someone else’s kitchen.
📌 Healthy crispy baked chicken cutlets that stay crunchy even after reheating — save this recipe for your next weeknight dinner that’s actually worth looking forward to.
Crispy Baked Chicken Cutlets
Equipment
- 12-inch cast iron skillet
- Rimmed baking sheet
- Wire Rack
- Three Shallow Bowls or Pie Plates
- Kitchen Tongs
Ingredients
- 1 1/2 pounds chicken breast cutlets, pounded to 1/2-inch thickness
- 1 cup panko breadcrumbs
- 1/2 cup freshly grated Parmesan
- 2 large eggs
- 2 tablespoons mayonnaise or Greek yogurt
- 1 teaspoon garlic powder
- 1 teaspoon onion powder
- 1/2 teaspoon smoked paprika
- Salt and black pepper to taste
- Olive oil spray, for misting
- Lemon wedges, for serving
Instructions
- Set up your dredging station: whisk the eggs with the mayonnaise or Greek yogurt in a shallow dish until smooth. In another dish, combine the panko, Parmesan, garlic powder, onion powder, smoked paprika, and a good pinch of salt and pepper. Mix with your fingers so the cheese is evenly distributed.
- Place a cast iron skillet over medium-high heat and let it get hot — shimmering but not smoking. While it heats, pat the chicken cutlets dry and pound to an even 1/2-inch thickness if needed.
- Dredge each cutlet: dip into the egg mixture, let the excess drip off, then press firmly into the panko mixture until both sides are well coated. Press the crumbs on — don’t just sprinkle.
- Sear the cutlets in the hot skillet in a single layer, undisturbed, for 2 minutes until golden underneath. Flip and cook for 2 minutes more. If your skillet isn’t 12 inches, work in batches.
- Transfer the seared cutlets to a wire rack set inside a rimmed baking sheet, leaving space between them. Lightly spray the tops with olive oil.
- Bake at 400°F for 10 to 12 minutes, until the chicken is cooked through and the crust is deep golden brown and very crisp. An instant-read thermometer should hit 165°F in the thickest part.
- Let the cutlets rest on the rack for exactly 3 minutes before serving, with lemon wedges on the side.
Notes
Related Recipes:
 Cheesy Hamburger Casserole Bake That’s Ready in 40 Minutes (No Canned Soup Here)
 Creamy Garlic Tagliatelle That Looks Like a Restaurant Dish in 20 Minutes
 Texas Roadhouse Style Baked Salmon with Sweet and Savory Glaze — Ready in Under 30 Minutes
 Easy Italian Meatloaf That’s Actually Juicy (Not Dry) — in 1 Hour
 The Biscuits and Gravy Casserole That’s Actually Crispy on Top (And Ready in 40 Minutes)
 Air Fryer Chicken and Vegetables That Don’t Taste Like a Regret (30 Minutes, One Pan)