
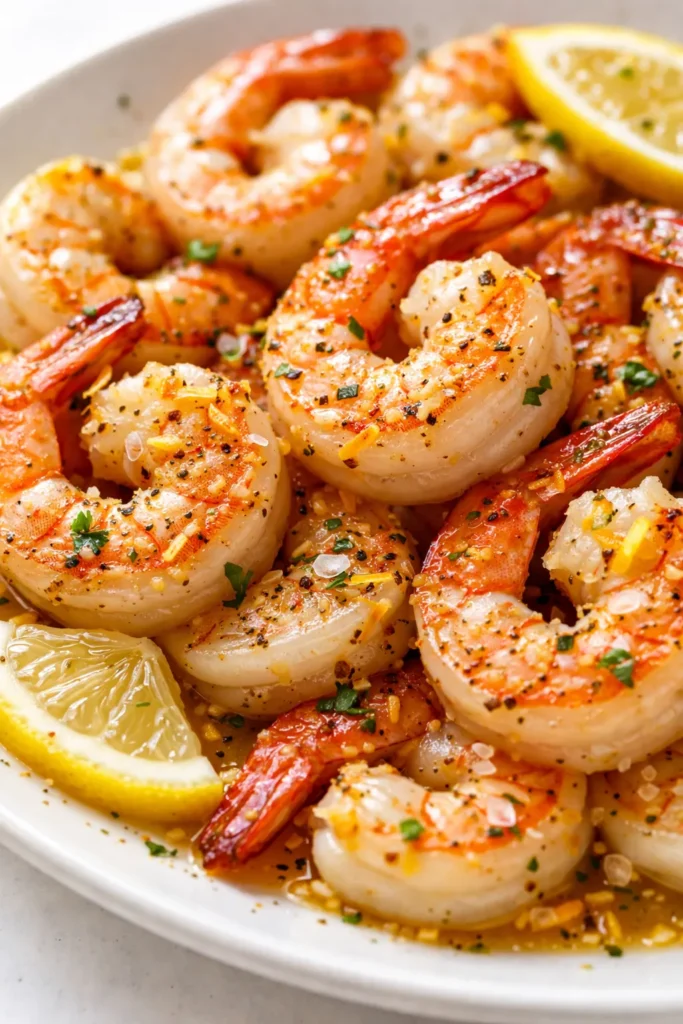
That first moment — when the shrimp curls into a tight pink coil, the edges browning, and the garlic butter pools around them — is why this is my go-to Tuesday night dinner. My kids start hovering before I’m even done plating, which is the highest compliment in our house. You wouldn’t think something this fast could feel like a real meal, but it does. It’s the kind of dish that makes you look like you know exactly what you’re doing, even when all you did was follow a very short list of steps.
The short version: Twenty minutes, one skillet, and shrimp that stay crisp instead of turning rubbery.
I’ve made this more times than I can count — no joke, I’ve got a sticky note on my fridge with the proportions memorized. It’s become my secret weapon for nights when I want something that feels luxe but takes less time than my kids’ bath routine.
- Serves: 4 as main, 6 as appetizer
- Hands-On Time: 10 min | Total Time: 15 min
- Difficulty: Easy enough for a weeknight, impressive enough for guests
- Cost per serving: ~$3.50
- Calories: ~280 per serving (4-6 shrimp)
- Dietary Notes: Naturally gluten-free, low-carb. Swap butter for olive oil if dairy-free.
(Photo above: overhead shot of a white ceramic plate filled with golden shrimp in garlic butter sauce, scattered flat-leaf parsley, lemon wedges on the side, warm afternoon light from a south-facing window. The shrimp are close together, sauce pooling slightly, parsley placed in small clusters — not scattered from a height.)
What Makes These Shrimp Actually Crispy (Not Boiled Boring)
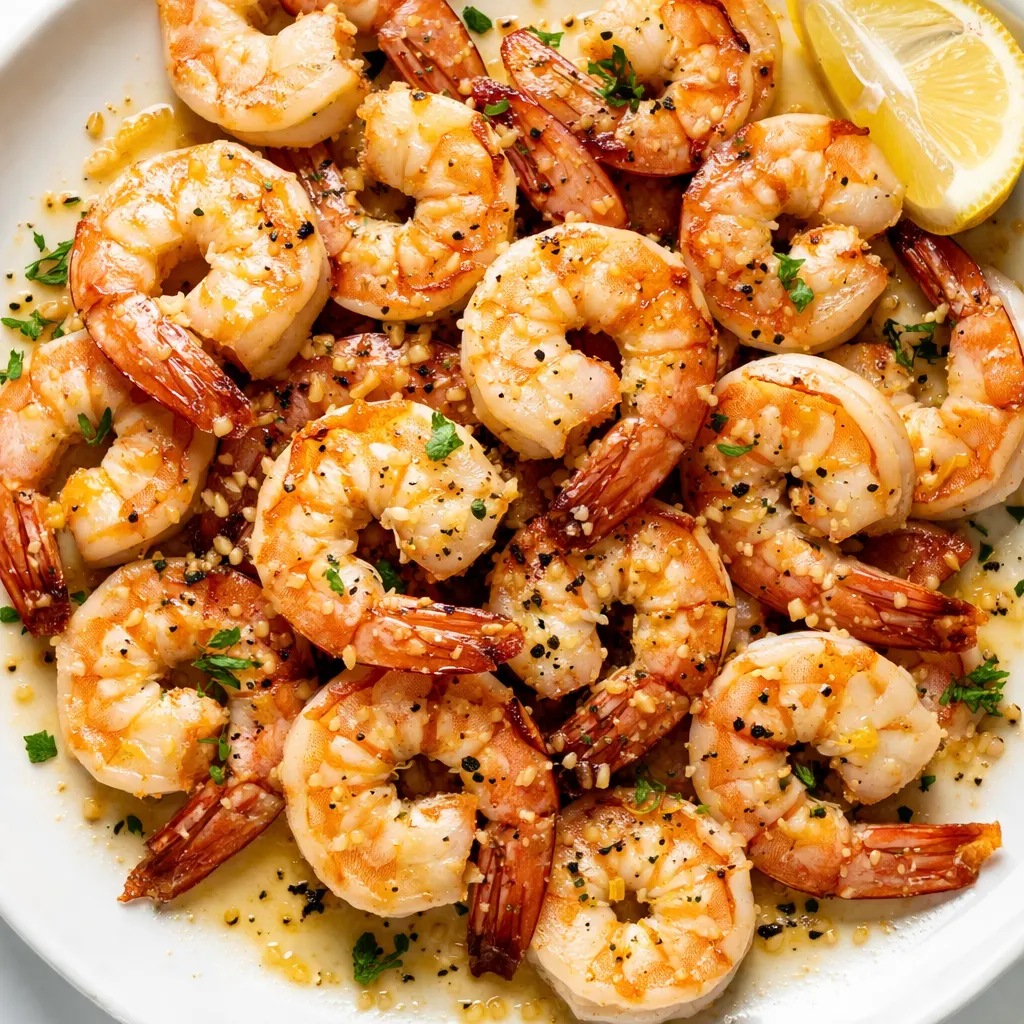
The secret is two things you’re probably already doing wrong: high heat and dry shrimp. Most people throw wet shrimp into a medium-hot pan and wonder why they steam instead of sear. Not here. Pat them completely dry with paper towels — I mean really dry, like you’re trying to get every drop of moisture off the surface. Then get your pan screaming hot. The butter hits the pan, foams, and within a minute you have those brown-butter kissed edges that taste like restaurant quality. No food science lecture needed — it’s just heat and dry shrimp doing their thing.
The other trick? Don’t crowd the skillet. If you pile shrimp on top of each other, they steam. Leave space between them so the heat can hit each one directly. I use a 12-inch skillet and do the shrimp in two batches if I’m making a full pound. It’s one extra minute and the difference between “okay” and “oh my gosh, make this again.”
Everything You Need (And a Few Notes From Me)
- 1 lb large shrimp (21-25 count), peeled and deveined: I buy frozen raw shrimp and thaw them in cold water for 10 minutes. Fresh from the fish counter works too — but pat them dry either way. My kids are weird about “fishy” shrimp, so I always use wild-caught. The texture is firmer and the flavor is cleaner.
- 3 tbsp unsalted butter: Use the real stuff. Margarine or spreadable butter has water and won’t brown right. If you’re dairy-free, replace with good olive oil — you’ll lose the brown butter flavor but still get a great sear.
- 4 cloves garlic, minced (not pressed): Fresh garlic only. Pre-minced jarred garlic is too wet and burns fast. Microplane it for the finest mince — it melts right into the butter. I’ve tested this with garlic powder in a pinch (1/2 tsp) and it works, but you miss the little bits that toast in the pan.
- 1 lemon (zest + juice): Zest the lemon before you squeeze it. The zest goes in with the garlic — it releases oils that perfume the whole dish. Then juice it at the end. I keep a bag of lemons on the counter specifically for this. They last a week and make everything better.
- 1/4 tsp red pepper flakes (optional but recommended): Just enough heat to wake up the butter, not enough to scare the kids. If your family is spice-sensitive, add the flakes to your own serving at the table.
- 2 tbsp flat-leaf parsley, chopped: Flat-leaf only. Curly parsley has that bitter, coarse vibe — skip it. I place the parsley in small clusters instead of scattering from a height. Makes it look like I actually styled it, which I did, for about fifteen seconds.
- Flaky salt and black pepper to finish: Maldon or similar. Fine salt dissolves too fast — you want those little crystals that pop on the tongue.
- Lemon wedges for serving: Don’t skip this. The squeeze of fresh acid at the table pulls everything together.
What to Pull Out Before You Start
- Large skillet — 12-inch stainless steel or cast iron. Nonstick works too, but you won’t get as much browning on the butter (still fine, just less visual drama).
- Tongs — For flipping shrimp quickly. A spatula works but tongs give you more control.
- Microplane — For garlic and lemon zest. A regular grater works too, but microplane makes it melt into the butter.
- Paper towels — A full stack. You’ll use them to dry the shrimp thoroughly. This is not optional — it’s the crispy secret.
That’s it. If you don’t have a microplane, you can mince the garlic with a knife and zest the lemon with a regular box grater. The dish will still be fantastic.
Let’s Make It (Step by Step)
Everything moves fast once the butter hits the pan, so have your garlic, zest, and lemon juice prepped and ready at the stove. This is a “start to finish in ten minutes” kind of deal.
- Dry the shrimp: Lay the peeled shrimp in a single layer on a plate lined with paper towels. Pat the tops dry with more paper towels, pressing gently to absorb moisture. Season generously with flaky salt and a few grinds of black pepper. This is the one step I’m annoyingly pedantic about — wet shrimp = steamed shrimp. Take the extra thirty seconds. (📸 Photo tip: Your shrimp should look matte, not shiny. If you see any wet spots, pat them again.)
- Heat the skillet: Set the skillet over medium-high heat for 2 minutes. Add 1 tablespoon of the butter and let it melt, tilting the pan to coat the bottom. The butter should foam and then start to quiet down — that’s when it’s hot enough. Don’t add the shrimp until the butter is fully melted and just starting to brown around the edges.
- Sear the shrimp: Arrange the shrimp in a single layer in the hot skillet. Don’t crowd them — if they overlap, they’ll steam. Cook for 90 seconds without moving them. You’ll see the edges turn golden and the bottoms get a nice crust. Flip each shrimp with tongs and cook another 90 seconds on the second side. (📸 Photo tip: You want a deep golden-brown spot on one side — that’s the Maillard browning doing its thing. It shouldn’t look pale and gray.)
- Add garlic and zest: Reduce the heat to medium-low. Push the shrimp to one side of the pan. Add the remaining 2 tablespoons butter, the minced garlic, and the lemon zest. Stir the garlic and zest into the melting butter — it should sizzle gently, not aggressively. Cook for 30 seconds, just until the garlic is fragrant and the butter is fully melted. If the garlic starts to turn brown immediately, the pan is too hot — pull it off the heat for a few seconds.
- Finish with lemon and parsley: Toss the shrimp into the garlic butter to coat. Squeeze the juice of half the lemon over the top (reserve the other half for serving). Sprinkle half the chopped parsley over the shrimp. Stir everything together for another 15 seconds — the butter should coat each shrimp nicely.
- Serve immediately: Transfer the shrimp and all the garlic butter sauce to a serving platter or individual plates. Top with the remaining parsley, a few extra flakes of flaky salt, and lemon wedges on the side. Place the parsley in small, deliberate clusters — not scattered from above like confetti. It makes a difference visually.
Sunday Prep = Stress-Free Weeknight Dinner
I make a double batch on Sundays sometimes, and we use it in three different ways: over rice for Monday, on toast with avocado for Tuesday lunch, and tossed with pasta on Wednesday. The shrimp themselves only take minutes to cook, so the real time-saver is prepping the ingredients ahead.
- Fridge: Store cooked shrimp in an airtight container for up to 2 days. The garlic butter sauce will solidify — that’s okay. Reheat gently in a skillet over low heat, adding a splash of water or lemon juice to loosen the sauce. The microwave makes the shrimp tough, so I don’t recommend it.
- Freezer: I don’t recommend freezing this dish after cooking — the texture of the shrimp changes. But you can freeze raw peeled shrimp with the garlic-butter mixture in a freezer bag for up to 2 months. Thaw overnight in the fridge, then cook as directed. The sauce will be a little less silky but still delicious.
- Reheat: Best method: a nonstick skillet over low heat, add a small knob of butter and the leftover shrimp, warm for 1-2 minutes, stirring gently. Add a squeeze of fresh lemon at the end to revive the brightness. If you’re eating them cold in a salad, that’s also excellent — I’ll never judge.
Things I Wish I’d Known the First Time
- Pat, pat, pat that shrimp dry: I know I said it already, but it’s the most common mistake. Even a little water from the rinsing process will prevent browning. I use three paper towels per pound of shrimp. No shame in using a whole roll.
- Don’t skip the lemon zest: The zest adds a floral, citrusy aroma that the juice alone can’t replicate. It’s the difference between “lemon-ish” and “oh, there’s lemon in here.” I microplane it right over the garlic so the oils hit the pan immediately.
- Use cold butter for the best sauce: For step 4, if you have time, cut the butter into small cubes and keep them in the fridge until you’re ready to add them. Cold butter going into a hot pan emulsifies better with the lemon juice, giving you a saucier, less greasy coating. I do this when I’m feeling fancy — it works even if you use room-temp butter, just stir a little faster.
- One bad trick I used to do: I used to add the lemon juice too early (before the shrimp were cooked), thinking I’d get more lemon flavor. But the acid kept the shrimp from browning properly. Save the juice for the very end — it’s a finishing move, not a marinade.
Swaps That Actually Work
- Dairy-Free: Replace butter with 3 tablespoons good olive oil. The sauce won’t be as rich or as emulsified, but it’s still delicious. I add an extra squeeze of lemon to brighten it up. I make this version for my brother-in-law who’s lactose intolerant — he never complains.
- Spicy Kid-Friendly (adult addition): For the kids, skip the red pepper flakes entirely. Then after you plate, stir 1/2 teaspoon gochugaru (Korean chili flakes) or cayenne into the remaining sauce in the pan and spoon it over the adult portions. My older kid likes it spicy, so I add a pinch to their serving too — they feel very adult about it.
- Add vegetables: Throw in a handful of blanched asparagus or sliced zucchini after the shrimp come out. Sauté them in the remaining garlic butter for 2 minutes, then serve alongside. I do this when I want to pretend we’re eating healthy — it works because the butter makes any vegetable taste good.
- Make it a pasta dish: Cook 8 oz linguine or angel hair while the shrimp are cooking. Reserve 1/2 cup pasta water, then toss the pasta with the cooked shrimp and garlic butter, adding a splash of pasta water to loosen the sauce. Finish with parsley and lemon zest. This is my go-to for company — it looks like way more effort than it actually is.
- Grilled version: Thread the shrimp onto skewers, brush with the garlic-butter mixture (skip the pan-searing step), and grill over high heat for 2-3 minutes per side. Finish with lemon juice and parsley. The smoky flavor is incredible. I do this when the weather cooperates and I feel like being outside.
Questions I Get About This Recipe All the Time
Q: Why did my shrimp turn out rubbery?
A: Ugh, I’ve been there. The most likely culprit is overcooking — shrimp cook in about 3 minutes total. They’re done when they curl into a C shape and the center is opaque. The second cause is overcrowding the pan, which traps steam and overcooks the outside before the inside finishes. Give them space and keep the heat high. Even if you mess up the timing a little, this recipe is forgiving — I’ve left them in an extra minute and they were still fine, just a bit firmer.
Q: Can I use frozen shrimp straight from the bag?
A: Don’t do it. Frozen shrimp are full of water that will steam instead of sear. Thaw them first: place the frozen shrimp in a bowl of cold water for 10-15 minutes, then drain and pat very dry. I’ve tested this — it’s not the same if you skip the thaw. Trust me, the extra 10 minutes are worth it.
Q: How long do leftovers last? Can I freeze the cooked shrimp?
A: Cooked shrimp keep in the fridge in an airtight container for up to 2 days. I don’t recommend freezing the finished dish — the texture of the shrimp gets watery and mealy. If you have extra shrimp, you can freeze them raw with the garlic and lemon zest in a bag, then cook from frozen when ready (add a couple extra minutes to the cook time). But the fully cooked version? Better to just eat it while it’s fresh.
Q: What do you serve with these shrimp?
A: My go-tos are crusty bread for sopping up the garlic butter, a simple arugula salad with lemon vinaigrette, or steamed white rice. The kids love it over angel hair pasta with a little Parmesan. For something unexpected, spoon the shrimp and butter over warm polenta — that combo is a revelation. I also sometimes serve them on toasted sourdough with a smear of ricotta as a quick lunch.
More Recipes My Family Makes on Repeat
If you liked this one, here are a few others that get the same reaction at our table:
- Cajun Butter Chicken — Crispy skin, juicy meat, and a lemony pan sauce that comes together in one skillet.
- Cajun Shrimp Pasta — The same garlic-shrimp magic, tossed with pasta for a complete meal in 20 minutes.
- Baked Salmon with Lemon Butter — Minimal cleanup, maximum flavor — another weeknight hero.
If you try this garlic lemon shrimp, drop a comment below — I love hearing how it goes for you and whether your family has the same hovering-at-the-stove reaction mine does. And tag me on Pinterest or Instagram when you make it — I always love seeing your versions.
📌 This lemon garlic shrimp recipe comes together in 15 minutes and stays perfectly crispy — save it for the nights you need dinner on the table fast, no matter how tired you are.
Garlic Lemon Shrimp (Crispy in 15 Minutes)
Equipment
- Large Skillet (12-inch)
- Tongs
- Microplane
- Paper towels
Ingredients
Shrimp and Seasoning
- 1 lb large shrimp (21-25 count), peeled and deveined
- to taste flaky salt and black pepper
Garlic Butter Sauce
- 3 tbsp unsalted butter, divided
- 4 cloves garlic, minced
- 1 lemon (zest and juice)
- 1/4 tsp red pepper flakes (optional)
Garnish
- 2 tbsp flat-leaf parsley, chopped
- extra flaky salt
- lemon wedges for serving
Instructions
- Dry the shrimp: Lay peeled shrimp on a paper towel-lined plate. Pat tops very dry with more paper towels, pressing gently. Season generously with flaky salt and pepper. The shrimp should look matte, not shiny.
- Heat the skillet: Place skillet over medium-high heat for 2 minutes. Add 1 tablespoon butter and let it melt and foam until the foam subsides — that’s when it’s hot enough.
- Sear the shrimp: Arrange shrimp in a single layer (don’t crowd). Cook 90 seconds without moving until edges are golden. Flip with tongs and cook another 90 seconds. You want deep golden-brown spots.
- Add garlic and zest: Reduce heat to medium-low. Push shrimp to one side. Add remaining 2 tablespoons butter, minced garlic, and lemon zest. Stir into butter for 30 seconds until fragrant. If garlic browns too fast, remove pan from heat briefly.
- Finish with lemon and parsley: Toss shrimp into garlic butter. Squeeze juice of half a lemon over top. Sprinkle half the parsley. Stir for 15 seconds to coat evenly.
- Serve immediately: Transfer shrimp and all garlic butter sauce to a platter. Top with remaining parsley, extra flaky salt, and lemon wedges. Place parsley in small clusters for a styled look.
Notes
Make-ahead tip: Prep all ingredients (peel shrimp, mince garlic, zest lemon) ahead of time for a 10-minute cook the night of.
Dairy-free: Replace butter with 3 tbsp good olive oil. Sauce won’t be as rich but still delicious.
Pasta version: Toss with 8 oz cooked linguine and a splash of pasta water. Finish with Parmesan and extra lemon zest.
Related Recipes:
 Cheesy Hamburger Casserole Bake That’s Ready in 40 Minutes (No Canned Soup Here)
 Lemon Capellini Salad for Late Summer Evenings: Bright, Tangy, Ready in 20 Minutes
 Creamy Garlic Tagliatelle That Looks Like a Restaurant Dish in 20 Minutes
 Texas Roadhouse Style Baked Salmon with Sweet and Savory Glaze — Ready in Under 30 Minutes
 Easy Italian Meatloaf That’s Actually Juicy (Not Dry) — in 1 Hour
 The Biscuits and Gravy Casserole That’s Actually Crispy on Top (And Ready in 40 Minutes)