
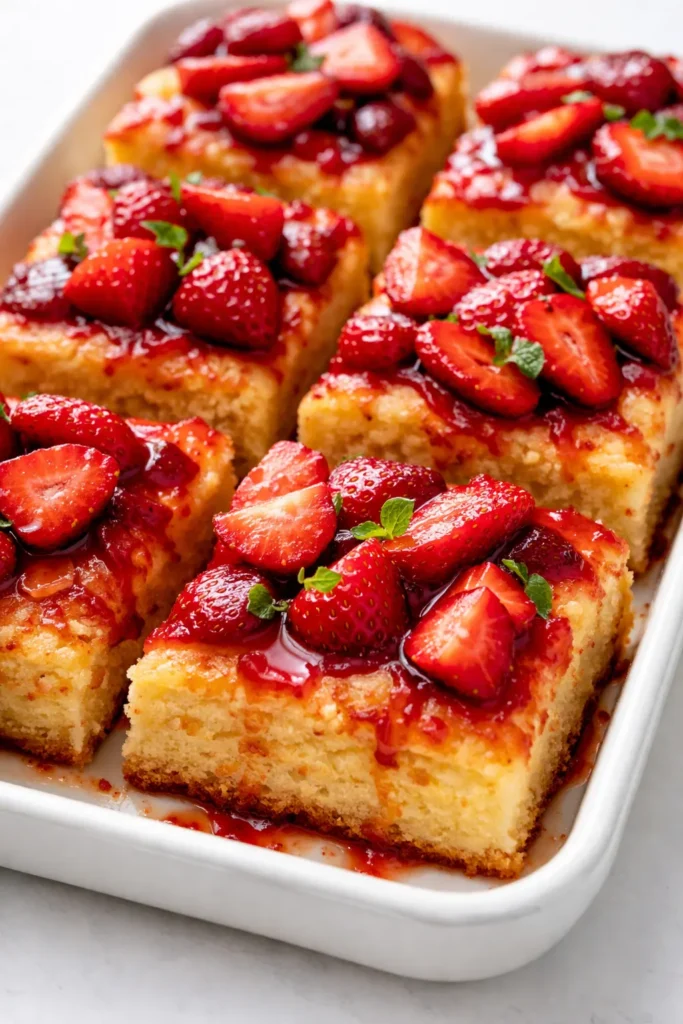
The first bite — soft, buttery biscuit, cold whipped cream, jammy strawberries that have given up just enough of their juice to stain the cream a pale pink — is the one that makes everyone at the table go quiet. That’s the moment you want. That’s the whole reason you’re making these instead of a regular shortcake that falls apart the second you cut it.
The short version: A skillet-baked biscuit base, a quick macerated strawberry layer, and barely-sweetened cream that holds its shape. All in a pan. No individual assembly.
I made three versions of this for last summer’s dinner parties before I landed on this one. The first was too crumbly. The second too sweet. This one — butter-toasted biscuit, berries that have had exactly fifteen minutes to sit in their own syrup, cream that stays billowy for hours — is the only one my friends ask for by name now.
- Serves: 8 as dessert
- Hands-On Time: 20 min | Total Time: 45 min
- Difficulty: Easy enough for a Wednesday, impressive enough for a Saturday guest list
- Cost per serving: ~$2.50
- Calories: ~340 per serving
- Dietary Notes: Vegetarian. Easily adaptable for gluten-free (see swaps)
(Photo above: overhead shot of the golden biscuit base in a cast-iron skillet, topped with a thick layer of macerated strawberries and a swoop of whipped cream, garnished with tiny mint leaves. Natural daylight from a side window, wooden table, white linen napkin folded in the corner.)
The Trick That Makes These Actually Work as Bars
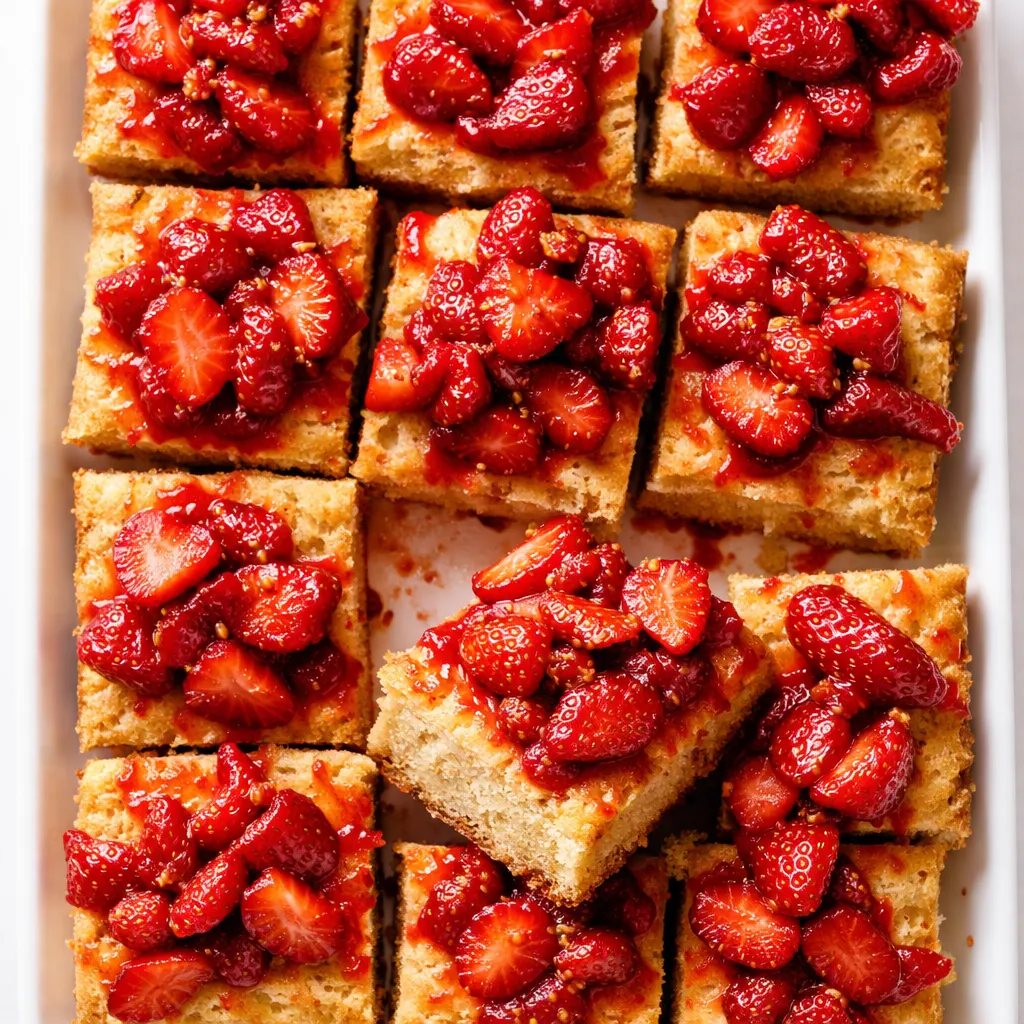
The problem with traditional strawberry shortcake is structural. A biscuit crumbles, the cream slides, the berries roll off the plate. It’s delicious and infuriating. For bar form, you need a base that stays intact when you cut it and a topping that doesn’t weep into the biscuit before you serve it.
The fix is two-part. First, you press the biscuit dough into the pan like a shortbread — no rolling, no cutting individual rounds. It bakes up sturdy but still tender because you’re using cold butter and not overworking it. Second, you macerate the strawberries in just a little sugar and lemon juice so they release their juice into a syrup, but not so long that they turn to mush. Then you drain off the syrup (save it for cocktails or drizzling) so the berries stay glossy but not wet.
The result: a bar that doesn’t fall apart when you pick it up. A dessert that looks like you spent an hour on plating even though it’s right out of the pan. This is the version I bring to every potluck where I want people to ask where I got the recipe.
Everything You Need (Plus a Few Honest Notes)
- 1 ½ cups all-purpose flour: Spoon and level it. Scooping packs in extra flour and makes the biscuit tough. I learned this after three batches that came out like hockey pucks — not a mistake you want to make twice.
- ½ cup granulated sugar (divided): ¼ cup goes into the dough for sweetness, ¼ cup goes onto the berries. Don’t be tempted to add more — the cream and fruit carry the sweetness forward.
- 2 tsp baking powder: Fresh baking powder matters. If yours has been in the cupboard for a year, go buy a new tin.
- ½ tsp salt: Fine sea salt. The contrast with the berries is what makes the second bite different from the first.
- 6 tbsp cold unsalted butter, cubed: Straight from the fridge. Grate it if you want even distribution — that’s my low-effort trick for flaky layers.
- ¾ cup heavy cream (for the dough): Plus another 1 ½ cups for whipping later. Use cold cream. Warm cream makes a greasy biscuit.
- 1 lb fresh strawberries, hulled and quartered: Use the sweetest berries you can find. Pale pink ones will give you pale-pink everything. My friends can always tell when I used farmers’ market berries instead of grocery store ones.
- 1 tbsp lemon juice: Fresh only. Bottled lemon juice tastes like regret.
- ½ tsp vanilla extract: For the cream. Real vanilla, not imitation. You’ll taste the difference.
- Optional garnish: Small mint leaves or a pinch of flaky salt. I use both. Don’t skip the salt.
What to Pull Out Before You Start
- 8-inch square baking pan (or 9-inch cast-iron skillet — the rounded corners make for less fussy cutting, I actually prefer it)
- Parchment paper — helps lift the whole thing out cleanly
- Pastry cutter or two knives (or your hands, if you work fast and keep the butter cold)
- Medium mixing bowl for the berries
- Large mixing bowl for the dough
- Stand mixer or hand mixer for the cream (or a whisk and some arm endurance)
- Offset spatula — not required, but makes spreading the cream look effortless
Let’s Make It (Step by Step, No Fancy Skills Required)
Read through once before you start. The dough comes together fast and you don’t want to be digging for the vanilla mid-mix.
Preheat and prep: Heat your oven to 400°F. Line your pan with parchment paper, leaving overhang on two opposite sides for easy lifting.
- Maceration the berries: In a medium bowl, toss the quartered strawberries with ¼ cup sugar and the lemon juice. Let them sit at room temperature while you make the dough — at least 15 minutes. They’ll release a beautiful ruby syrup. (📸 Photo tip: After 15 minutes, the berries should look glossy and there should be a visible puddle of syrup at the bottom of the bowl.)
- Mix the dry ingredients: In a large bowl, whisk together the flour, remaining ¼ cup sugar, baking powder, and salt.
- Cut in the butter: Add the cold cubed butter to the flour mixture. Use a pastry cutter or your fingertips to work it in until the mixture looks like coarse meal with some pea-sized butter pieces still visible. Don’t overdo it — those bits create steam pockets that make the biscuit tender. I used to think you had to get it down to sand. Nope. Leave some chunks.
- Add the cream: Pour in ¾ cup cold heavy cream. Stir with a fork until a shaggy dough forms. It should hold together when you squeeze a handful, but not be sticky. If it’s too dry, add another tablespoon of cream. (📸 Photo tip: The dough should look ragged and uneven, not smooth like a cookie dough.)
- Press into the pan: Transfer the dough to your prepared pan. Press it evenly into an even layer — use your knuckles or the bottom of a measuring cup. Don’t knead it or you’ll develop gluten and get tough bars. Just press until flat.
- Bake: Bake for 18–22 minutes, until the edges are golden brown and a toothpick inserted in the center comes out clean. The top should be lightly golden and firm to the touch. Let it cool in the pan for 10 minutes, then lift out onto a wire rack using the parchment overhang. Cool completely — about 30 minutes. I know it’s tempting to add the berries while it’s warm. Don’t. The cream will melt and the berries will turn the biscuit to mush.
- Drain the berries: While the biscuit cools, strain the macerated strawberries through a fine-mesh sieve. Reserve the syrup — it’s amazing over ice cream or drizzled on pancakes. Set the berries aside.
- Whip the cream: In a large bowl, beat the remaining 1 ½ cups heavy cream with the vanilla extract until soft peaks form. You want it billowy but not stiff — it should hold a soft swoop. A hand mixer takes about 2 minutes.
- Assemble: Place the cooled biscuit on a cutting board or serving platter. Spread the whipped cream evenly over the top with an offset spatula. Spoon the drained strawberries over the cream, leaving a ½-inch border of cream visible around the edges. Garnish with tiny mint leaves and a few flakes of flaky salt.
- Cut and serve: Use a sharp chef’s knife to cut into 8 bars. Wipe the blade clean between cuts for the cleanest edges. Serve immediately, or refrigerate up to 4 hours — but the biscuit will start to soften after that.
How I Prep These for a Party (Make-Ahead Notes)
These bars are great for entertaining because most of the work happens in advance. I often make the biscuit base the night before, then do the berries and cream just before serving. The trick is not to assemble until you’re ready to put them on the table — the biscuit stays crisp for about 2 hours after assembly, and after that it’s still good but loses that first-bite crunch.
- Fridge: Store assembled bars uncovered in the fridge for up to 4 hours. After that, the biscuit gets soft. If you need longer, store components separately.
- Freezer: Not recommended for assembled bars. You can freeze the baked biscuit base, tightly wrapped, for up to 1 month. Thaw at room temperature, then reassemble fresh.
- Reheat: Not applicable for this recipe — serve cold or at room temp. If the biscuit is pre-baked and you want it warm, reheat individual pieces in a 300°F oven for 5 minutes, but add the cream and berries after.
My Honest Advice After Making These Eight Times
- Use a scale for the flour: Cups are inconsistent. If you’re baking by cups, fluff the flour first, then spoon it in and level with a knife. I can tell when I’ve over-measured — the biscuit is dense instead of tender. Even if you mess it up a little, it still tastes good, but the texture won’t be as airy.
- Don’t skip the salt on top: I know it sounds weird — salt on a dessert? — but it cuts the sweetness and makes the strawberries taste more like themselves. My friends argued about it until I made a batch without. They missed it.
- Cut the strawberries into even pieces: Quartered berries look more intentional than random chunks. Uniform pieces also macerate more evenly. I learned this after a batch where some berries were mush and others were hard.
- Wipe the knife between cuts: This is the difference between bars that look like they came from a bakery and bars that look like you were in a hurry. I use a damp paper towel. Takes two seconds, changes everything.
- The cream can be made ahead: Whip the cream up to 4 hours in advance, cover, and refrigerate. Give it a quick whisk before spreading to bring back the fluff.
Swaps That Actually Work
- Gluten-Free: Use a 1-to-1 gluten-free flour blend (I like King Arthur Measure for Measure). Add an extra tablespoon of cream — GF doughs tend to be drier. The texture is slightly more crumbly but still good. I made this for a friend with celiac and she asked for seconds.
- Dairy-Free: Swap the butter for a good vegan butter (like Miyoko’s) and use full-fat canned coconut cream for the whipped cream. The coconut flavor is noticeable but not overwhelming — it actually pairs well with strawberries.
- Kid-Friendly: My friends’ kids love these with the cream spread like frosting and the berries arranged in a smiley face. Not my aesthetic, but I’ve seen it work. Also, use less lemon in the berries — quarter the amount — or double the sugar if your berries are tart.
- Fancy Guest Version: Add a tablespoon of freeze-dried strawberry powder to the dough for a pink tint. Or use a mix of strawberries and raspberries. I’ve also added a splash of rose water to the cream — just a drop, it’s powerful.
Questions People Always Ask Me About These Bars
Q: Why did my biscuit turn out tough?
A: Ugh, I’ve been there. Almost always means you overworked the dough. Mix until it just comes together, press it gently into the pan, and don’t knead. Also check your baking powder is fresh. An old one won’t give any lift, and the dough stays dense. You’ve got this next time — keep the butter cold and your hands fast.
Q: Can I make this with frozen strawberries?
A: Yes, but thaw them first and drain the excess liquid. Frozen berries are mushier, so macerate them for only 10 minutes and skip the lemon — they’re already tart. The texture won’t be as firm, but the flavor is still great. I’ve done this in winter when fresh berries are sad.
Q: How long do these last? Can I freeze them?
A: Assembled bars last about 4 hours in the fridge before the biscuit softens. If you need to make them a day ahead, store the biscuit base wrapped at room temp, the strained berries in the fridge, and whip the cream just before serving. Do not freeze an assembled bar — the thawing turns the whole thing to mush. The baked biscuit base freezes beautifully for up to a month.
Q: What do you serve with these?
A: They’re rich enough to stand alone, but I love them with a dollop of Greek yogurt on the side for tang. A cold glass of rosé or lemonade works. If I’m doing a full summer spread, I put them out next to a bowl of fresh cherries and a plate of shortbread cookies — easy little nibbles that don’t compete. My friends always say the bars are the star, though.
More Recipes That Get the Same Reaction at My Table
If you liked these strawberry shortcake bars, here are a few others that disappear just as fast:
- Classic Buttermilk Biscuits — The base for so many things, with the exact flaky-tender texture I’m after in these bars.
- Roasted Strawberry Ice Cream — When you have too many berries and want to make them into something colder.
- Blondies with Brown Butter and Sea Salt — Another bar that looks way harder than it is. Same skillet, same crowd reaction.
These bars are the dessert I bring when I want people to think I spent the whole afternoon in the kitchen — but really I just used a pan, a whisk, and the exact amount of patience it takes to let a biscuit cool. That’s the whole trick. Don’t rush it, trust the cold butter, and put the salt on top. Your friends will ask for the recipe, and you get to say “oh, it’s nothing” while knowing full well it’s everything.
If you try these, drop a comment below and let me know how they turned out — I always love hearing about your kitchen victories. And tag me on Pinterest or Instagram so I can see your beautiful bars. That first cut photo is my favorite thing.
📌 These homemade strawberry shortcake bars come together in 45 minutes and stay beautiful on the table — save this recipe for your next summer dinner party or weekend baking project.
Homemade Strawberry Shortcake Bars
Equipment
- 8-inch Square Baking Pan
- Parchment Paper
- Pastry cutter
- Mixing bowls
- Stand mixer or hand mixer
- Offset spatula
Ingredients
Dough
- 1 ½ cups all-purpose flour
- ¼ cup granulated sugar
- 2 teaspoons baking powder
- ½ teaspoon fine sea salt
- 6 tablespoons cold unsalted butter, cubed
- ¾ cup heavy cream (for dough)
Macerated Strawberries
- 1 lb fresh strawberries, hulled and quartered
- ¼ cup granulated sugar
- 1 tablespoon lemon juice
Whipped Cream
- 1 ½ cups heavy cream
- ½ teaspoon vanilla extract
Optional Garnish
- small mint leaves
- flaky salt
Instructions
- Preheat and prep: Heat oven to 400°F. Line an 8-inch square baking pan with parchment paper, leaving overhang on two sides.
- Macerate the berries: In a medium bowl, toss quartered strawberries with ¼ cup sugar and lemon juice. Let sit at room temperature at least 15 minutes while you make the dough.
- Mix dry ingredients: In a large bowl, whisk together flour, remaining ¼ cup sugar, baking powder, and salt.
- Cut in the butter: Add cold cubed butter to flour mixture. Use a pastry cutter or fingertips to work it in until the mixture resembles coarse meal with some pea-sized butter pieces still visible.
- Add the cream: Pour in ¾ cup cold heavy cream. Stir with a fork until a shaggy dough forms. It should hold together when squeezed but not be sticky. Add another tablespoon of cream if needed.
- Press into the pan: Transfer dough to prepared pan. Press evenly into an even layer using your knuckles or a measuring cup. Do not knead.
- Bake: Bake 18–22 minutes until edges are golden and a toothpick inserted in center comes out clean. Cool in pan 10 minutes, then lift out onto a wire rack to cool completely (about 30 minutes).
- Drain the berries: While biscuit cools, strain macerated strawberries through a fine-mesh sieve. Reserve syrup for another use.
- Whip the cream: In a large bowl, beat remaining 1 ½ cups heavy cream with vanilla until soft peaks form (about 2 minutes with a hand mixer).
- Assemble: Place cooled biscuit on a cutting board. Spread whipped cream evenly over top. Spoon drained strawberries over cream, leaving a ½-inch border of cream visible. Garnish with mint leaves and flaky salt.
- Cut and serve: Use a sharp chef’s knife to cut into 8 bars, wiping blade clean between cuts. Serve immediately or refrigerate up to 4 hours.
Notes
Related Recipes:
 Apple Rose Pastry Blooms That Look Like a Patisserie Display (With Zero Fancy Skills Needed)
 The Only Strawberry Shortcake Recipe That Works Every Time
 Fudgy Zucchini Brownies You’d Never Guess Are Hiding a Vegetable
 The Buttermilk Scones You’d Never Guess Are This Flaky (and Easy)
 Mixed Berry Crumble Bars That Look Like a Bakery Window (But Cost Pennies)
 The Healthy Breakfast Cookie You’d Never Guess Is Actually Good for You