
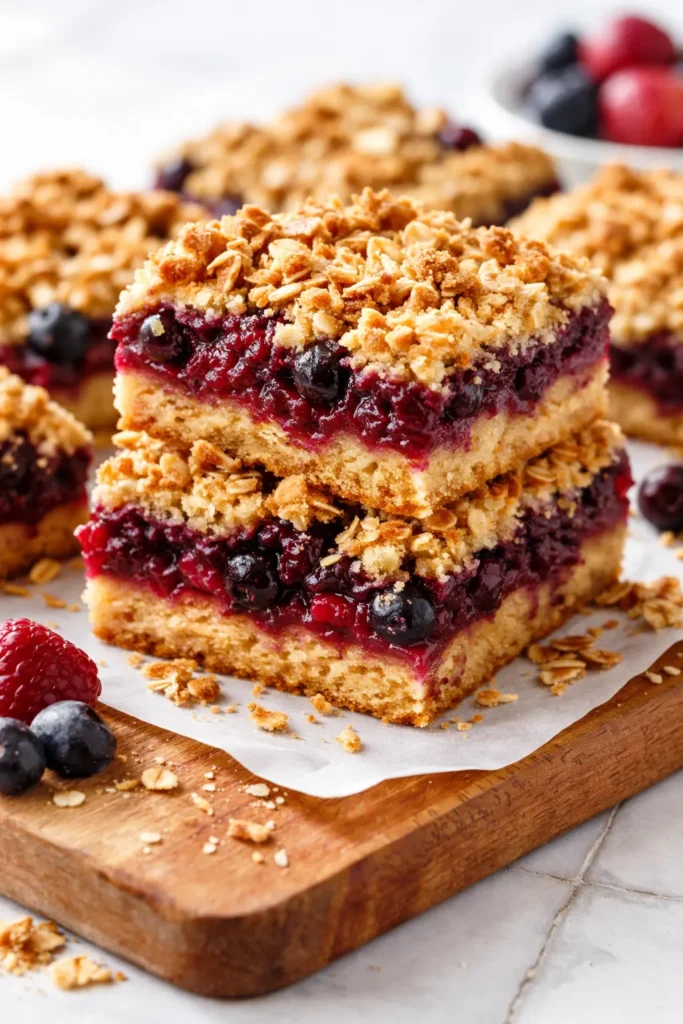
The golden crumb topping, the jammy berry center bubbling up around the edges, that perfect shortbread crust that doesn’t sog out underneath. These bars look like you spent a whole afternoon fussing. The secret? I used frozen berries (they’re actually better for this) and a food processor for the crust. My friends started requesting these for every single get-together once they saw the first batch. One pan, nine ingredients, and a slice that stays together beautifully.
The short version: These come together in about fifteen minutes of actual work and taste like they came from a $6 slice at a bakery.
I’ve made these for three different friend gatherings this month alone, and someone asks for the recipe every single time. Usually before I’ve even had a cup of coffee the next morning.
- Serves: 16 bars as a dessert or snack
- Hands-On Time: 15 min | Total Time: 55 min
- Difficulty: Easy — a food processor does the heavy lifting
- Cost per serving: ~$0.75
- Calories: ~320 per bar
- Dietary Notes: Adaptable for gluten-free and dairy-free
(Photo above: An overhead shot of the bars in a light blue ceramic baking dish, the oat crumble topping deeply golden with a few honey-colored edges, streaks of magenta-berry jam peeking through the crust, placed on a well-worn wooden board with afternoon light coming from the window on the left.)
The Counterintuitive Secret to the Best Berry Bars
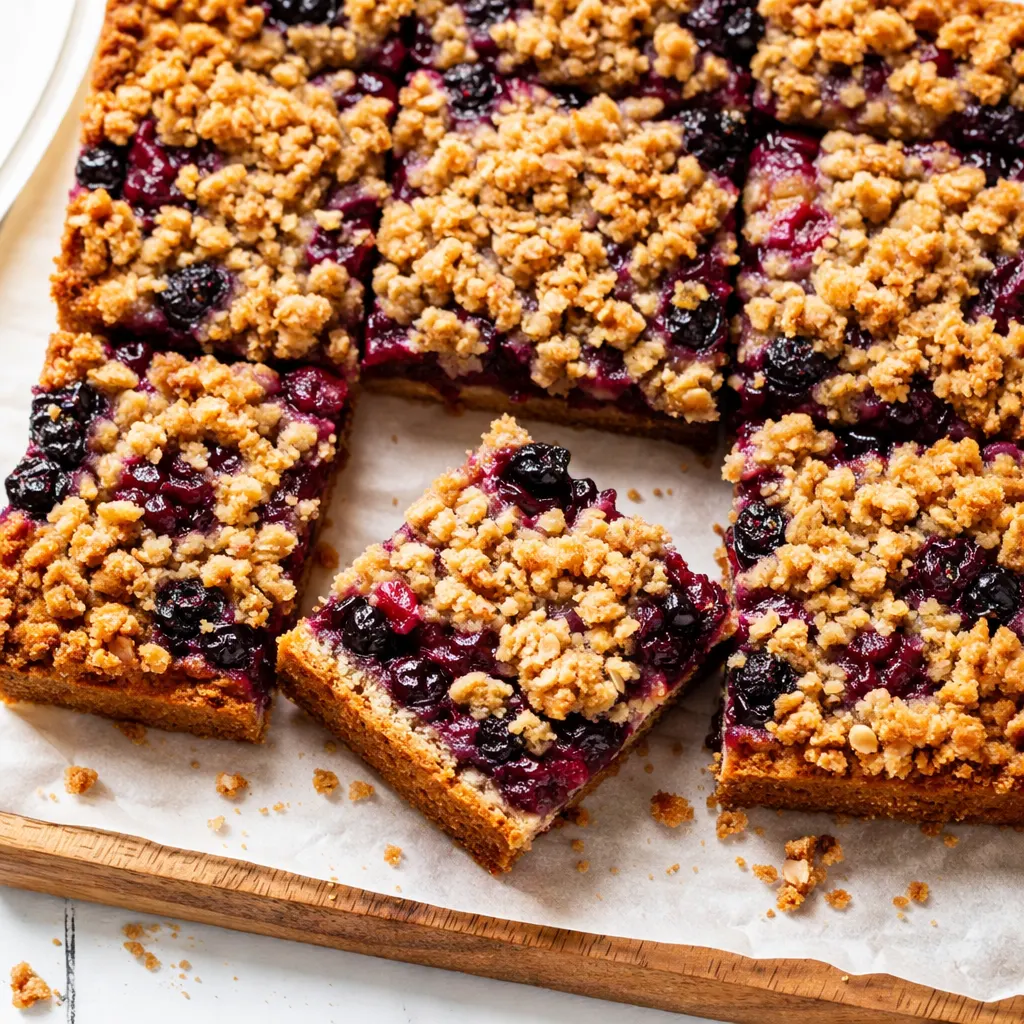
It feels wrong, I know. You’re standing in the store and the fresh raspberries look beautiful. Use the frozen ones. The bag in your freezer aisle works better here than anything fresh ever could. Frozen berries release their moisture gradually as they bake, which means you get a thick, jammy filling instead of a watery one that soaks the crust into a sad, soggy pile. Plus, they’re a third of the price. I don’t make the rules, I just save us all some money.
What You Need + A Few Notes
Nine ingredients, and I bet you already have most of them. The ones worth talking about:
- 3 cups frozen mixed berries: DO NOT THAW THEM. This is rule number one. Tossing them straight into the sugar and cornstarch while frozen is what gives you that perfect thick jam texture instead of a soupy mess. I usually do a mix of raspberries, blueberries, and blackberries.
- 1 cup unsalted butter, cold and cubed: Cold is non-negotiable here. If the butter warms up, that shatteringly crisp crust texture disappears. Pop your cubed butter in the freezer for ten minutes if your kitchen runs warm.
- 1 ½ cups old-fashioned rolled oats: Not the quick-cooking kind. The rolled ones toast up in the oven and give the streusel that actual *crumbly* texture we’re after. The quick oats just kind of dissolve into the flour and you lose the bite.
- 1 ½ cups granulated sugar: Split between the crust and the filling. Honestly, you could reduce it by a quarter cup if your berries are sweet, but I don’t trust most grocery store berries to be sweet.
- 3 tbsp cornstarch: This does all the thickening work. No substitutions here unless you’re using arrowroot powder, and even then, measure carefully.
The Setup
Minimal, which is the whole point of a dessert like this. Here’s what to grab:
- A 9×13 baking dish — metal or ceramic both work, metal edges get a little crisper
- A food processor — makes the crust in under 30 seconds. A pastry cutter works too if you want an arm workout.
- Parchment paper — leave an overhang on two sides so you can lift the whole slab out cleanly. This tip alone will save you from mangling the first row.
- A large skillet or saucepan — for cooking down the berries before they hit the pan
If you don’t have a food processor, just use a bowl and your hands. Rub the cold butter into the flour until it feels like damp sand. It’s the same result, takes maybe an extra two minutes.
Let’s Make These Bars
Read through once. It’s fast. You got this.
Preheat and Prep: Heat your oven to 375°F. Line your 9×13 baking dish with parchment paper, leaving a generous overhang on the two long sides.
- Make the crust and streusel base: In a food processor, combine 2 ½ cups all-purpose flour, 1 cup of the sugar, and a pinch of kosher salt. Pulse to combine. Add 1 cup cold cubed butter and pulse until the mixture looks shaggy — about 10 pulses. Add 1 ½ cups rolled oats and pulse just twice more. You want oat pieces, not oat dust. Set aside 1 ½ cups of this mixture for the topping. (📸 Photo tip: It should look like wet sand with flat oat flakes throughout — not a paste.)
- Press the crust: Pour the remaining crust mixture into your lined baking dish. Press it firmly and evenly into the bottom. Use the bottom of a measuring cup or your knuckles. The firmer you press, the cleaner the slice will be. Bake for 15 minutes — it should be just barely golden at the edges.
- Cook the filling: While the crust bakes, combine 3 cups frozen mixed berries, ½ cup sugar, 2 tbsp lemon juice, and 3 tbsp cornstarch in a skillet over medium heat. Cook, stirring occasionally, until the berries have thawed and the mixture begins to thicken — about 5-7 minutes. It should look like loose jam. Don’t overdo it, it’ll thicken more in the oven.
- Assemble: Pour the berry filling over the hot pre-baked crust and spread it into an even layer. Sprinkle the reserved crumble mixture evenly over the top. Squeeze some of it into clumps as you go — those clumps are what make the crunchy bits everyone fights over. (📸 Photo tip: It should look uneven and craggy — you want those golden peaks.)
- Bake: Bake at 375°F for 35-40 minutes, until the top is deeply golden and the filling is bubbling at the edges. The bubbling is how you know it’s set.
- Cool completely: This is the hardest step. Set the pan on a wire rack and let it cool fully — about 2 hours. I know. Do it anyway. Cutting into hot bars gives you a delicious pile of crumble instead of a clean square. Once cool, use the parchment overhang to lift the slab onto a cutting board. Slice into 16 squares with a sharp chef’s knife, wiping the blade between cuts for the cleanest lines.
Make-Ahead Notes for Your Weekend Self
These bars are genuinely better the second day. The flavors settle, the crust softens just slightly into that perfect chewy-brittle texture, and they slice even cleaner. I make a batch on Sunday afternoon and we’re set through Thursday.
- Fridge: Airtight container, up to 5 days. They firm up beautifully when chilled and taste great cold or at room temp.
- Freezer: Yes. Freeze the entire cooled slab whole, then slice once frozen. Wrap individual bars in parchment and stash them in a freezer bag for a quick dessert. They hold for up to 3 months.
- Reheat: Microwave for about 15 seconds if you want it warm. The microwave keeps the texture intact better than the oven here.
My Honest Advice After Making These 30+ Times
- Press the crust like you mean it: If the crust layer is loose, your first bite will crumble into a mess on the plate. Press it firmly and evenly, especially at the corners. I use the bottom of a flat measuring cup and it works every time.
- Don’t overwork the streusel: Two pulses in the food processor after the oats go in. That’s it. If you pulse it to death, you lose those oat clusters that make the topping look like something from a bakery display case.
- Let the filling get jammy on the stove: Give it that full 5-7 minutes over medium heat. If you rush it, the cornstarch won’t activate properly and you’ll blame the recipe when it runs. It’s not the recipe. It’s the patience.
- Trust the cooling process: Even if you’re convinced it will fall apart, it won’t. Letting it cool completely gives the cornstarch time to finish its job and the butter to reset. I know it smells incredible. Walk away for two hours.
Swaps That Actually Work
- Gluten-Free: Swap the all-purpose flour for a 1:1 gluten-free baking blend (I use King Arthur Measure for Measure) and use certified GF oats. Not a single person at my table noticed.
- Dairy-Free: Use a high-quality vegan butter stick like Miyoko’s. Keep it cold. The rest of the recipe stays exactly the same and it works perfectly.
- Peach-Berry: Swap one cup of the frozen berries for frozen diced peaches. The peach chunks soften into these little jammy pockets that taste like summer in January. My favorite variation, honestly.
- Citrus Zest: Add the zest of one orange to the crust mixture and another to the berry filling. It lifts the whole thing in a way that makes people ask “what is that?” and look impressed when you say “just an orange.”
Questions I Get About This Recipe All the Time
Q: Why did my filling turn out runny?
A: Ugh, I’ve been there. Most likely culprit: your berries weren’t fully frozen when you cooked them, or you pulled the cornstarch mixture off the heat too early. Next time, cook it until it visibly thickens — about 7 minutes — and toss the berries in frozen. You’ve got this next time.
Q: Can I make this dairy-free?
A: Yes, and it works. Use a cold vegan butter stick — the kind that comes in a block, not a tub. I’ve tested this with Miyoko’s and it holds up beautifully. The flavor is slightly less buttery, but the texture is spot on.
Q: How long do these keep?
A: Airtight container at room temp for 2 days. In the fridge, they last a full week — just let them sit out for 10 minutes before serving if you want that softer texture. They freeze beautifully for up to 3 months if you wrap them individually.
Q: What do you serve with these?
A: A dollop of crème fraîche or thick Greek yogurt cuts the sweetness perfectly. For a real dessert moment, serve them barely warm with vanilla ice cream. My favorite move: a light dusting of powdered sugar right before serving. It takes four seconds and makes them look like you tried much harder than you did.
More Recipes My Family Makes on Repeat
If these bars find a regular spot in your rotation (they will), here are a few others that live in mine:
- No-Bake Peanut Butter Oat Cups — Salty-sweet perfection, another one that starts with oats and doesn’t quit.
- Strawberry Shortcake — Same jammy berry energy, much looser and scoopier, zero slicing required.
- Lemon Buttermilk Cake — The citrus move that pairs perfectly with summer berries.
This is the kind of bar that looks like you raided a high-end bakery, but you just raided your freezer and pantry. If you make them, drop a comment below and let me know how they turned out — I love hearing which berry combos people use and whether anyone managed to wait the full two hours before slicing.
📌 Mixed berry crumble bars recipe that looks like a bakery window — save it for your next weekend baking project.
Mixed Berry Crumble Bars That Look Like a Bakery Window
Equipment
- 9×13 Baking Dish
- Food Processor
- Parchment Paper
- Skillet or saucepan
- Wire Rack
Ingredients
For the Crust and Streusel
- 2 1/2 cups all-purpose flour
- 1 cup granulated sugar
- 1 pinch kosher salt
- 1 cup unsalted butter, cold and cubed
- 1 1/2 cups old-fashioned rolled oats
For the Berry Filling
- 3 cups frozen mixed berries
- 1/2 cup granulated sugar
- 2 tablespoons lemon juice
- 3 tablespoons cornstarch
Instructions
- Preheat oven to 375°F. Line a 9×13 baking dish with parchment paper, leaving overhang on the two long sides.
- Make the crust and streusel: In a food processor, combine flour, 1 cup sugar, and salt. Pulse to combine. Add cold cubed butter and pulse until shaggy (about 10 pulses). Add oats and pulse twice more. Set aside 1 1/2 cups for the topping.
- Press the remaining crust mixture firmly into the prepared dish. Bake for 15 minutes, until just golden at edges.
- Meanwhile, in a skillet over medium heat, combine frozen berries, 1/2 cup sugar, lemon juice, and cornstarch. Cook, stirring occasionally, until berries thaw and mixture thickens (5-7 minutes). It should look like loose jam.
- Pour the berry filling over the hot crust and spread evenly. Sprinkle the reserved crumble mixture on top, squeezing some into clumps for crunchy bits.
- Bake for 35-40 minutes, until deeply golden and bubbling at edges. Cool completely in the pan on a wire rack (about 2 hours). Use parchment to lift out, then slice into 16 bars with a sharp knife.
Notes
Related Recipes:
 Apple Rose Pastry Blooms That Look Like a Patisserie Display (With Zero Fancy Skills Needed)
 The Only Strawberry Shortcake Recipe That Works Every Time
 Strawberry Shortcake Muffins That Taste Like Summer (With a Crunchy Sugar Lid)
 Cottage Cheese Flagels That Are Actually Chewy (Not Spongy) — in 35 Minutes
 Fudgy Zucchini Brownies You’d Never Guess Are Hiding a Vegetable
 The Buttermilk Scones You’d Never Guess Are This Flaky (and Easy)