
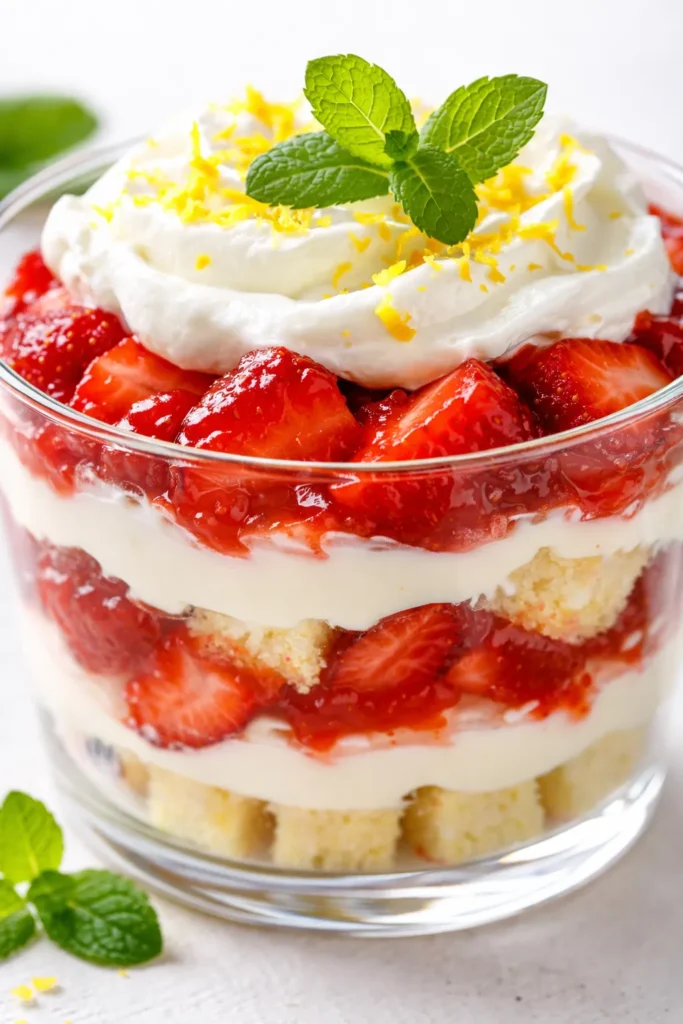
I used to think impressive desserts required a stand mixer, a piping bag, and a full Sunday afternoon with nothing else to do. This trifle taught me otherwise. Three layers, one bowl, twenty minutes of actual hands-on time, and it lands on the table looking like it came from a bakery window — glass sides showing off every clean stripe of cream, fruit, and cake. The first time I set it down at a spring brunch, someone literally asked which bakery I’d gone to. I told the truth. She didn’t believe me until she watched me make it again the following week.
The short version: A no-bake cheesecake layer, macerated strawberries, toasted almonds, and store-bought cake stacked in a glass dish that looks like you planned it for days.
I’ve made this for Easter brunch, a friend’s baby shower, and a random Tuesday when I needed to remind myself that dessert doesn’t have to be a project. Every time, same reaction: the pause before the first bite, then the question. This is the one I send people home with the recipe for.
- Serves: 8–10 as dessert
- Hands-On Time: 20 min | Total Time: 2 hr 20 min (includes chilling)
- Difficulty: Easy — if you can whip cream and slice strawberries, you’ve got this
- Cost per serving: ~$3.50
- Calories: ~410 per serving
- Dietary Notes: Can be made gluten-free with a simple cake swap
(Photo above: overhead shot of the trifle in a clear glass pedestal bowl, layers of cheesecake cream, macerated strawberries, and golden cake cubes visible through the sides, finished with a swirl of whipped cream, fresh berries, and toasted almond slices on top, soft morning light from a side window.)
The Thing That Makes This Look So Much Harder Than It Is
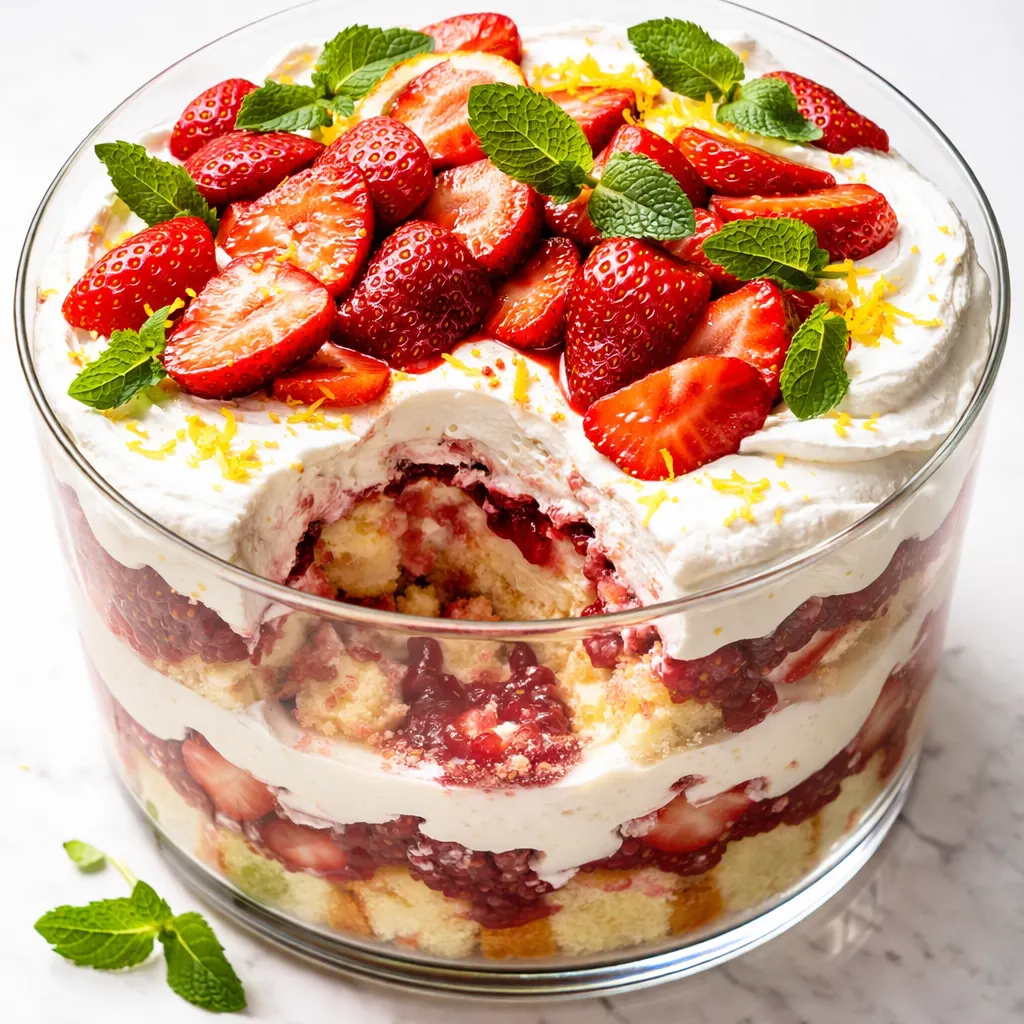
The secret isn’t a fancy technique — it’s the glass dish. A clear glass trifle bowl does more work for you than any piping bag ever could. Those visible layers? They’re the whole show. And they take about ninety seconds per layer to assemble. The contrast between the creamy white cheesecake layer, the deep red strawberry compote, and the golden cake cubes reads as deliberate and composed, even though you’re basically stacking things in order and moving on with your day.
The second thing is the fruit treatment. Most people just throw sliced strawberries into a trifle and hope for the best. I macerate them first — a sprinkle of sugar and a squeeze of lemon, then let them sit while you make the cream. That十分钟 draw out the juices and creates a syrupy layer that soaks into the cake just enough to soften it without turning it into mush. It’s the difference between a trifle that tastes like separate components and one that tastes like a single, cohesive dessert. I learned this after making a version that was fine but forgettable. The maceration step is not optional.
What You Need (Plus My Honest Notes on Each One)
- 1 store-bought pound cake (10–12 oz): The cake is the structure. I use a good-quality frozen pound cake — thawed — or the bakery section loaf from the grocery store. Angel food cake works too, but pound cake holds up better and doesn’t get as soggy. I’ve tried making my own from scratch exactly once for this recipe. It was fine. The store-bought version was better and took zero effort. Choose your battles.
- 16 oz cream cheese, softened: Full-fat, block-style. Not the spreadable tub — it has a different texture and won’t whip as smoothly. My kids can tell the difference. I tested it once when I was out of block cream cheese and thought I’d get away with it. I did not.
- 1/2 cup granulated sugar: Divided — some for the cream cheese, some for the strawberries.
- 1 tsp vanilla extract: Pure, not imitation. It matters here because there are so few ingredients that each one shows up. I keep a bottle of the good stuff for recipes like this and the imitation for baking where it cooks off.
- 2 cups heavy cream, divided: One cup goes into the cheesecake layer, one cup gets whipped for the topping. Cold cream whips better — I stick the bowl and beaters in the fridge for ten minutes before I start.
- 1 lb fresh strawberries: Ripe but still firm. Mushy strawberries turn the layers into a pink blur. I’ve made this with frozen strawberries in a pinch and it works, but the texture is softer and the color is less vibrant. Fresh is worth the extra minute at the store.
- 1/4 cup strawberry jam: Adds body and sweetness to the strawberry layer. I use a seedless jam for a smoother texture, but seeded is fine too.
- 1 tbsp fresh lemon juice: Brightens the berries and balances the sweetness. Bottled lemon juice works in a crisis but fresh is noticeably better. I squeeze half a lemon and call it done.
- 1/4 cup sliced almonds, toasted: The texture element. Every layer of this trifle is soft — cake, cream, berries — so the almonds provide the crunch that makes you want another bite. Toast them in a dry pan for about three minutes until they’re golden and smell like something good is happening. Watch them closely — they go from perfect to burnt in about fifteen seconds.
- Lemon zest and fresh mint: The final garnish. The zest adds color and a hit of brightness right before the first bite. The mint is optional but makes it look like you considered every element. I do not garnish this with anything that needs to be moved aside to eat. No whole mint sprigs. Just a few small leaves placed with intent.
What to Pull Out Before You Start
- A 2.5- to 3-quart glass trifle bowl (a clear glass bowl works too — the point is visibility)
- An electric hand mixer or stand mixer (you’re whipping cream and cream cheese)
- A large mixing bowl for the cheesecake layer
- A medium bowl for the strawberries
- A small skillet for toasting the almonds
- A spatula for layering (the flatter the better for clean stripes)
Let’s Make It — The Method, No Fancy Skills Required
This goes fast, so I recommend reading through once before you start. The actual hands-on time is about twenty minutes, then the fridge does the rest of the work.
First, the strawberry layer:
- Macerate the berries: Hull and slice the strawberries into even 1/4-inch pieces. Toss them in a medium bowl with 2 tablespoons of the sugar, the strawberry jam, and the lemon juice. Stir gently. Let them sit at room temperature while you make the cream layers. This draws out the juices and creates that syrupy consistency. (📸 Photo tip: You should see a pool of deep red syrup gathering at the bottom of the bowl after about 10 minutes — that’s the sign it’s working.)
- Toast the almonds: In a small dry skillet over medium heat, toast the sliced almonds for 2–3 minutes, stirring frequently, until they’re golden and fragrant. Transfer to a small bowl and set aside. They’ll go on top at the end.
- Make the cheesecake layer: In a large mixing bowl, beat the softened cream cheese with the remaining 1/4 cup sugar and the vanilla extract until smooth and fluffy — about 2 minutes with a hand mixer. Scrape the bowl well. In a separate bowl (or the same bowl if you wash it), whip 1 cup of the heavy cream to stiff peaks. Fold the whipped cream into the cream cheese mixture in two additions. Gently — you want to keep the air in. My first time making this, I stirred too hard and ended up with a dense, sad layer. Fold until just combined. Streaks are fine. Over-mixing is not.
- Whip the topping cream: In the same bowl (no need to wash — a little cheesecake residue won’t hurt), whip the remaining 1 cup of heavy cream with 1 tablespoon of sugar (optional, depending on how sweet you want the top) to soft peaks. Set aside in the fridge.
Now, assembly — this is where the visual magic happens:
- First cake layer: Cut the pound cake into 3/4-inch cubes. Arrange a single layer of cubes in the bottom of your trifle bowl — about half the cake. Don’t press them down. You want them to stay light. (📸 Photo tip: The cubes should form a neat, even layer with small gaps between them — the cream will settle into those gaps and create that striped look.)
- First strawberry layer: Spoon half the macerated strawberries and their syrup evenly over the cake cubes. Some syrup will soak into the cake — that’s exactly what you want.
- First cheesecake layer: Spoon half the cheesecake cream over the strawberries and spread it gently to the edges. Use a spatula to make it as even as possible. This is the layer that creates the clean white stripe when you slice into it.
- Repeat the layers: Add the remaining cake cubes, remaining strawberries (with syrup), and remaining cheesecake cream. Spread evenly. Top with all the whipped cream, swirling it decoratively with the spatula.
- Garnish: Arrange the remaining fresh strawberry slices (reserve a few nice ones before macerating) on top. Sprinkle the toasted almonds over everything. Add a few small mint leaves and a fine grating of lemon zest. Don’t scatter the almonds from a height — place them in a deliberate pattern. I do a cluster in the center and a few scattered toward the edges.
- Chill: Cover loosely and refrigerate for at least 2 hours — 4 is better. This lets the layers settle and the flavors marry. The cake absorbs just enough syrup without losing its structure.
How I Prep This for the Week (or for a Crowd)
This trifle is actually better the day after you make it, which makes it ideal for entertaining. I assemble it the night before a brunch or dinner party, keep it covered in the fridge, and pull it out about twenty minutes before serving to take the chill off. The layers set more firmly overnight, so slices are cleaner. I make a double batch for big gatherings — it disappears fast and people always want seconds.
- Fridge: Covered, for up to 3 days. The cake stays just tender enough. After day 3, the berries start to release more liquid and the layers get loose.
- Freezer: I don’t recommend it. The cream separates on thawing and the cake turns to mush. This one is best fresh or next-day.
- Reheat: You don’t. Serve cold or at cool room temperature. If it’s been in the fridge, let it sit out for 15–20 minutes before serving so the flavors open up.
Things I Wish I’d Known the First Three Times I Made This
- Room-temperature cream cheese is non-negotiable: Cold cream cheese whips into lumps that never fully smooth out. Set it out on the counter an hour before you start. If you forget, microwave it in 10-second bursts, flipping the block each time, until it’s soft to the touch but not warm. I’ve done the rushed version and it produced a grainy cheesecake layer that looked fine but tasted like I’d cut a corner. Because I had.
- Whip the cream to stiff peaks for the cheesecake layer: Soft peaks deflate when you fold them into the cream cheese, and you lose the lightness that makes the layer look airy in the glass. Stiff peaks hold their shape and create that clean stripe. If you over-whip and it starts to look grainy, add a tablespoon of cold cream and fold it in gently — it will smooth out.
- Don’t press the cake cubes down: I know it’s tempting to pack them in to make the layers look tight. Resist. Pressed cake absorbs too much syrup and turns into a dense, wet layer. Loose cubes create pockets of air and cream that make the trifle look layered and intentional. Trust the process.
- Maceration time matters: Ten minutes is the minimum. Thirty is better. The sugar needs time to draw out the strawberry juices. If you rush this step, the berries stay firm and the syrup never develops. You’ll end up with a dry trifle that tastes like separate ingredients stacked in a bowl. I’ve made that mistake exactly once.
Swaps That Actually Work (I’ve Tested Them)
- Gluten-free: Use a good-quality gluten-free pound cake or gluten-free vanilla cake cubes. I’ve tested this with a store-bought GF vanilla loaf and it worked perfectly — same structure, same texture. This is the version I make for my friend whose daughter has celiac disease. She said it was the first trifle she’d been able to eat at a party in years.
- Dairy-free: Replace the cream cheese with a dairy-free block-style alternative (I like the one from Miyoko’s or Kite Hill), use coconut cream (chilled, whipped) in place of heavy cream, and use a dairy-free pound cake. The texture is slightly less rich but still very good. My sister-in-law is dairy-free and I’ve made this for her twice — she asked for the recipe both times.
- Kid-friendly: Skip the lemon zest and mint garnish. Some kids find the lemon too sharp. Add a few chocolate shavings on top instead. My nephew calls this ‘the pink cake’ and requests it for every birthday that isn’t his own.
- Fancy guest version: Swap the store-bought pound cake for a homemade vanilla sponge (one layer, cut into cubes). Use crème fraîche in place of half the heavy cream in the cheesecake layer for a tangier finish. Add a drizzle of aged balsamic over the strawberries. I do this version for actual dinner parties. It takes a little more time but the balsamic note with the berries is worth it.
- Summer berry version: Replace half the strawberries with blueberries and raspberries. Macerate them together with the same sugar and lemon. The color contrast is beautiful — deep red, purple, and blue against the white cream. I made this for Fourth of July and it looked like a flag in a glass bowl.
Questions I Get About This Trifle All the Time
Q: Why did my cheesecake layer turn out runny?
A: Ugh, I’ve been there. The most common reason is that the cream cheese wasn’t fully softened before you mixed it, or the cream wasn’t whipped to stiff peaks. Cold cream cheese won’t incorporate properly, and soft-peak cream deflates when folded. Next time, give the cream cheese a full hour on the counter and whip the cream until it holds a firm peak that doesn’t droop. You’ve got this next time — it’s a fixable mistake.
Q: Can I make this with frozen strawberries?
A: Yes, but with one adjustment. Frozen strawberries release a lot more liquid than fresh. If you use them, thaw them first, then macerate them in a bowl with the sugar, jam, and lemon, but drain off about a third of the liquid before layering. Otherwise the cake gets too soggy. I’ve done it when fresh berries weren’t in season, and it works — just needs that extra step.
Q: How long does this last in the fridge? Can I freeze it?
A: It keeps in the fridge for up to three days covered. The cake will soften more over time, but it stays pleasant through day three. I do not recommend freezing — the cream separates on thawing and the texture becomes watery. This is a make-ahead dessert, not a make-and-freeze one. Assemble it the day before, and you’ll have the best results.
Q: What do you serve with this trifle?
A: I keep it simple because the trifle is rich. A shortbread cookie on the side adds a buttery crunch that contrasts nicely. For a spring brunch, I serve it after a light main like quiche or a green salad with lemon vinaigrette. My family likes it with a dollop of extra whipped cream and a cup of black coffee — the bitterness balances the sweetness. For a summer dinner, I’ve served it alongside a berry sangria and it was a hit.
More Recipes My Family Makes on Repeat
If you liked this one, here are a few others that get the same reaction at our table:
- Lemon Blueberry Pound Cake — The one that disappears before I can get a slice for myself. Same store-cake hack, different fruit.
- No-Bake Chocolate Tart — For the nights when you want dessert to look like a pastry case did it, but you have zero oven time.
- Berry Compote with Whipped Ricotta — The five-minute version when the trifle feels like too much. Same energy, smaller bowl.
This is the kind of dessert you set on the table without explaining it first. Let the glass sides do the talking. The first person to see it will say something. The second person will ask for the recipe. Have a simple answer ready — the real answer is just good layers and one good bowl.
If you try it, drop a comment below — I love hearing how it goes for you. Tag me on Pinterest so I can see your layers.
📌 This no-bake strawberry cheesecake trifle recipe looks like a bakery dessert but comes together in twenty minutes — save it for your next spring brunch or dinner party.
Strawberry Cheesecake Trifle That Looks Like a Pastry Case
Equipment
- 2.5- to 3-quart glass trifle bowl
- Electric hand mixer or stand mixer
- Large Mixing Bowl
- Medium Mixing Bowl
- Small skillet
- Spatula
Ingredients
- 1 loaf store-bought pound cake (10–12 oz)
- 16 oz cream cheese, softened
- 1/2 cup granulated sugar, divided
- 1 tsp vanilla extract
- 2 cups heavy cream, divided
- 1 lb fresh strawberries
- 1/4 cup strawberry jam
- 1 tbsp fresh lemon juice
- 1/4 cup sliced almonds
- Lemon zest and fresh mint for garnish
Instructions
- Macerate the berries: Hull and slice the strawberries into even 1/4-inch pieces. Toss them in a medium bowl with 2 tablespoons sugar, strawberry jam, and lemon juice. Let sit at room temperature while you prepare the cream layers.
- Toast the almonds: In a small dry skillet over medium heat, toast the sliced almonds for 2–3 minutes, stirring frequently, until golden and fragrant. Transfer to a small bowl and set aside.
- Make the cheesecake layer: In a large bowl, beat softened cream cheese with remaining 1/4 cup sugar and vanilla extract until smooth and fluffy, about 2 minutes. In a separate bowl, whip 1 cup heavy cream to stiff peaks. Fold the whipped cream into the cream cheese mixture in two additions, gently, until just combined.
- Whip the topping cream: In the same bowl, whip the remaining 1 cup heavy cream with 1 tablespoon sugar (optional) to soft peaks. Set aside in the fridge.
- Assemble the trifle: Cut pound cake into 3/4-inch cubes. Arrange half the cubes in a single layer in the bottom of the trifle bowl. Spoon half the macerated strawberries and their syrup over the cake. Spoon half the cheesecake cream over the strawberries and spread gently to the edges.
- Repeat layers: Add remaining cake cubes, remaining strawberries (with syrup), and remaining cheesecake cream. Spread evenly. Top with whipped cream, swirling decoratively.
- Garnish: Arrange reserved fresh strawberry slices on top. Sprinkle toasted almonds, mint leaves, and a fine grating of lemon zest.
- Chill: Cover loosely and refrigerate for at least 2 hours, preferably 4, before serving. Serve cold or cool room temperature.
Notes
Related Recipes:
 The Perfectly Pillowy Chocolate Chip Milk Buns (Tangzhong Method)
 Cheesy Hamburger Casserole Bake That’s Ready in 40 Minutes (No Canned Soup Here)
 Creamy Garlic Tagliatelle That Looks Like a Restaurant Dish in 20 Minutes
 Texas Roadhouse Style Baked Salmon with Sweet and Savory Glaze — Ready in Under 30 Minutes
 Easy Italian Meatloaf That’s Actually Juicy (Not Dry) — in 1 Hour
 Moist Lemon Zucchini Bread with a Crunchy Lemon Sugar Top