
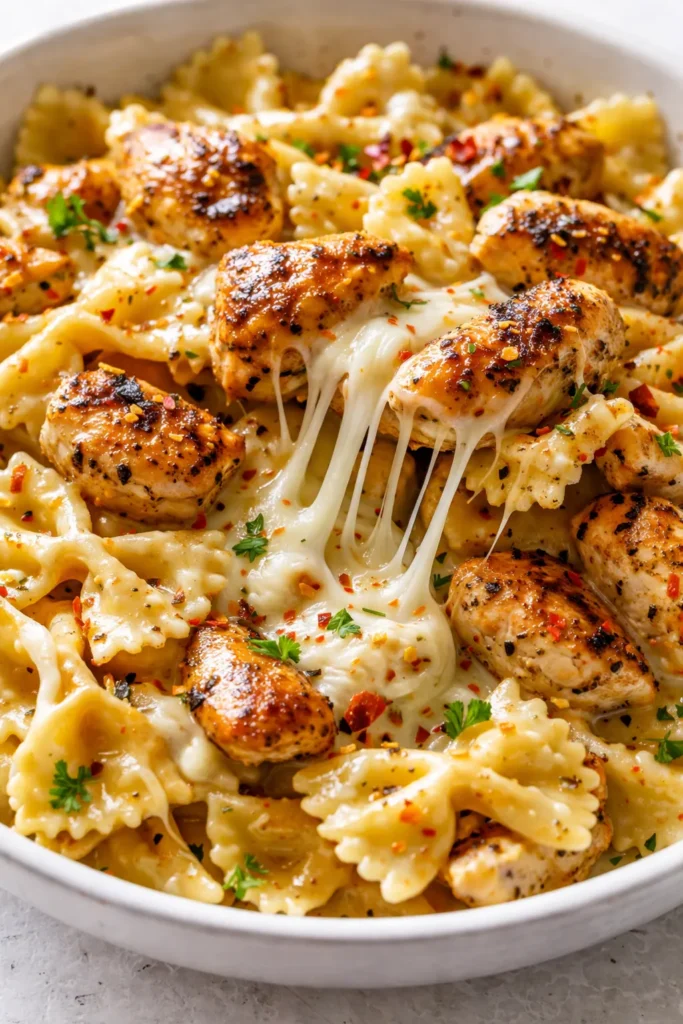
Listen. I have made a lot of pasta in my life. But this one — this one stopped my husband mid-bite the first time I served it. He just looked at me, fork frozen, and said “What did you do to this chicken?” The garlic butter situation is serious. The mozzarella pulls into these long, dramatic strands that make the whole thing feel like a dinner party even when you’re eating it over the sink at 7pm on a Tuesday. And the whole thing — chicken, sauce, pasta — comes together in one skillet in the time it takes to boil water and cook the bowties. I am not exaggerating.
The short version: Garlic butter chicken, creamy mozzarella sauce, bowtie pasta — one skillet, 35 minutes, and your family will ask for it every single week.
I’ve made this maybe 30 times now. My kids call it “the fancy pasta” and I love that they think I’m being fancy when really I’m just trying to get dinner on the table fast. The trick is a few deliberate moves — searing the chicken in garlic butter first, building the sauce in the same pan, and finishing with fresh mozzarella that melts into these incredible milky pockets. Every time I make it, someone asks for the recipe. So here it is.
- Serves: 4 as a main
- Hands-On Time: 25 min | Total Time: 35 min
- Difficulty: Easy enough for a Tuesday — one skillet, no fancy skills
- Cost per serving: ~$4.50
- Calories: ~680 per serving
- Dietary Notes: Can be made gluten-free with GF pasta
(Photo above: overhead shot of the finished pasta in a wide white bowl, bowties tangled in creamy sauce with golden-brown chicken pieces on top, a dusting of fresh parsley and cracked black pepper, natural afternoon light from the left showing the glossy sauce coating every piece of pasta.)
The Two Things That Make This Pasta Actually Unforgettable
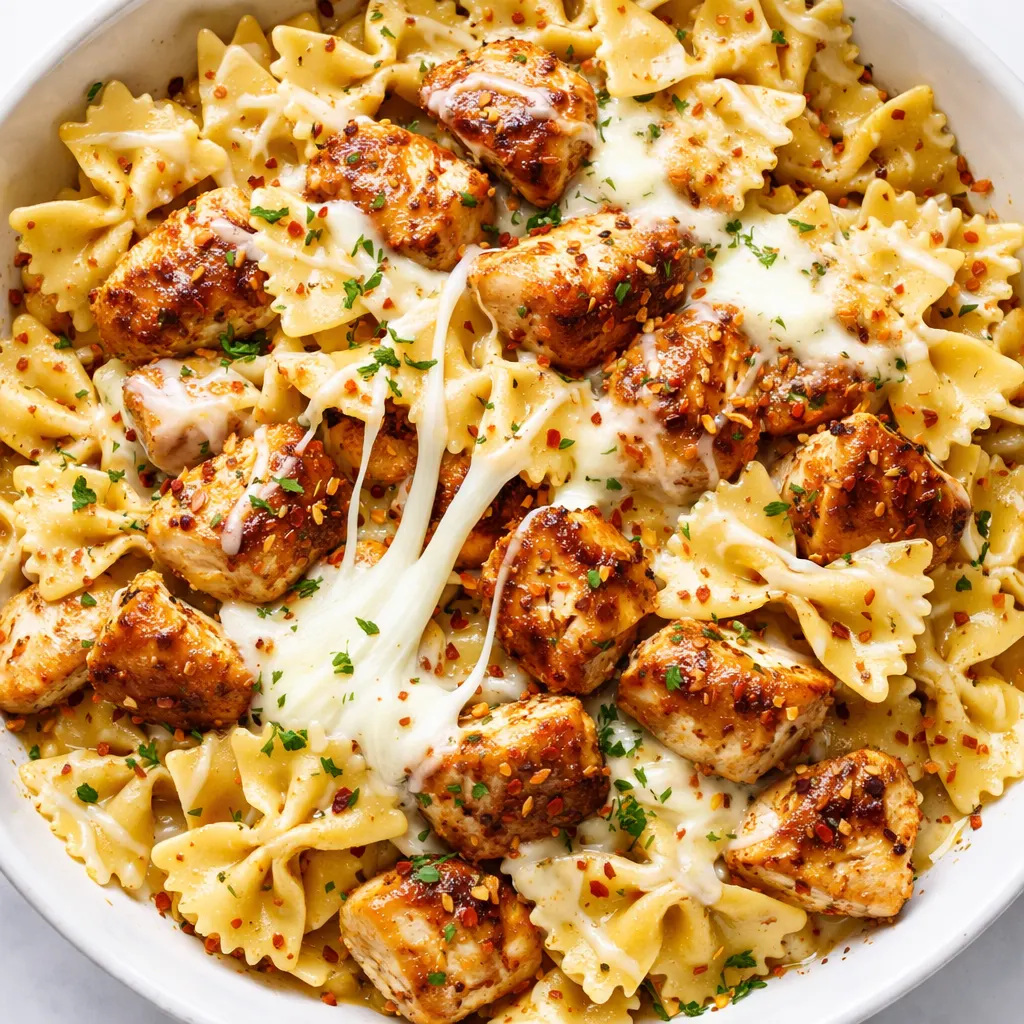
First: the garlic butter chicken gets seared in the same pan you build the sauce in. That’s not a convenience thing — the browned bits left behind from the chicken are what make the cream sauce taste like you spent an hour on it. It’s a one-pan flavor shortcut that works every single time.
Second: fresh mozzarella stirred in at the very end. Not pre-shredded (too dry, doesn’t melt right), but torn into small pieces so it melts into soft, milky pockets throughout the sauce. The cheese pulls when you twirl the pasta. That visual moment — the stretch — is what makes people think you did something complicated. You didn’t. You just added the cheese at the right time.
Together, these two moves produce a dish that feels luxurious without any real effort. The garlic butter does the heavy lifting. The mozzarella does the showmanship. You just stand there and stir.
Everything You Need (And a Few Notes From Me)
- 1 ½ lbs boneless skinless chicken breasts (about 2 large): Cut into bite-sized pieces so they cook fast and fit nicely on the fork. My kids actually prefer thighs here — juicier and harder to overcook. Use whichever you have.
- 4 tbsp salted butter: The base of the garlic butter situation. Don’t use unsalted — you want that seasoning built in. If you only have unsalted, add a pinch of salt to the butter when it melts.
- 5 large garlic cloves, minced: Not the jarred stuff. Fresh garlic is non-negotiable here — it’s the backbone of the whole dish. I mince mine fine and let it sit in the butter for about 30 seconds before adding the chicken. Just enough to wake it up.
- 1 ½ cups heavy cream: The base of the sauce. Do not substitute half-and-half here — it won’t thicken the same way. If you need a lighter version, use full-fat coconut milk once. It’s different but good in its own way.
- 1 cup low-sodium chicken broth: Thins the cream just enough so the sauce coats the pasta without being gluey. Better than Bouillon in water works great here if that’s what you have.
- 1 cup freshly grated Parmesan: Not the green can. Freshly grated melts smooth and gives the sauce that savory depth. I buy a block on Sundays and grate it as I need it — takes 30 seconds and makes a real difference.
- 8 oz fresh mozzarella (the soft kind in water): Torn into small pieces, about ½-inch each. This creates the milky pockets and the pull. Drain it and pat it dry before tearing so the sauce doesn’t get watery.
- 1 tbsp olive oil: For searing the chicken along with the butter. Keeps the butter from burning.
- 12 oz farfalle (bowtie pasta): The shape matters here — the little ridges and folds catch the sauce perfectly. Any short pasta works but bowties are the most fun. My kids will eat anything shaped like a bow.
- ½ cup reserved pasta water: The secret weapon for getting the sauce to the right consistency. Don’t forget to scoop it out before you drain the pasta. I’ve made that mistake exactly once.
- Salt, black pepper, red pepper flakes (optional): For seasoning the chicken and finishing the sauce. A pinch of red pepper flakes in the butter adds a warmth that’s barely there but really rounds out the dish.
- Fresh parsley or basil for garnish: Fresh herbs on top add color and a clean finish. I use parsley if I want it bright, basil if I’m feeling Italian-restaurant vibes.
What to Pull Out Before You Start
- Large skillet or braiser (12-inch): Heavy-bottomed is best — cast iron or stainless steel. Non-stick works but you won’t get as many browned bits on the bottom.
- Large pot for pasta: 4- to 6-quart with salted water.
- Cutting board and sharp knife: For the chicken and garlic.
- Microplane or box grater: For the Parmesan.
- Tongs: For flipping the chicken.
Let’s Make It (Step by Step)
This moves fast once you start — so read through once, get your ingredients prepped, and then go. The whole thing takes less time than a typical sitcom episode.
Start the pasta water: Bring a large pot of generously salted water to a boil. Salt it like the sea — this is the only chance to season the pasta itself.
- Sear the chicken: Pat the chicken pieces dry with paper towels (this is key for a good sear). Season with salt and pepper. Heat the olive oil and 2 tablespoons of the butter in your skillet over medium-high heat. Add the minced garlic and let it sizzle for 30 seconds — just until fragrant, don’t let it brown. Add the chicken in a single layer and cook for 5-6 minutes, flipping once, until golden brown and cooked through. Transfer the chicken to a plate and leave all the juices and browned bits in the pan. (📸 Photo tip: You want deep golden-brown spots on the chicken — that means you got the sear right. If the pan looks dry, add another pat of butter.)
- Start cooking the pasta: Drop the bowties into the boiling water and cook according to package directions until al dente. Reserve ½ cup of the pasta water just before draining, then drain. Don’t rinse the pasta — you want that starch on the surface to help the sauce cling.
- Build the sauce: Reduce the heat to medium. Add the remaining 2 tablespoons of butter to the same skillet. Once it melts, scrape up all those browned bits from the bottom with a wooden spoon — that’s pure flavor. Pour in the heavy cream and chicken broth, whisking to combine. Bring to a gentle simmer and let it cook for 3-4 minutes, stirring occasionally, until it thickens enough to coat the back of a spoon.
- Add the Parmesan and season: Stir in the grated Parmesan until fully melted and smooth. Taste and adjust with salt and pepper — go easy on the salt since the Parmesan is already salty. If you want a little warmth, add a pinch of red pepper flakes. (📸 Photo tip: The sauce should be smooth and glossy at this point, with no graininess from the cheese. If it looks grainy, the heat was too high — lower it and stir in a splash of pasta water.)
- Add the mozzarella and pasta: Drop the heat to low. Add the drained pasta and the torn fresh mozzarella to the skillet. Toss everything together with tongs — the mozzarella will start to melt into soft, milky strands. If the sauce looks too thick, add the reserved pasta water a tablespoon at a time until it’s loose and silky. I usually use about ¼ cup. You want it to coat the pasta but still move freely in the pan.
- Finish with the chicken: Return the seared chicken pieces to the skillet. Toss everything together for another minute, just until the chicken is warmed through and everything is glossy and combined.
- Plate and garnish: Transfer to a serving bowl or individual plates. Finish with a flaky salt (Maldon if you have it — the little crunch is everything), fresh cracked pepper, and a scattering of fresh parsley or torn basil. Serve immediately — this one doesn’t wait. My kids fight over the bowl for the last bit of sauce. I do not intervene.
How I Meal Prep These for the Week
I make a double batch on Sundays and we eat it for lunches or quick dinners through Wednesday. The sauce thickens as it sits, but a splash of milk or broth when you reheat brings it right back. I portion it into individual containers so the kids can grab one after school.
- Fridge: Airtight container, 3-4 days. Add a splash of milk or cream when reheating to loosen the sauce.
- Freezer: Not ideal — the cream sauce can separate when thawed. If you have to freeze, do it without the pasta and cook fresh noodles when you reheat.
- Reheat: Stovetop is best — low heat with a splash of liquid, stirring gently. Microwave works in a pinch but go in 30-second bursts and stir between each.
My Honest Advice After Making This 30 Times
- Pat the chicken dry. I know it seems like a pointless step, but if the chicken is wet it’ll steam instead of sear, and you’ll lose those browned bits that make the sauce taste like it’s been simmering for hours. Pat it dry, season it, then sear it. Trust me on this one.
- Taste the sauce before you add the pasta. It’s your last chance to fix the seasoning. Add salt a pinch at a time, and remember the Parmesan will continue to add saltiness as it melts. My rule: if it tastes a little too salty hot off the spoon, it’ll be perfect once it coats the pasta.
- Don’t walk away from the cream sauce. It can go from silky to separated in about 30 seconds if the heat is too high. Keep it at a low simmer, not a boil, and stir it every minute or so. If you see it starting to break (little dots of butter forming on the surface), remove it from the heat immediately and whisk in a splash of cold cream or milk to bring it back.
- Fresh mozzarella makes the magic. Pre-shredded mozzarella has anti-caking agents that keep it from melting into those soft, milky pockets. Buy the fresh stuff in water, pat it dry, and tear it into pieces yourself. Even if you mess up the size a little, it’ll still taste incredible — I’ve done it.
Swaps That Actually Work
- Dairy-Free: Use full-fat canned coconut milk and a dairy-free butter substitute (I like Miyoko’s). Skip the mozzarella or use a dairy-free shred that melts well. The flavor changes a bit but it’s still creamy and satisfying — my sister-in-law who’s dairy-free requests this version.
- Gluten-Free: Use your favorite GF farfalle or any short GF pasta. The rest of the recipe stays the same. Use GF pasta reserved water to adjust the sauce consistency — it works just as well.
- Spicy Version for Grown-Up Dinners: Add ½ teaspoon of red pepper flakes with the garlic, and finish with a drizzle of chili crisp before serving. My husband does this after the kids go to bed and says it’s a completely different (and excellent) experience.
- Kid-Friendly Mild Version: Skip the red pepper flakes, use regular cream, and let them pick the pasta shape. My kids love when I use mini shells or rotini instead of bowties — same sauce, different vibe.
- Fancy Guest Version: Add ½ cup of sun-dried tomatoes (chopped) with the cream, and top with extra fresh mozzarella pearls and basil. It looks like a restaurant dish and takes almost no extra work. I’ve served this for dinner guests and gotten asked for the recipe every single time.
- Add Vegetables: Stir in a handful of baby spinach at the end and let it wilt into the sauce, or add roasted broccoli on the side. The kids don’t even notice the spinach if you chop it small.
Questions I Get About This Recipe All the Time
Q: Why did my sauce turn out grainy?
A: Ugh, I’ve been there. Grainy sauce usually means the heat was too high when you added the Parmesan, or you used pre-grated cheese (it has anti-caking agents that don’t melt smoothly). Next time, use freshly grated Parmesan and keep the heat on low when you stir it in. If it’s already grainy, try whisking in a splash of cold cream or broth — sometimes you can pull it back.
Q: Can I use chicken thighs instead of breasts?
A: Yes, and honestly I prefer thighs here. They’re juicier and more forgiving if you cook them a minute too long. Use boneless skinless thighs and cut them into the same bite-sized pieces. The cook time is about the same — just make sure they hit 165°F internally. My family almost always uses thighs and it’s never been a problem.
Q: How long does this last in the fridge? Can I freeze it?
A: It keeps in the fridge for 3-4 days in an airtight container. The sauce will thicken as it sits, so add a splash of milk or broth when reheating to bring it back. Freezing isn’t ideal — cream sauces can separate when thawed and the pasta gets mushy. If you want to meal prep, cook the sauce and chicken ahead, then cook fresh pasta when you’re ready to eat. That’s my go-to move.
Q: What do you serve with this?
A: A simple green salad with lemon vinaigrette is my default — the brightness cuts through the richness. Garlic bread is also incredible for sopping up any leftover sauce (my kids fight over the bread more than the pasta). If I want to make it a full meal, I’ll add roasted broccoli or asparagus on the side. We always do a salad first, then this as the main event.
More Recipes My Family Makes on Repeat
If you liked this one, here are a few others that get the same reaction at our table:
- Creamy Sun-Dried Tomato Chicken Pasta — The one my husband requests for his birthday every year.
- Garlic Butter Shrimp Bowties with Spinach — Faster than takeout and my kids actually eat the spinach.
- One-Skillet Cheesy Sausage and Peppers Pasta — The weeknight hero when I have zero energy but still want dinner to feel like something.
This one has become our family’s “special Tuesday” pasta — the one that feels like a treat but doesn’t actually require any extra effort. That twirl of pasta with the mozzarella pull, that garlic butter sheen on the chicken, the way the whole kitchen smells like a restaurant — it’s the kind of dinner that makes everyone at the table a little bit happier. Even on a regular old Tuesday.
If you try it, drop a comment below — I love hearing how it goes for your family. And tag me on Pinterest so I can see your beautiful bowl of bowties.
📌 Mozzarella garlic butter chicken bowties in cheesy cream — save this one-skillet pasta recipe for your next busy weeknight when you need dinner that feels special without the hassle.
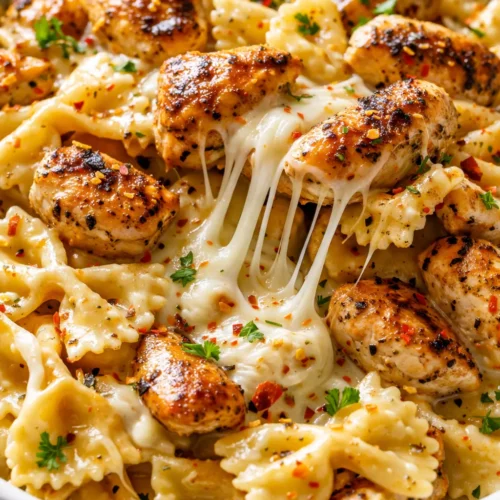
Mozzarella Garlic Butter Chicken Bowties
Equipment
- Large Skillet (12-inch)
- Large pot for pasta
- Cutting board
- Sharp Knife
- Microplane or box grater
- Tongs
- Wooden Spoon
Ingredients
- 1 ½ lbs boneless skinless chicken breasts
- 4 tbsp salted butter
- 5 cloves garlic, minced
- 1 ½ cups heavy cream
- 1 cup low-sodium chicken broth
- 1 cup freshly grated Parmesan
- 8 oz fresh mozzarella (soft, in water)
- 1 tbsp olive oil
- 12 oz farfalle (bowtie pasta)
- ½ cup reserved pasta water
- salt
- black pepper
- red pepper flakes (optional)
- fresh parsley or basil for garnish
Instructions
- Pat the chicken pieces dry with paper towels. Season with salt and pepper. Heat the olive oil and 2 tablespoons of the butter in your skillet over medium-high heat. Add the minced garlic and let it sizzle for 30 seconds, then add the chicken in a single layer. Cook for 5-6 minutes, flipping once, until golden brown and cooked through. Transfer the chicken to a plate and leave all the juices and browned bits in the pan.
- Drop the bowties into the boiling water and cook according to package directions until al dente. Reserve ½ cup of the pasta water just before draining, then drain. Do not rinse the pasta.
- Reduce the heat to medium. Add the remaining 2 tablespoons of butter to the same skillet. Scrape up the browned bits from the bottom with a wooden spoon. Pour in the heavy cream and chicken broth, whisking to combine. Bring to a gentle simmer and cook for 3-4 minutes, stirring occasionally, until it thickens enough to coat the back of a spoon.
- Stir in the grated Parmesan until fully melted and smooth. Taste and adjust with salt and pepper. Add a pinch of red pepper flakes if desired.
- Drop the heat to low. Add the drained pasta and the torn fresh mozzarella to the skillet. Toss everything together with tongs until the mozzarella starts to melt into soft strands. If the sauce looks too thick, add the reserved pasta water a tablespoon at a time until it’s loose and silky.
- Return the seared chicken pieces to the skillet. Toss everything together for another minute, just until the chicken is warmed through and everything is glossy and combined.
- Transfer to a serving bowl or individual plates. Finish with flaky salt, fresh cracked pepper, and a scattering of fresh parsley or torn basil. Serve immediately.
Notes
- Pat the chicken dry for a good sear.
- Taste the sauce before adding pasta – it should be slightly salty hot, perfect when coating pasta.
- Keep the cream sauce at a low simmer, not boil, and stir often.
- Use fresh mozzarella, not pre-shredded, for the best melt.
Related Recipes:
 Cheesy Hamburger Casserole Bake That’s Ready in 40 Minutes (No Canned Soup Here)
 Lemon Capellini Salad for Late Summer Evenings: Bright, Tangy, Ready in 20 Minutes
 Creamy Garlic Tagliatelle That Looks Like a Restaurant Dish in 20 Minutes
 Texas Roadhouse Style Baked Salmon with Sweet and Savory Glaze — Ready in Under 30 Minutes
 Easy Italian Meatloaf That’s Actually Juicy (Not Dry) — in 1 Hour
 The Biscuits and Gravy Casserole That’s Actually Crispy on Top (And Ready in 40 Minutes)