
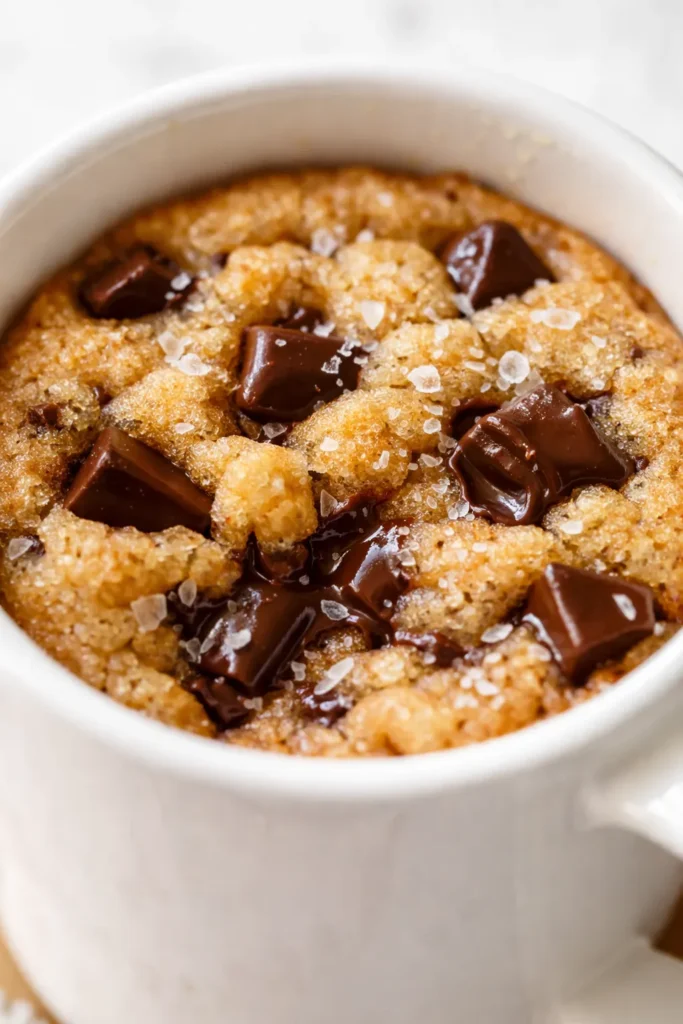
Look, I’m normally a whole-chicken-in-a-cast-iron kind of cook. But sometimes — late at night, after the kids are asleep, when the only thing standing between me and a pint of ice cream is a microwave — I need a dessert that’s faster than delivery and doesn’t leave me with a sink full of dishes. This microwave mug cookie is that. It’s not a sad, cakey disappointment. It’s a legit cookie, warm and gooey in the middle, with a slightly crisp edge. And it takes exactly 90 seconds.
The short version: One mug, 90 seconds, a gooey chocolate chip cookie that actually tastes like butter and brown sugar — not a science experiment.
I’ve made this close to thirty times over the past two years (pandemic late nights, school vacation afternoons, and a few times just because). My kids have their own favorite mugs now. They know the drill: butter, sugar, egg, flour, chocolate. Nine minutes tops.
- Serves: 1 (stubbornly single-serving, no sharing required)
- Hands-On Time: 5 min | Total Time: 8 min
- Difficulty: So easy a second-grader could do it (mine has)
- Cost per serving: ~$0.50
- Calories: ~450 per serving (it’s a treat, not a salad)
- Dietary Notes: Naturally vegetarian; can be made gluten-free with an easy swap
(Photo above: overhead shot of a white ceramic mug on a rustic wooden table, the cookie peeking out slightly over the rim, a single mint leaf placed deliberately on top, a small spoon resting beside it. Warm golden light from a kitchen window at 4pm.)
Why This Works When Most Mug Cookies Don’t
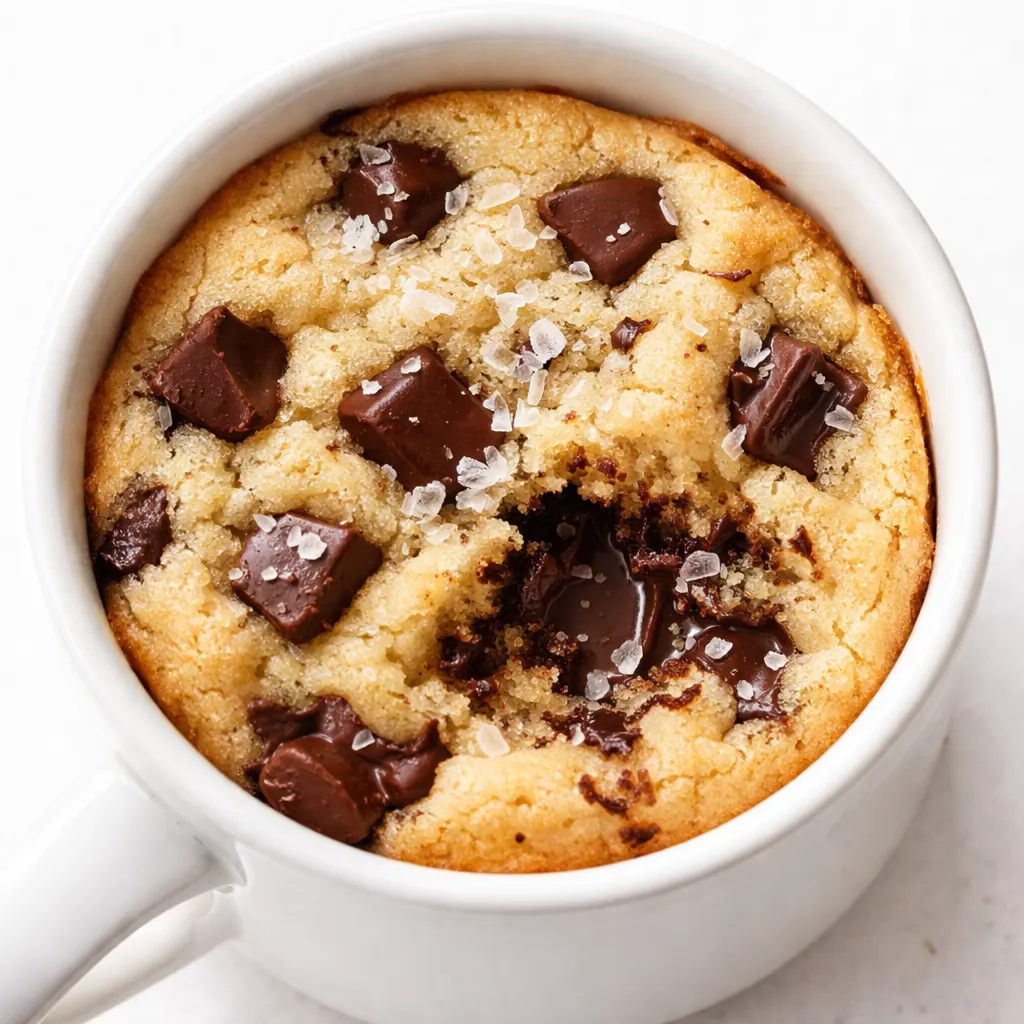
Most microwave mug cookies turn out dry or rubbery because the ratio is off — too much flour or egg, not enough fat. This version uses melted butter (not oil) and a single egg yolk instead of a whole egg. The yolk adds richness and keeps the texture soft while the butter gives it that real-cookie flavor. The trick is also the timing: 60 seconds for a gooey center, 90 seconds for fully cooked. I’ve tested both ways. I stand by the gooey.
The other reason this works: you do not overmix. Stir until just combined, no more. The microwave cooks fast, so you want those pockets of butter and chocolate to stay distinct. Overmixing makes it tough. I learned that the hard way the first three tries.
This produces a mug cookie that you actually want to eat — not a sad spongey thing you regret.
Ingredients Worth Talking About (And What You Probably Already Have)
- 2 tablespoons unsalted butter, melted: This is non-negotiable. Margarine or coconut oil change the texture. Real butter gives that brown-butter edge note. My kids can taste the difference — they’ve told me, loudly.
- 2 tablespoons granulated sugar + 1 tablespoon packed brown sugar: The brown sugar is key for that chewy, almost caramel note. If you only have white, add a tiny drizzle of maple syrup to mimic the moisture.
- 1 large egg yolk (save the white for breakfast): The yolk is pure fat and emulsifier. A whole egg adds too much liquid and makes it cakey. Trust the yolk.
- ¼ teaspoon vanilla extract: Don’t skip it — it rounds out the sweetness. I once used vanilla bean paste because I felt fancy — worked, but not worth the price for a mug cookie.
- 3 tablespoons all-purpose flour (or 2 tablespoons + 1 teaspoon almond flour for gluten-free): Spoon and level the flour. Scooping directly from the bag packs in too much and makes the cookie dense.
- ⅛ teaspoon baking powder: Just enough lift to keep it from turning into a hockey puck.
- Pinch of flaky sea salt (Maldon if you have it): The finishing touch.
- 3 tablespoons chocolate chips (or chopped chocolate): Use whatever you’d eat out of the bag. I like a mix of semi-sweet and dark for depth. My kids prefer all milk chocolate — that’s fine, I adjust when it’s for them.
What to Pull Out Before You Start
- A microwave-safe mug (minimum 12 oz — don’t use a tiny teacup; the cookie will overflow and make a mess). I use an old diner mug that’s about 14 oz.
- A fork or small whisk for mixing
- A small bowl to melt the butter (or just microwave the butter in the mug itself — I do this, but be careful, the mug gets hot)
- Measuring spoons
That’s it. No mixer, no stand, no separate bowl if you’re smart about order.
Let’s Make It (Step by Step — Yes, It’s This Easy)
I like to do everything in the mug to minimize dishes. Trust the order: butter first, then sugar, then yolk, then dry ingredients. It works.
Melt the butter: Put the butter in your mug and microwave on high for about 20 seconds until melted. Swirl to coat the bottom and up the sides a little (that coating helps prevent sticking).
- Stir in the sugars: Add both sugars to the melted butter and stir with a fork until combined. It’ll look like a thick paste. This is good. Press out any lumps. (📸 Photo tip: At this stage you should see a uniform, gritty-looking paste — not separated or watery. If it separates, the butter was too hot; let it cool a minute.)
- Add egg yolk and vanilla: Drop in the yolk and vanilla. Stir vigorously until it’s smooth and slightly lighter in color — about 30 seconds. This is the only step where you want a little arm work. It helps dissolve the sugar.
- Add flour, baking powder, and a pinch of salt: Sprinkle the dry ingredients over the mixture. Stir gently until just combined — maybe 15 seconds. You should still see a streak of flour. That’s fine. Overmixing now leads to a tough cookie. I’ve done it. Don’t be me.
- Fold in chocolate chips: Add the chocolate chips and fold a few times to distribute. Press a few extra chips onto the top for looks. (📸 Photo tip: The batter should look like thick cookie dough — not runny, not dry. A few chocolate chips sticking up on top makes the final photo better.)
- Microwave: Place the mug on a microwave-safe plate (in case of overflow). Cook on high for 45 seconds for a gooey, almost molten center — or 60 to 75 seconds for a firmer cookie. I do 50 seconds for my sweet spot. Every microwave is different — start with 45 and add 10-second bursts until it looks puffed and slightly dry on top but still a little jiggly in the center if you nudge the mug.
- Rest: Let the mug sit for 1–2 minutes after microwaving. The cookie continues to set and the chocolate firms up slightly. Do not skip this — or you’ll burn your mouth and get a broken cookie.
- Finish and serve: Sprinkle a small pinch of flaky sea salt on top. Add a dollop of yogurt or ice cream if you’re feeling extra. Eat directly from the mug with a spoon. No plates. No apologies.
How I Meal Prep These for the Week (Seriously)
When I know the week’s going to be a long one, I pre-portion the dry mix into little jars or snack bags: flour, baking powder, salt, and chocolate. Then I write on the outside: “Add 2T butter, 3T sugar, 1 yolk, ¼t vanilla.” The kids can measure the wet ingredients and stir. It’s become a Friday night ritual. I make a batch of four dry mixes on Sunday, and we’re set until Wednesday.
- Fridge: Not recommended — the egg yolk needs to be fresh. But you can store a leftover cookie (if that happens) in a covered mug in the fridge for up to 1 day. Reheat 15 seconds in the microwave.
- Freezer: I don’t freeze baked mug cookies — the texture goes weird. But you can freeze the dry mix (without butter and egg) for up to 3 months. Just thaw to room temp before using.
- Reheat: Best in the microwave at 50% power for 20 seconds. The microwave on high will make it rubbery – trust me, I’ve had to throw away a few.
Things I Wish I’d Known the First Time I Made This
- Use a big enough mug: I once used a small espresso cup because I thought it would be “cute.” The cookie overflowed, made a huge mess, and I was left with half a serving. Minimum 12 oz. I use a 14 oz diner mug now. No regrets.
- Don’t overmix: When you add the flour, stop as soon as it’s incorporated. I used to stir until it looked “smooth.” That made it dense. A few streaks of flour are fine — they cook out.
- Let it rest after microwaving: I know you’re hungry. I am too. But if you dig in right away, the structure is too fragile and the cookie falls apart in the mug. One minute rest. It’s worth the wait.
- Salt is not optional: A tiny pinch of flaky salt on top doesn’t make it salty — it makes the chocolate taste more like chocolate. My husband thought I was being pretentious until he tried it both ways. Now he adds the salt himself.
Swaps That Actually Work (When You’re Out of Something)
- Gluten-free: Use 2 tablespoons + 1 teaspoon almond flour instead of all-purpose. The texture is a little more delicate but still delicious. This is the version I make for my SIL who has celiac — she loves it.
- Vegan: Replace the butter with vegan butter (melted), and the egg yolk with 1 tablespoon of unsweetened applesauce + ¼ teaspoon baking powder added to the dry mix. It’s a bit cakier, but honestly still good. My vegan friend approved.
- Kid-friendly (lower sugar): Use 2 tablespoons of your favorite granulated sweetener (like monk fruit blend) instead of white sugar, and reduce brown sugar to 1 teaspoon. Add an extra ½ tablespoon of applesauce for moisture. My kids don’t notice the difference when the chocolate is good.
- Spicy adult version: Add a pinch of cayenne or cinnamon to the dry mix, and use dark chocolate chips with a splash of bourbon vanilla. This is what I do after the kids go to bed.
- Make it a special occasion: Swap chocolate chips for chopped caramel-filled chocolate squares or add a tablespoon of peanut butter in the middle. It becomes a mug cookie with a molten center.
Questions I Get About This Mug Cookie All the Time
Q: Why did my cookie turn out dry and rubbery?
A: Ugh, I’ve been there. Ninety percent of the time it’s because you cooked it too long or used too much flour. Next time, lower the microwave time to 45 seconds and check it. Also, make sure you’re not overmixing after adding the flour — stir just until you can’t see dry bits. And if your mug is too big, the batter spreads thin and cooks unevenly. Stick to 12–14 oz.
Q: Can I make this without an egg yolk? I don’t have any eggs.
A: You can use 1 tablespoon of unsweetened applesauce or 1 tablespoon of flax meal + 3 tablespoons water (let sit for 5 minutes). The texture will be a bit more muffin-like but still tasty. I’ve done the applesauce version when I didn’t feel like buying eggs. It works, but it’s not quite as rich.
Q: How long does the baked mug cookie keep? Can I make it ahead?
A: It’s best eaten within 5 minutes of resting — seriously, it’s a single-serving treat, not a batch bake. If you have leftover cookie (my kids have never left any), you can cover the mug with plastic wrap and refrigerate for up to a day. Reheat at 50% power for 20 seconds. But the texture won’t be as good. The dry mix prepped ahead is the better make-ahead move.
Q: What do you serve with this mug cookie?
A: A cold glass of milk, obviously. But for a slightly fancy version, add a scoop of vanilla ice cream and a drizzle of caramel sauce. My kids request it with a few fresh berries on the side — it feels like a real dessert. For a grown-up twist, pour a splash of bourbon over the top before serving (after the microwave, obviously).
More Recipes My Family Makes on Repeat
If you loved how easy and satisfying this mug cookie is, you’ll probably also like these other quick-fix favorites from my kitchen:
- [INTERNAL LINK PLACEHOLDER: 3-Ingredient Peanut Butter Cookies] — One bowl, no mixer, done in 15 minutes. My kids make these themselves.
- [INTERNAL LINK PLACEHOLDER: No-Churn Vanilla Ice Cream] — The perfect companion for this mug cookie, no machine required.
- [INTERNAL LINK PLACEHOLDER: 5-Minute Microwave Fudge] — Another 90-second dessert for when you need chocolate now.
So yes, a microwave mug cookie can look intentional — a soft, puffed top with a few chocolate chips peeking through, a tiny sprinkle of flaky sea salt catching the light, and a single mint leaf perched on the side. It’s not a fancy dinner party dessert. But on a Tuesday night when you need something warm and sweet, it’s exactly right. And that’s worth saving.
If you try it, drop a comment below — I love hearing how it goes for you! Or tag me on Pinterest so I can see your mug’s transformation.
📌 This microwave mug cookie recipe is gooey, buttery, and ready in 8 minutes — save it for your next late-night craving or after-school treat.
Microwave Mug Cookie That’s Actually Good — 90 Seconds to a Warm, Gooey Single Serving
Equipment
- Microwave
- Microwave-safe mug (12-14 oz)
- Fork or small whisk
- Measuring spoons
Ingredients
Wet Ingredients
- 2 tablespoons unsalted butter, melted
- 2 tablespoons granulated sugar
- 1 tablespoon packed brown sugar
- 1 large egg yolk
- 1/4 teaspoon vanilla extract
Dry Ingredients
- 3 tablespoons all-purpose flour
- 1/8 teaspoon baking powder
- 1 pinch flaky sea salt
Add-ins
- 3 tablespoons chocolate chips or chopped chocolate
Instructions
- Melt the butter: Put the butter in your mug and microwave on high for about 20 seconds until melted. Swirl to coat the bottom and up the sides a little.
- Stir in the sugars: Add both sugars to the melted butter and stir with a fork until combined and it forms a thick paste. Press out any lumps.
- Add egg yolk and vanilla: Drop in the yolk and vanilla. Stir vigorously until smooth and slightly lighter in color, about 30 seconds.
- Add flour, baking powder, and a pinch of salt: Sprinkle dry ingredients over the mixture. Stir gently until just combined — maybe 15 seconds. A streak of flour is fine.
- Fold in chocolate chips: Add chocolate chips and fold a few times. Press a few extra chips onto the top for looks.
- Microwave: Place mug on a microwave-safe plate. Cook on high for 45 seconds for gooey, 60-75 seconds for firmer. Start with 45 and add 10-second bursts until puffed and slightly dry on top but jiggly in center.
- Rest: Let the mug sit for 1–2 minutes after microwaving. The cookie continues to set and the chocolate firms up slightly. Do not skip.
- Finish and serve: Sprinkle flaky sea salt on top. Add yogurt or ice cream if desired. Eat directly from the mug with a spoon.
Notes
Related Recipes:
 Twice Baked Breakfast Potatoes for a Lazy Sunday: The Only Brunch Dish You Actually Want to Make
 The Starbucks Pink Drink Recipe with the Perfect Coconut Milk Float
 Starbucks Vanilla Bean Copycat Recipe That Costs a Fraction of the Drive-Thru — and Tastes Better
 The Crispiest Breakfast Egg Sandwich You’ll Make at Home (No Soggy Bread)
 Caramel Ribbon Crunch Bars That Look Like a Bakery Item (But You Made in 35 Minutes)
 Frozen Whipped Coffee That’s Creamy, Dreamy, and Ready Whenever You Are