
The sound is the first thing you notice. That crackle when the beef hits the hot pan and starts to sear — not steam, not gray, but actually brown. By the time you’ve finished the sauce, the kitchen smells like the best takeout you’ve ever canceled on. This bowl is what I make on Tuesday nights when I want something that feels like a proper dinner, takes under half an hour, and leaves me with leftovers I actually look forward to.
The short version: Ground beef gets properly crispy — not steamed — then gets tossed in a sticky, salty-sweet honey garlic sauce that coats every single piece.
I’ve made this roughly thirty times since I figured out the cornstarch trick, and my friends have started asking for “the crispy beef bowl” by name when they come over.
- Serves: 4 as a main
- Hands-On Time: 15 min | Total Time: 25 min
- Difficulty: Easy enough for a Tuesday, impressive enough to take a photo of
- Cost per serving: ~$3.50
- Calories: ~520 per serving
- Dietary Notes: Naturally dairy-free. Gluten-free if you swap the soy sauce for tamari.
(Photo above: overhead shot of the finished bowl on a dark slate plate — jasmine rice on the bottom, crispy beef piled in the center, a drizzle of the thick honey garlic sauce catching the light, scattered sliced scallions and sesame seeds, bright green steamed broccoli on the side. The bowl looks like a restaurant kitchen sent it out.)
The Trick That Makes the Beef Actually Crispy (Not Steamed)
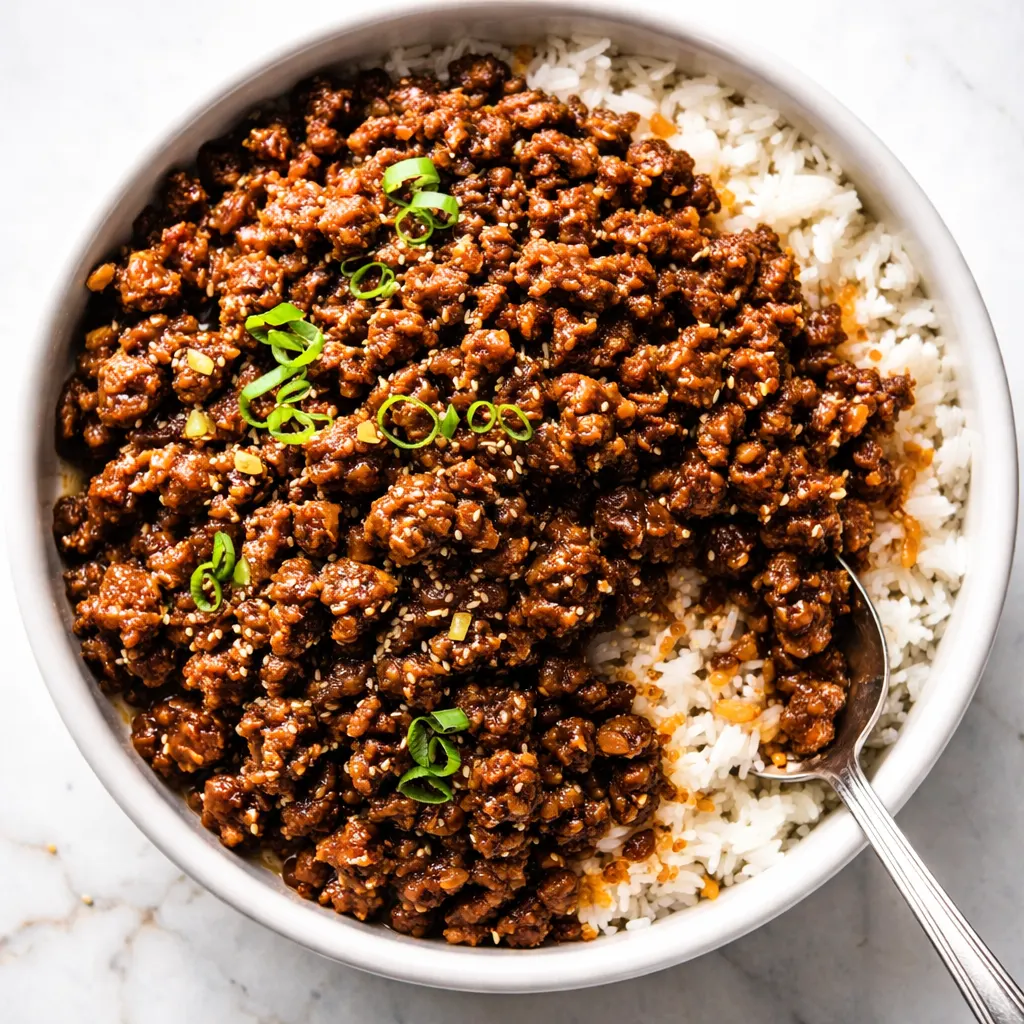
Most versions of this recipe produce gray, sad ground beef swimming in sauce. That’s because the beef releases moisture as it cooks — and if you crowd the pan, it steams instead of sears. The fix is two things: I use a thin layer of cornstarch to help the surface dry out faster, and I spread the beef into a single, thin layer and do not touch it for a full four minutes. Let it develop a crust. Break it up after the crust is formed, not before.
I learned this after a truly depressing batch where I ended up with sweet gray meat and a sauce that tasted fine but looked like regret in a bowl. Now the beef comes out with these little crispy, craggy edges that actually hold onto the honey garlic glaze. If you’ve ever had the experience of eating takeout and wondering why yours doesn’t taste as good — this is the step. It’s not a secret. It’s just patience.
The result is a bowl that has texture in every direction: crispy beef, soft rice, something green, and a sauce that hits sweet, salty, and garlicky all at once.
Ingredients Worth Talking About
- 1 lb ground beef (80/20 preferred): You need some fat here — it’s what makes the beef crisp instead of dry out. I’ve tried leaner blends and the texture is not the same. If you can only find 93/7, add a teaspoon of oil to the pan before you start.
- 1 tbsp cornstarch: This is the texture secret. It helps the surface of the beef dry out so it actually crisps. My friend who cooks everything by feel was skeptical until I made her test it side-by-side. She’s a believer now.
- ¼ cup honey: Use a runny honey, not crystallized — it makes the sauce silkier. Local honey if you have it, the flavor is actually noticeable here.
- 3 cloves garlic, finely minced: Not pressed through a garlic press if you can help it. The uneven small pieces from a knife hold up better in the sauce. In a hurry? I’ve used the jarred stuff, but fresh makes a real difference.
- 2 tbsp soy sauce: Low-sodium, because the sauce reduces and regular soy sauce gets dangerously salty. Tamari works perfectly for gluten-free.
- 1 tbsp rice vinegar: The acid that keeps the sweetness from being cloying. Don’t skip this — it’s not optional.
- ½ tsp grated fresh ginger: One small piece, microplaned. Dried ginger is not a substitute here. It’s a completely different thing.
- 2 cups cooked jasmine rice: Day-old rice is best — it’s slightly drier and holds up better under the beef. If using fresh rice, spread it on a plate to cool for 10 minutes so it stops steaming.
- Optional but recommended: 1 tsp sesame oil — finish the sauce with it on the stove. It adds that takeout aroma that makes everyone look up from their phone.
- Garnish: sliced scallions, toasted sesame seeds, a drizzle of sriracha or chili crisp — all three if you have them, but even just the scallions and sesame seeds make it look styled.
What to Pull Out Before You Start
- A large nonstick skillet or well-seasoned cast iron pan — 12-inch is ideal for getting the beef in a thin layer
- A small bowl for the sauce
- A microplane or fine grater for the ginger and garlic
- A spatula that can scrape up the crispy bits without shredding the pan coating
A wok works beautifully here too if you have one — the high sides make it easier to toss the beef in the sauce at the end.
Let’s Make It (Step by Step)
This goes fast once you start, so have everything prepped before you turn on the heat. The sauce takes 30 seconds to mix. The beef takes one technique you’ll use forever once you see it work.
Start the rice: If you don’t have leftover rice, start a pot now — or cheat with the microwave rice packets and fluff them into a bowl. I’ve done both, no shame in either.
- Mix the sauce: In a small bowl, combine ¼ cup honey, 2 tbsp low-sodium soy sauce, 1 tbsp rice vinegar, the minced garlic, and the grated ginger. Stir until the honey dissolves. Set it next to the stove. (📸 Photo tip: You should see a smooth, amber-colored liquid with small flecks of garlic and ginger suspended in it — not separated or clumpy.)
- Prep the beef: In a medium bowl, toss the ground beef with 1 tbsp cornstarch and a pinch of salt until evenly coated. Don’t overwork it — just a gentle toss until the cornstarch disappears into the meat. This step takes 20 seconds, do not skip it.
- Get the pan hot: Heat your skillet over medium-high heat until a drop of water sizzles immediately. Add the beef and immediately press it into a single, even layer across the entire pan. Resist every urge to stir. I mean it.
- Don’t touch it for 4 minutes: Let the beef cook undisturbed for exactly 4 minutes. You’ll see the edges start to brown and the fat render out. This is where the crust forms. (📸 Photo tip: The bottom of the beef should be deep golden brown with crispy edges when you finally lift a corner to peek — not pale or gray.)
- Break and crisp: Break the beef into small pieces with your spatula. Let it cook for another 2–3 minutes, stirring occasionally, until the pieces are browned and some have those small crispy bits. If you hear a sizzle, you’re doing it right. If you don’t, your pan wasn’t hot enough.
- Add the sauce: Pour the sauce into the pan and stir to coat all the beef. Let it bubble and reduce for 1–2 minutes, stirring constantly, until it thickens and clings to the beef. The second it starts looking sticky and glossy, take it off the heat.
- Finish with sesame oil: Remove from heat and stir in 1 tsp sesame oil if using. This is the smell that makes people walk into the kitchen and say “oh, what are you making?” before they’ve even seen the stove.
- Assemble the bowls: Divide the rice among 4 bowls. Top with the crispy beef and any accumulated sauce from the pan. Add your steamed broccoli, a shower of sliced scallions, a sprinkle of sesame seeds, and whatever heat level you want.
How I Meal Prep These for the Week
This is my go-to Sunday prep when I know I have three nights where I’ll walk in the door hungry and want something that feels like effort without actually requiring effort. I make the full batch of rice and beef, then I’m two minutes from dinner for the next few days.
- Fridge: Store the beef, rice, and any vegetables in separate containers. The beef keeps for up to 4 days. I reheat it in a hot skillet with a splash of water to loosen the sauce — it stays crispy-ish this way.
- Freezer: Yes, the beef freezes great for up to 2 months. Thaw overnight in the fridge and reheat in a pan over medium heat. I portion the rice separately — it freezes well too, just microwave it straight from frozen.
- Reheat: The microwave works if you’re in a rush but it does soften the crispy edges. For the texture to come back, use a skillet over medium-high heat with a tiny splash of water. 90 seconds and it’s back to almost-new.
Things I Wish I’d Known the First Time
- The pan has to be hot before the beef goes in: I know, every recipe says this. But if the pan is even a little below medium-high, the beef will release its liquid before it can sear and you’ll be stirring gray meat in a puddle. I got impatient one time and paid for it in texture. Give the pan the full 2 minutes to heat up.
- The cornstarch matters more than you think: I tried making this without it to test the difference. The beef was still fine — but fine is not what we’re here for. The cornstarch creates that dry surface that turns into the crust. Even a tablespoon changes the outcome entirely.
- Don’t oversauce the rice: The beef has plenty of sauce. If you pour all of the pan’s liquid over the rice, the rice gets soggy and the bowl loses its structure. Spoon the beef on top with a slotted spoon (if you’re being fastidious) or just tilt the pan so the sauce pools back into the beef area as you scoop. I’m not a monster — I let some sauce drizzle down onto the rice, just not a pool of it.
- The rice matters less than you’d think: I’ve made this with jasmine, basmati, brown rice, leftover Chinese takeout rice, and even quinoa one time when I was out. The beef and sauce are the stars. The rice is the stage. Use whatever you have.
Swaps That Actually Work
- Ground turkey: Works, but add 1 tsp of oil to the pan and don’t expect quite the same level of crispness. Still delicious — I make this version for a friend who doesn’t eat beef and she asks for the recipe every single time.
- Vegetarian version: Use crumbled firm tofu or a plant-based ground. Tofu needs extra cornstarch (about 1½ tbsp) and a longer cook time to get crispy. I’ve done it for my vegetarian friends and it’s a different thing, but a good different thing.
- Spicy version: Add 1 tbsp sambal oelek or gochujang to the sauce before pouring it in. Or just drizzle sriracha on top at the end — that’s what I do when I want the heat to hit in layers rather than blends.
- Veggie-loaded version: Add a cup of finely chopped mushrooms to the beef as it crisps, and serve with a side of steamed broccoli or snap peas. I do this when I want the bowl to feel like a full meal without serving anything extra.
- Lower-sugar version: Reduce honey to 2 tbsp and add 2 tbsp of a sugar-free sweetener (I use allulose) or just accept that it’s a slightly less sticky version. It’s still good, just less glossy.
Questions I Get About This Recipe All the Time
Q: Why did my beef turn out gray and not crispy?
A: I’ve been there — it’s the most common miss. Two things to check: your pan wasn’t hot enough when the beef went in, or you moved the beef around too early. Let it sit undisturbed for the full 4 minutes. The crust comes from contact, not stirring. If the pan was hot and you still got gray, your cornstarch might have clumped — make sure it’s evenly distributed before the beef hits the pan.
Q: Can I make this gluten-free?
A: Yes, easily. Swap the soy sauce for tamari or coconut aminos. Everything else is naturally gluten-free. I’ve made it with tamari at least ten times and the flavor difference is negligible — if anything, tamari is slightly smoother. My gluten-free friends love this one.
Q: How long does the beef last? Can I freeze it?
A: The beef keeps in the fridge for 4 days in an airtight container. Freeze it for up to 2 months — I portion it into single servings in freezer bags so I can grab one for lunch. To reheat, thaw overnight in the fridge, then crisp it back up in a hot skillet with a splash of water. The microwave makes it soft, which is fine for a desperate lunch, but the skillet brings back the texture.
Q: What do you serve with this bowl?
A: My go-to is a simple side of steamed broccoli or snap peas with a squeeze of lime. If I’m being extra, I’ll make a quick cucumber salad with rice vinegar, sesame oil, and chili flakes. My friends who’ve had this always ask for the cucumber version — it cuts the richness perfectly. For a weekend version, I add a fried egg on top with a runny yolk. The yolk + the honey garlic sauce + the crispy beef is genuinely one of my favorite combinations of all time.
More Recipes My Friends Keep Asking For
If this bowl is your thing, here are a few others that get the same reaction at my table:
- [INTERNAL LINK PLACEHOLDER: Gochujang Glazed Meatballs with Sticky Rice] — The same sweet-spicy-salty energy, but in hand-rollable form. Great for a dinner where everyone’s standing around the kitchen.
- [INTERNAL LINK PLACEHOLDER: 15-Minute Sesame Garlic Noodles with Crispy Tofu] — For nights when you want noodles instead of rice and the same kind of glossy, sticky sauce situation.
- [INTERNAL LINK PLACEHOLDER: Sheet Pan Salmon with Soy Ginger Glaze] — Less than 10 minutes of hands-on time and the same flavor family. My weeknight salmon rotation.
This bowl is exactly what it looks like: fast, satisfying, and finished in the time it takes to watch one episode of something you’ve already seen. I make it on the nights when I want to eat something that feels like I cared — without actually spending the whole evening in the kitchen.
If you make it, tag me on Instagram so I can see your crispy edges. I love seeing the variations you come up with.
📌 Save this crispy honey garlic ground beef rice bowl for your next meal prep Sunday — it takes 25 minutes, stays good for days, and finally solves the “how do I get ground beef to actually crisp up” question.
Crispy Honey Garlic Ground Beef Rice Bowl
Equipment
- Large Nonstick Skillet or Cast Iron Pan
- Small Bowl
- Microplane or Fine Grater
- Spatula
Ingredients
Beef
- 1 lb ground beef (80/20)
- 1 tbsp cornstarch
- 1 pinch salt
Sauce
- 1/4 cup honey
- 3 cloves garlic, minced
- 2 tbsp low-sodium soy sauce
- 1 tbsp rice vinegar
- 1/2 tsp fresh ginger, grated
For Serving
- 2 cups cooked jasmine rice
- 1 tsp sesame oil (optional)
- sliced scallions, for garnish
- toasted sesame seeds, for garnish
- sriracha or chili crisp (optional)
Instructions
- Start the rice: If you don’t have leftover rice, start a pot now or use microwave rice packets. Fluff into a bowl and set aside.
- Mix the sauce: In a small bowl, combine 1/4 cup honey, 2 tbsp low-sodium soy sauce, 1 tbsp rice vinegar, the minced garlic, and the grated ginger. Stir until the honey dissolves. Set it next to the stove.
- Prep the beef: In a medium bowl, toss the ground beef with 1 tbsp cornstarch and a pinch of salt until evenly coated. Don’t overwork it — just a gentle toss until the cornstarch disappears into the meat.
- Get the pan hot: Heat your skillet over medium-high heat until a drop of water sizzles immediately. Add the beef and immediately press it into a single, even layer across the entire pan. Resist every urge to stir.
- Don’t touch it for 4 minutes: Let the beef cook undisturbed for exactly 4 minutes. You’ll see the edges start to brown and the fat render out. This is where the crust forms.
- Break and crisp: Break the beef into small pieces with your spatula. Let it cook for another 2–3 minutes, stirring occasionally, until the pieces are browned and have crispy bits.
- Add the sauce: Pour the sauce into the pan and stir to coat all the beef. Let it bubble and reduce for 1–2 minutes, stirring constantly, until it thickens and clings to the beef.
- Finish with sesame oil: Remove from heat and stir in 1 tsp sesame oil if using.
- Assemble the bowls: Divide the rice among 4 bowls. Top with the crispy beef and any accumulated sauce. Add steamed broccoli, sliced scallions, sesame seeds, and your choice of heat.
Notes
Related Recipes:
 Cheesy Hamburger Casserole Bake That’s Ready in 40 Minutes (No Canned Soup Here)
 Creamy Garlic Tagliatelle That Looks Like a Restaurant Dish in 20 Minutes
 Texas Roadhouse Style Baked Salmon with Sweet and Savory Glaze — Ready in Under 30 Minutes
 Easy Italian Meatloaf That’s Actually Juicy (Not Dry) — in 1 Hour
 The Biscuits and Gravy Casserole That’s Actually Crispy on Top (And Ready in 40 Minutes)
 Creamy Rotel Pasta with Ground Beef That’s Ready in 30 Minutes (No Cans of Soup!)