
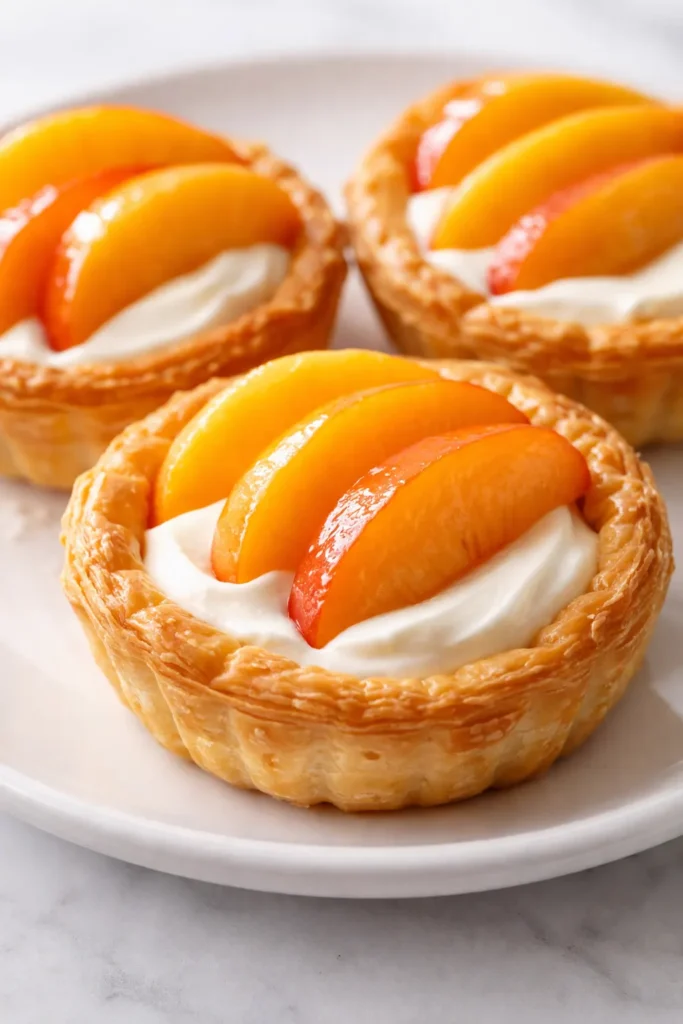
The first bite of one of these mini tarts — cool, creamy, tangy filling against a sweet juicy peach and a buttery crisp shell — is the kind of thing that makes people assume you spent all afternoon in the kitchen. You didn’t. Twenty minutes of hands-on work, a handful of ingredients, and one smart shortcut get you a dessert that looks like it came from a bakery case. I’ve been making these every summer since I discovered the trick of using store-bought puff pastry shells as the base, and they’ve become my go-to for every barbecue, potluck, and dinner party where I want to look like I actually planned ahead.
The short version: These come together in 20 minutes of active time and cost about $1.50 per tart. No oven required beyond toasting the shells — and people will ask for the recipe every single time.
The summer I first made these, my friend Kate texted me at 10pm asking if I had any leftover. I didn’t. I’ve since learned to make a double batch.
- Serves: 12 as dessert
- Hands-On Time: 20 min | Total Time: 45 min (includes baking shells and chilling)
- Difficulty: Easy enough for a weeknight, impressive enough for company
- Cost per serving: ~$1.50
- Calories: ~180 per tart
- Dietary Notes: Naturally vegetarian. Adaptable for gluten-free (see variations).
(Photo above: overhead shot of six mini tarts arranged on a white platter, each topped with a peach slice and a mint leaf, morning light from a window, linen napkin beneath.)
The Thing That Makes These So Impressive (Without Being Fussy)
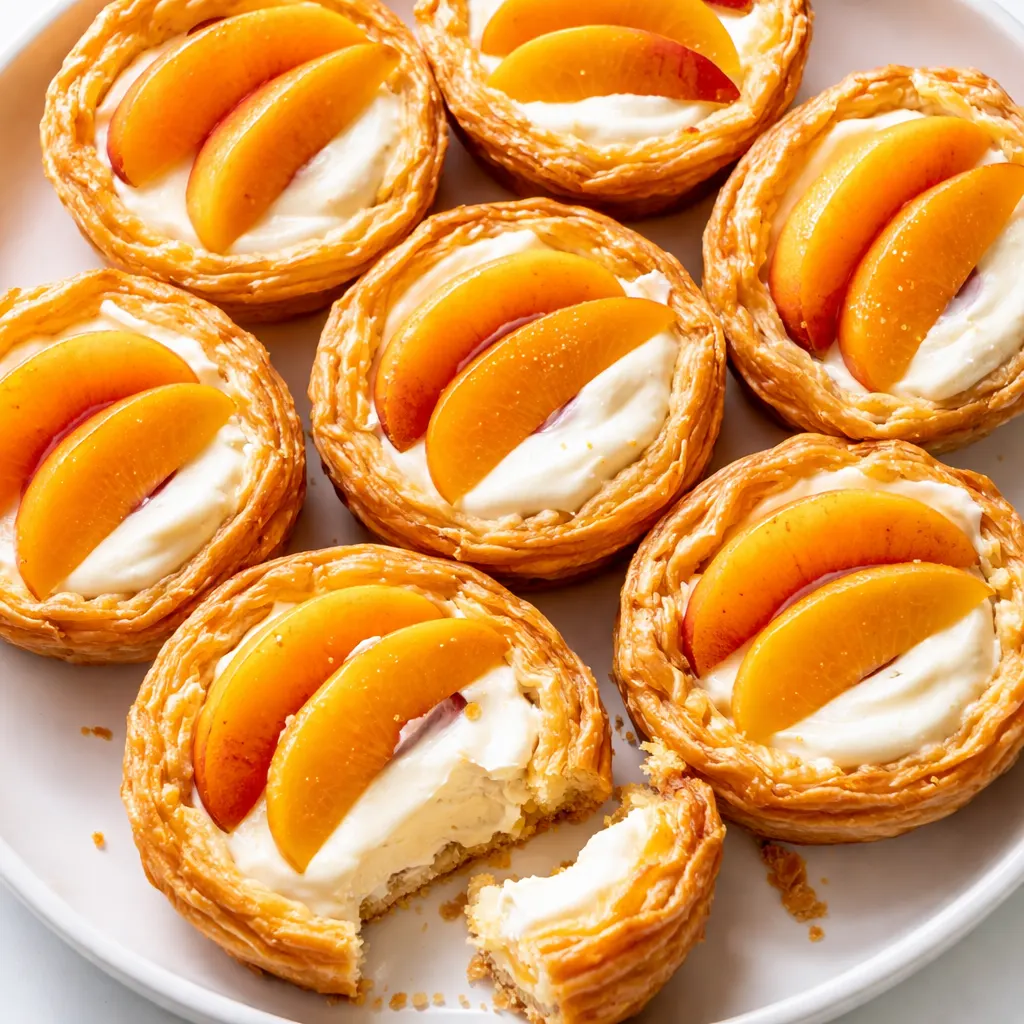
Three small moves create a dessert that looks way more involved than it is. First, the cream cheese filling is stabilized with a little powdered sugar and lemon zest so it holds its shape — no runny mess, even on a hot day. Second, the peaches get a quick maceration in sugar and a splash of bourbon (or vanilla, if you prefer), which draws out their juices and concentrates the flavor. Third, the puff pastry shells are baked until deeply golden and then allowed to cool completely before filling. That last step is the one everyone skips, and it’s the difference between a crisp tart and a soggy one. I learned that the hard way after a batch of watery tarts that looked sad on the plate. Never again.
The result? A creamy, fruity, crunchy bite that tastes like summer but doesn’t require turning on the oven for longer than it takes to toast the shells. You can make the components ahead, then assemble in minutes before people arrive.
Everything You Need (And a Few Notes From Me)
- 1 package frozen puff pastry shells (usually 10–12 per box): These are the star shortcut. Look for the kind that come in a box, not the refrigerator rolls — those are for turnovers, and the shells give you a built-in cup. I buy two boxes so I can snack on the extra baked shells while I work. Don’t judge.
- 8 oz full-fat cream cheese, softened: Full-fat, please. The low-fat version gets grainy and won’t hold its shape when you pipe it into the shells. I made that mistake once. My tart filling turned into a puddle.
- 1/3 cup powdered sugar: It dissolves instantly and keeps the filling smooth. Granulated sugar would leave a grainy texture — not ideal when you want that silky finish.
- 1/2 teaspoon lemon zest + 1 teaspoon lemon juice: The zest adds brightness without extra liquid. The juice helps stabilize the cream cheese. Microplane your lemon over the bowl — the oils from the zest hit the sugar and something magical happens.
- 1/4 cup heavy cream: Just enough to lighten the filling. If you don’t have heavy cream, you can use half-and-half, but the filling won’t be as fluffy.
- 2 large ripe but firm peaches: Ripe enough to be fragrant, firm enough to slice without falling apart. Freestone peaches are easiest because the pit comes out clean. My kids can smell fresh peaches from across the house, so I hide them until tart time.
- 1 tablespoon bourbon OR 1 teaspoon vanilla extract: The bourbon adds a warm depth that nobody can quite place, but they’ll ask what you added. For kids or nondrinkers, use vanilla extract — it still gives that “what’s in this?” effect.
- 1 tablespoon granulated sugar: For macerating the peaches. Just enough to draw out the juices without making them syrupy.
- Fresh mint or basil leaves for garnish: Mint is classic; basil is unexpected and works beautifully with peaches. Place each leaf deliberately, not dropped from a height. We’re not making confetti.
What to Pull Out Before You Start
- Baking sheet (lined with parchment if you want easy cleanup)
- Muffin tin (optional but helps the puff pastry shells hold their shape while baking)
- Mixing bowls (one for filling, one for peaches)
- Electric hand mixer or stand mixer (you can whisk by hand, but it takes patience)
- Sharp paring knife (for slicing peaches evenly)
- Microplane or fine zester
- Piping bag or zip-top bag with the corner snipped (for neat filling — or just use a spoon and a steady hand)
Here’s How I Do It (Step by Step, No Fancy Skills Required)
This goes fast, so read through once before you start. The most hands-off part is baking the shells, and that gives you time to prep the filling and peaches.
Preheat & Prep: Preheat your oven to 400°F. Place the frozen puff pastry shells on a baking sheet (fit a muffin tin upside down and set each shell into the cups to keep them from rising too much — a trick I learned from a pastry chef friend).
- Bake the shells: Bake for 12–15 minutes, until puffed and deep golden brown. The centers should look hollow and the edges should be flaky. (📸 Photo tip: The shells should be a warm, buttery gold with visible flaky layers. If they look pale, they need another 2 minutes.) Let cool completely on a wire rack — at least 10 minutes. If any centers puffed too high, gently press them down with the back of a spoon to make a well.
- Make the cream cheese filling: In a medium bowl, beat the softened cream cheese with powdered sugar, lemon zest, and lemon juice until smooth and creamy, about 1 minute. Add the heavy cream and beat for another 30 seconds until light and fluffy. The mixture should hold a soft peak. (📸 Photo tip: The filling should be smooth, not grainy. A quick taste test — yes, we’re doing that — will tell you if it needs more lemon or sugar. My kids usually demand a spoonful at this point.)
- Macerate the peaches: While the shells cool, slice the peaches into thin wedges about 1/4-inch thick. Toss them in a bowl with the granulated sugar and bourbon (or vanilla). Let sit for 5 minutes — they’ll release some juices that you’ll drizzle over the top later.
- Assemble the tarts: Spoon or pipe the cream cheese filling into the cooled shells, filling each one almost to the top — leave a tiny rim. Arrange 2–3 peach slices on top in a fan or overlapping pattern. Drizzle a little of the macerating juices over the peaches.
- Chill to set: Refrigerate the assembled tarts for at least 30 minutes (up to 4 hours) before serving. This firms the filling so it holds when you pick up a tart. If you’re in a rush, 15 minutes in the freezer works too — just don’t forget about them.
- Garnish and serve: Right before serving, place one mint or basil leaf on each tart. The fresh green against the peachy gold is exactly the kind of deliberate visual that makes people think you styled the plate. Serve cold or at cool room temperature.
How I Meal Prep These for a Stress-Free Summer Gathering
I make the shells and the filling a day ahead, then assemble right before people arrive. The peaches should be sliced and macerated no more than an hour ahead so they stay firm. Here’s the full breakdown:
- Fridge: Assemble up to 4 hours in advance. Keep them on a tray covered loosely with plastic wrap. If you go longer, the shells soften from the moisture in the filling and peaches. I’ve done it — they’re still good, but not as crisp.
- Freezer: Not recommended. The cream cheese filling turns icy when thawed, and the peaches release too much water. Make fresh or eat within a day.
- Reheat: Don’t. These are served cold or at room temperature. If you absolutely must warm them (say, for a peach dessert on a chilly evening), pop a tart in the microwave for 10 seconds, but expect a softer shell.
Things I Wish I’d Known the First Time (After Making These About 30 Times)
- Use the best peaches you can find: This is not the recipe for out-of-season, mealy peaches. They’ll look sad and taste sad. Wait for peak summer fruit, or use a high-quality jarred peach packed in juice (drained well) as a backup.
- Don’t skip the cooling step: I know you’re impatient. I am too. But if you put warm shells under cream cheese, it melts and pools. The texture goes from luscious to runny. Trust me: let them cool completely. Even if you’re starving.
- Pipe the filling neatly: A piping bag (or a zip-top bag with a corner snipped) gives you control and keeps the shells clean. If you spoon it in, be careful not to get filling on the edges of the shell — it’ll brown and get unpleasantly hard. My first batch looked like a toddler decorated them. A piping bag fixed everything.
- Taste your peaches before macerating: If they’re already super sweet, you can reduce the sugar. If they’re tart, add an extra pinch. This is the moment to adjust, not after everything’s assembled.
Swaps That Actually Work (For Every Situation)
- Gluten-free: Instead of puff pastry shells, use mini tart shells made from almond flour (the kind you find at health food stores or make from scratch). I’ve also used store-bought gluten-free phyllo cups — they’re smaller and more delicate, so keep the fruit slices tiny.
- Dairy-free/vegan: I haven’t tested a fully vegan version that I love, but readers have had success using a thick cashew cream base (soaked cashews blended with lemon and maple) and a vegan cream cheese alternative. The texture won’t be as stable, so plan to serve immediately.
- Kid-friendly: Skip the bourbon and use vanilla extract with a pinch of cinnamon. My kids go wild for a version with a tiny sprinkle of cinnamon on top of the peaches.
- Fancy guest version: Add a tiny sprig of thyme alongside the mint leaf. The herbal note complements the peach beautifully and makes the tart look like it came from a fancy patisserie.
- No puff pastry shells? Use mini graham cracker crusts (the pre-made kind for cheesecakes) or make your own using crushed graham crackers and butter baked in a muffin tin. The flavor profile shifts, but it’s still delicious.
Questions I Get About These Tarts All the Time
Q: Why did my cream cheese filling turn out runny?
A: Ugh, I’ve been there. Most likely the cream cheese wasn’t fully softened, or you added too much liquid (heavy cream or lemon juice). Next time: let the cream cheese sit out for 30 minutes before you start, and add the cream a tablespoon at a time. You can always add more, but you can’t take it out.
Q: Can I make these with canned peaches?
A: You can, but I don’t recommend it. Canned peaches are too soft and wet — they’ll make the shells soggy and the filling weepy. If that’s all you have, drain them very well, pat them dry with a paper towel, and skip the maceration step. They’ll taste fine but won’t look as pristine.
Q: How long do these last? Can I freeze them?
A: Best eaten within 6 hours of assembling. After that, the shells start to soften (cream cheese is moist, and the peaches release liquid). Leftovers will keep in the fridge for a day, but expect a softer texture. Freezing is not recommended — the filling gets grainy and the peaches turn to mush when thawed.
Q: What else can I put on top of these besides peaches?
A: So many things! Blueberries, raspberries, sliced nectarines, or crumbled shortbread cookies. In the fall, I swap the peaches for roasted pear slices and add a dash of cardamom. One reader used apricots and said they were her new favorite.
More Recipes My Family Makes on Repeat
If you liked these mini tarts, here are a few others that get the same reaction at our table:
- Peach Burrata Salad with Basil Vinaigrette — The savory counterpoint to the sweet tarts, perfect for a summer starter.
- No-Bake Lemon Cheesecake Bars — Another creamy, no-oven-required dessert that disappears fast.
- Classic Peach Crisp with Oat Topping — The warm, cozy cousin of these tarts. Good for a chilly evening when you want something baked.
I make these peach and cream cheese mini tarts every peach season, and every time someone says “you made these?” with genuine surprise. That never gets old. If you try them, leave a comment below — I love hearing how they turn out for you. And if you snap a photo, tag me on Pinterest so I can see your gorgeous creation.
📌 Peach and cream cheese mini tarts that look bakery-bought but cost pennies — save this no-bake dessert recipe for your next summer barbecue.
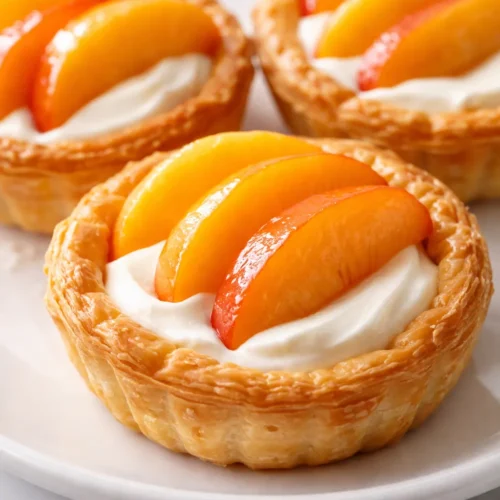
Peach and Cream Cheese Mini Tarts
Equipment
- Baking Sheet
- Muffin tin (optional)
- Mixing bowls
- Electric hand mixer or stand mixer
- Sharp paring knife
- Microplane or fine zester
- Piping bag or zip-top bag with corner snipped
Ingredients
For the Tarts
- 1 package frozen puff pastry shells (10–12), thawed
For the Filling
- 8 oz full-fat cream cheese, softened
- 1/3 cup powdered sugar
- 1/2 teaspoon lemon zest
- 1 teaspoon lemon juice
- 1/4 cup heavy cream
For the Peaches
- 2 large ripe but firm peaches, sliced
- 1 tablespoon bourbon or vanilla extract
- 1 tablespoon granulated sugar
For Garnish
- fresh mint or basil leaves
Instructions
- Preheat oven to 400°F. Place frozen puff pastry shells on a baking sheet (optional: set each shell into upside-down muffin tin cups to prevent excessive puffing).
- Bake shells for 12–15 minutes until puffed and deep golden brown. Let cool completely on a wire rack — at least 10 minutes. If centers rose too much, gently press down with the back of a spoon.
- In a medium bowl, beat softened cream cheese with powdered sugar, lemon zest, and lemon juice until smooth, about 1 minute. Add heavy cream and beat 30 seconds more until light and fluffy (holds a soft peak).
- Slice peaches into 1/4-inch wedges. Toss with granulated sugar and bourbon (or vanilla). Let sit 5 minutes to release juices.
- Spoon or pipe cream cheese filling into cooled shells, filling almost to the top. Arrange 2–3 peach slices on top in a fan. Drizzle a little maceration juice over peaches.
- Refrigerate assembled tarts at least 30 minutes (up to 4 hours) to set the filling. For a quick chill, freeze 15 minutes.
- Just before serving, garnish each tart with a mint or basil leaf placed deliberately. Serve cold or at cool room temperature.
Notes
Related Recipes:
 Twice Baked Breakfast Potatoes for a Lazy Sunday: The Only Brunch Dish You Actually Want to Make
 The Perfectly Pillowy Chocolate Chip Milk Buns (Tangzhong Method)
 Bagel Breakfast Sliders That Taste Like a Diner Breakfast — in 25 Minutes
 Cheesy Hamburger Casserole Bake That’s Ready in 40 Minutes (No Canned Soup Here)
 Lemon Capellini Salad for Late Summer Evenings: Bright, Tangy, Ready in 20 Minutes
 Creamy Garlic Tagliatelle That Looks Like a Restaurant Dish in 20 Minutes