
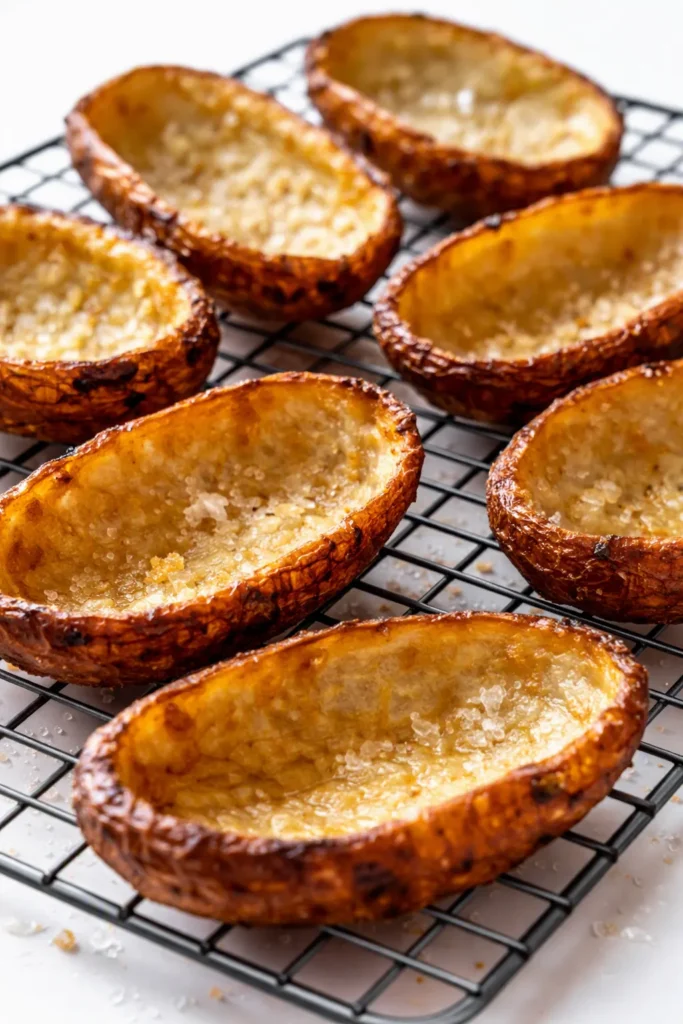
Every baked potato skins recipe I’ve tried has the same problem: they’re excellent for the first five minutes, and then the shells go soft and the whole platter starts to feel like a sad afterthought. This is the baked potato skins recipe that fixes that, permanently. The difference is one extra step — a separate bake on a wire rack — that turns the shells shatter-crisp before anything wet ever touches them.
The short version: Crispy twice-baked shells, melty sharp cheddar, and a garnish situation that looks intentional — in about an hour and fifteen.
I’ve made these at least thirty times. For Super Bowl spreads. For birthday dinners. For a random Tuesday when I needed something on a platter to feel like an occasion. They’re the first thing to disappear every single time, and my friend Rachel has texted me for the recipe twice.
- Serves: 4 as an appetizer (8 potato skin halves)
- Hands-On Time: 25 min | Total Time: 1 hr 15 min
- Difficulty: Easy — the only hard part is waiting
- Cost per serving: about $2.50
- Calories: ~330 per serving (2 skins)
- Dietary Notes: Naturally gluten-free; vegetarian if you skip the bacon
(Photo above: overhead shot of eight golden baked potato skins arranged in a loose fan on a dark wooden board, sour cream dolloped deliberately on each one, finely cut chives scattered in a conscious line down the center, natural window light coming from the left.)
The Extra Ten Minutes That Change Everything
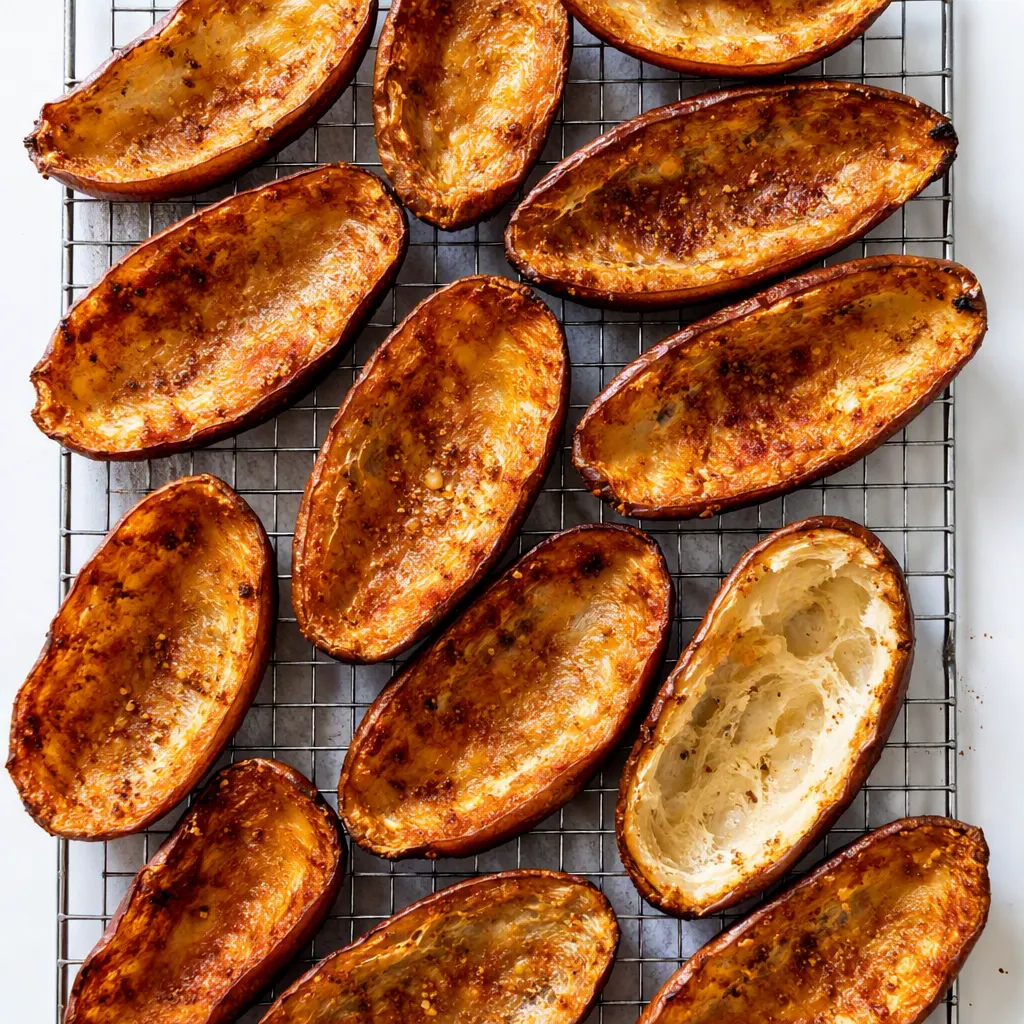
Most potato skin recipes bake the potato, scoop it, fill it with cheese, and call it done. That’s how you get a skin that starts out fine and then quietly turns into a chewy little canoe by the time the dip has been passed twice. The fix is one extra bake: after scooping, brush the shells with a butter mixture and give them ten minutes alone in a hot oven on a wire rack.
The rack is the whole trick. It lets air hit the underside of the shell, so every surface dries out and crisps — not just the top edge. Skip that step and you’re making a baked potato with cheese in it. Do it and you’re making something people pick up with their hands and genuinely crunch into.
The other non-negotiable is the order. Cheese is wet — even dry-looking shredded cheddar starts steaming the second it hits heat. So the shell gets fully crisp before the filling arrives, and then the cheese gets just enough time to melt. The shell stays crisp because it was already finished before the moisture showed up. That’s not complicated. It’s just two steps instead of one.
What this produces is a potato skin that holds its crunch for a solid hour on a table — which, if you’ve ever hosted and watched people politely pick at a sad platter of limp shells, is basically a superpower.
Everything You Need (Plus the Notes I’d Give You in Person)
- 4 large russet potatoes (about 8–10 ounces each): Bigger is better here — you want enough potato wall left after scooping that the shell stands up on its own. Small potatoes turn into limp canoes. I’ve made that mistake so you don’t have to.
- 3 tablespoons unsalted butter, melted: The base of the brushing mixture. I add a tiny pinch of garlic powder — not enough to taste like garlic bread, just enough that someone asks “what is that smell” before they put their coat down.
- ¼ teaspoon garlic powder: Goes into the butter mixture. It’s the background note nobody can name, which is exactly the register you want.
- 1 cup shredded sharp cheddar: Sharp cheddar is non-negotiable. Mild cheddar melts fine and tastes like nothing. Half cheddar, half Gruyère if you want to seem like you thought about it. You did. For approximately four seconds at the grocery store.
- 4 slices bacon: Cooked until crisp and crumbled small — like a seasoning, not a slab. My friend Dana gets the skipped-bacon version with smoked paprika in the butter, and she asks for it by name.
- ½ cup sour cream: For serving. Dollop it on deliberately — placed, not splatted. This is the difference between a platter that looks styled and one that looks like a buffet.
- Fresh chives: About 2 tablespoons, cut on a bias. Straight-cut chives look like someone gave up. The bias cut takes two seconds and changes how the whole plate reads.
- Flaky salt: For the finish. Do not skip this. It’s the difference between a good potato skin and one you’ll be thinking about on Thursday.
- Olive oil: A thin layer for rubbing the raw potatoes before baking.
- Kosher salt and black pepper: For the butter mixture and the shells right after scooping.
What to Pull Out Before You Start
- A rimmed baking sheet — the standard half-sheet pan.
- A wire rack that fits inside it. This is not optional. It’s the entire reason these stay crisp.
- A small bowl for the butter mixture.
- A pastry brush — or a regular spoon if you’re not precious about it.
- A spoon for scooping — a grapefruit spoon with the serrated edge is genuinely perfect for this; a regular tablespoon works fine.
- A chef’s knife and cutting board.
No special equipment beyond the rack. If you don’t have one, rest the shells on the upturned rims of a muffin tin — anything that lifts them off the pan and lets air move underneath.
Let’s Make It — Step by Step
This goes in three phases, and most of the time the oven is working while you stand around looking useful. Read through once before you start — it’ll make the actual cooking feel like a breeze.
- Heat and prep: Preheat the oven to 425°F. Scrub the potatoes well — you’re eating the skin, so it needs to be clean, not just rinsed. Dry them, poke each one a few times with a fork, and rub with a thin layer of olive oil and a pinch of kosher salt. (📸 Photo tip: the potatoes should look glossy and lightly salted on the sheet — that’s the foundation layer of the whole dish.)
- Bake the potatoes: Put them directly on the center rack or on a baking sheet and bake for 50–60 minutes, until a fork slides through the thickest part with zero resistance. If you can’t easily pierce the center, they’re not done. There’s no shortcut here — a par-cooked potato steams instead of crisping later.
- Cool and scoop: Let the potatoes cool for about 5 minutes — enough that you can handle them, but they’re still warm. Cut each in half lengthwise. Scoop out the flesh with your spoon, leaving a ¼-inch wall of potato inside the shell. This is the step that determines everything. A wall about a quarter-inch thick keeps its shape. A sliver of potato folds like a taco. Save the scooped potato for another meal: mashed potatoes tomorrow say hello.
- Brush and season: Mix the melted butter with the garlic powder, a generous pinch of salt, and a few cracks of pepper. Brush the insides of the shells and the edges — the edges especially, since they’re what crisp up and turn golden. Sprinkle a tiny pinch of salt inside each shell while they’re still warm so it actually absorbs. This is where the shell gets its flavor. Do it while they’re warm, not after they’ve cooled.
- First bake — the one that matters: Set the shells cut-side up on the wire rack over the baking sheet. Bake for 10 minutes, until the cut surface looks dry and the tips of the edges are just starting to turn golden. (📸 Photo tip: you’ll see the shells tighten and the edges go from pale to toasted — this is the moment they stop being baked potatoes and become potato skins.)
- Fill: Turn the shells cut-side up and fill each one with a layer of shredded cheddar. Don’t overstuff — one layer of cheese, not a mountain. Too much and it bubbles over the edges, sticks to the rack, and makes a mess of everything. When I’m really tired, this is the step I rush. Don’t. The extra 30 seconds of even spreading is what makes them look like you knew what you were doing.
- Melt: Return to the oven for 6–7 minutes, until the cheese is melted and just starting to bubble. You’re not looking for color — molten is the goal, brown is the warning.
- Finish and serve: Transfer to a serving plate, cut-side up. Sprinkle the crumbled bacon over the cheese, then the chives. Dollop a small spoonful of sour cream right on top of each skin — not a puddle beside it. Finish everything with flaky salt, right at the end. (📸 Photo tip: this is the shot — the sour cream placed, the chives scattered in a deliberate line, the flaky salt catching the light. Take the photo before you put the plate down, because it will not survive contact with guests.)
There’s a window of about 15 minutes where they’re at absolute peak. That’s fine. That’s the point.
How I Make These Ahead (Because Game Day Is Chaos)
You can do the first three phases a day ahead: bake, scoop, brush, and give the empty shells that first 10-minute crisp bake. Keep them uncovered in the fridge on a baking sheet. When your people are about to arrive, fill them, bake, and serve — they go from fridge to finished in under ten minutes, which means you’re not the host standing in the kitchen while everyone else is in the living room.
- Fridge: Prepped and crisped shells keep for up to 2 days, uncovered on a baking sheet, loosely wrapped in plastic if you must. Don’t stack them — the moisture gets trapped and the crispness goes away.
- Freezer: I don’t freeze these. Potato skins get soggy when they thaw, and a soggy potato skin is a sad potato skin. Make them fresh — the whole point is the crunch.
- Reheat: The oven is the only way. 400°F for 6–8 minutes. A microwave makes the shell soft and the cheese rubbery — use it only if you’ve officially given up on having a good time.
Things I Learned the Hard Way So You Don’t Have To
- Don’t over-scoop. The difference between a shell that stands up and one that folds in half is about a quarter-inch of potato. If you’re not sure, leave a little more than you think you need. You can always scoop more; you can’t scoop less once the wall is gone.
- The wire rack isn’t a suggestion. I made a long series of soggy Sunday-afternoon batches before realizing the shells were sitting flat on the baking sheet and steaming from the bottom. The rack changes everything. If you don’t have one, rest the shells on the upturned rims of a muffin tin — anything that lifts them.
- Bacon is a seasoning, not a topping. Crumble it finely — small enough that a forkful of cheese, sour cream, and bacon can all fit in one bite. Nobody wants a big chewy piece of bacon on top. Nobody’s ever complained about getting all three elements in one bite.
- Season the shells while they’re warm. The butter and salt sink into a warm shell. Cold shells just sit there, glossy and underseasoned on the inside. Brush immediately after scooping — all of it — and the flavor becomes part of the shell instead of sitting on top of it.
- Don’t leave the final melt. You’re not broiling a steak. Six minutes, then pull them. Even if you walk away and the cheese bubbles over the edges, it’ll still taste good. I’ve done it. It’s a forgiving recipe in that specific way — the mistakes are edible, they’re just not photogenic.
Swaps That Actually Work
- Meatless version: Skip the bacon and add a pinch of smoked paprika to the butter mixture. The smokiness reads as bacon without the meat. It’s the version I make for my friend Dana, and she always asks if there’s bacon in it. There isn’t. She doesn’t need to know.
- Dairy-free: Use olive oil instead of butter on the shells. Some dairy-free cheddars melt beautifully and some stay stubbornly solid, so choose a brand that melts. Or skip the cheese entirely and fill the hot shells with smashed avocado, lime, and the chives. It’s a different dish and a genuinely good one — I’ve tested it.
- Spicy: Add a pinch of cayenne to the butter mixture and lay a few slices of pickled jalapeño over the cheese before the final bake. Heat that builds instead of announcing itself.
- Sweet potato version: Use orange-flesh sweet potatoes and shorten the first bake to about 40 minutes — they cook faster. Not the same crunch, but a completely different flavor that works surprisingly well with smoked paprika and sour cream.
- Game-day full meal: Serve the skins next to a bowl of chili. They’re technically the appetizer, but nobody at my table has ever treated them as one.
Questions I Get About Potato Skins All the Time
Q: Why are my potato skins soggy?
A: Ugh, I’ve been there. Nine times out of ten, it’s skipping the first crisp bake — the 10 minutes on the wire rack after scooping. That bake dries out the shell so it can hold up against the cheese. The other sneaky culprit is over-scooping: if there’s no potato wall left, there’s nothing to hold structure. Leave a quarter-inch, don’t skip the rack, and you’re golden. You’ve got this next time.
Q: Can I make these dairy-free?
A: Yes. Use olive oil instead of the butter, and pick a dairy-free shredded cheese that actually melts — some of them stay stubbornly solid. Or skip the cheese entirely and fill the hot shells with smashed avocado and a squeeze of lime. It’s a different dish, but it’s a very good one. I’ve tested both versions, so I’m not handing you a theory.
Q: How long do these last? Can I freeze them?
A: They’re best within 15 minutes of coming out of the oven, and that’s the honest answer. For make-ahead: bake, scoop, brush, and crisp the shells up to 2 days in advance, keep them uncovered in the fridge, then fill and finish when you need them. I don’t recommend freezing — potato skins get soggy when they thaw, and reheating doesn’t bring the crunch back.
Q: What do you serve with potato skins?
A: They’re the appetizer, so I pair them with something that doesn’t need oven space while they’re working — a big green salad or a crudité platter. For a full meal, a bowl of chili next to a plate of skins is the single best game-day dinner in existence. My friends would back this claim.
Related Recipes My Friends Always Ask About
If you liked these, here are the other things that get the same reaction at my table:
- [INTERNAL LINK PLACEHOLDER: Crispy Smashed Potatoes with Herbed Sour Cream] — the same golden shell energy, about half the work.
- [INTERNAL LINK PLACEHOLDER: Caramelized Onion Dip Nobody Believes Is Homemade] — the other thing that disappears before halftime.
- [INTERNAL LINK PLACEHOLDER: Sheet Pan Chicken Wings That Get Genuinely Crispy] — proof your oven can do the thing you thought required a fryer.
The Last Word
When you put these on the table, don’t explain the technique. Don’t say “I did a second bake on a wire rack.” Just let someone grab the first one and hear it crunch — that’s the introduction. Everything else takes care of itself.
If you make them, comment below and tell me how long they lasted at your table. I have a theory about how fast they disappear, and it’s never under ten minutes!
📌 Save this baked potato skins recipe for your next game-day spread — they stay crispy for hours, so you can make them ahead and actually be a guest at your own party.
Baked Potato Skins That Don’t Go Soggy
Equipment
- Rimmed baking sheet
- Wire Rack
- Small Bowl
- Pastry brush
- Grapefruit Spoon or Spoon for Scooping
- Chef’s Knife and Cutting Board
Ingredients
Potatoes & Shell
- 4 large russet potatoes, about 8-10 ounces each
- 1 tablespoon olive oil, for rubbing the potatoes
- kosher salt and black pepper, for seasoning
Butter Wash
- 3 tablespoons unsalted butter, melted
- 1/4 teaspoon garlic powder
Filling & Finish
- 1 cup shredded sharp cheddar
- 4 slices bacon, cooked crisp and crumbled small
- 1/2 cup sour cream, for serving
- 2 tablespoons fresh chives, cut on a bias
- to taste flaky salt, for finishing
Instructions
- Preheat the oven to 425°F. Scrub the potatoes well, dry them, poke each one a few times with a fork, and rub with a thin layer of olive oil and a pinch of kosher salt.
- Bake the potatoes for 50-60 minutes, until a fork slides through the thickest part with zero resistance. Let them cool about 5 minutes.
- Cut each potato in half lengthwise. Scoop out the flesh, leaving a 1/4-inch wall of potato inside the shell. Save the scooped potato for another meal.
- Mix the melted butter with the garlic powder, a generous pinch of salt, and a few cracks of pepper. Brush the insides and edges of the shells while they are still warm. Sprinkle a tiny pinch of salt inside each shell.
- Set the shells cut-side up on a wire rack over a rimmed baking sheet. Bake for 10 minutes, until the cut surface looks dry and the edges are just starting to turn golden.
- Fill each shell with one even layer of shredded cheddar. Do not overstuff.
- Return to the oven for 6-7 minutes, until the cheese is melted and just starting to bubble. Transfer to a serving plate.
- Sprinkle the crumbled bacon over the cheese, then the chives. Dollop a small spoonful of sour cream on top of each skin and finish with flaky salt right at the end.
Notes
Related Recipes:
 Cheesy Hamburger Casserole Bake That’s Ready in 40 Minutes (No Canned Soup Here)
 Creamy Garlic Tagliatelle That Looks Like a Restaurant Dish in 20 Minutes
 Texas Roadhouse Style Baked Salmon with Sweet and Savory Glaze — Ready in Under 30 Minutes
 Easy Italian Meatloaf That’s Actually Juicy (Not Dry) — in 1 Hour
 The Biscuits and Gravy Casserole That’s Actually Crispy on Top (And Ready in 40 Minutes)
 Air Fryer Chicken and Vegetables That Don’t Taste Like a Regret (30 Minutes, One Pan)