
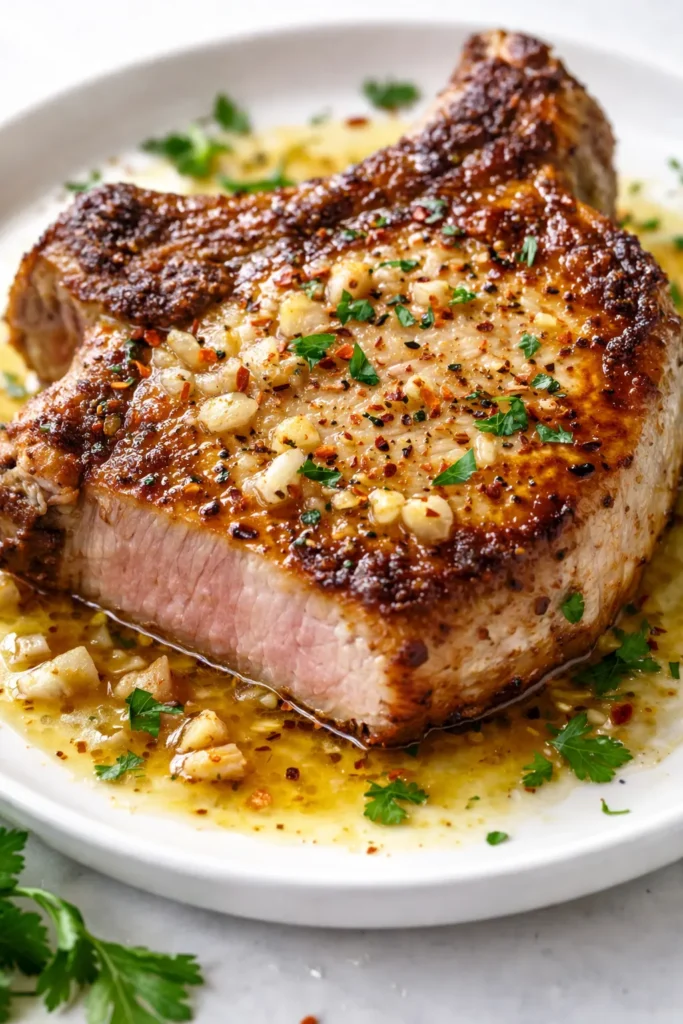
For years, I overcooked pork chops. Dry, sad, “do we have any apple sauce?”-level dry. The problem wasn’t the pork—it was that I was cooking it like chicken breast. Treat a pork chop like a good steak and it changes everything. Golden-brown crust, garlic butter basting, a center that’s actually juicy. This is the method that finally worked for me.
The short version: One hot skillet, four ingredients, twenty minutes. My family stopped asking for the old version.
I tested this method about a dozen times before I stopped second-guessing the internal temperature. The trick? Pulling them at 135°F and letting the carryover heat do the rest. Every single time.
- Serves: 4 as a main
- Hands-On Time: 10 min | Total Time: 20 min
- Difficulty: Easy (but looks like you know what you’re doing)
- Cost per serving: ~$4.50
- Calories: ~420 per serving
- Dietary Notes: Naturally gluten-free, keto-friendly
(Photo above: overhead shot of two bone-in pork chops seared deep golden brown in a cast iron skillet, butter and garlic cloves bubbling around them, a sprig of thyme visible. Warm evening light, dark wood table, fork resting to the side.)
The One Step Everyone Skips (Don’t Skip It)
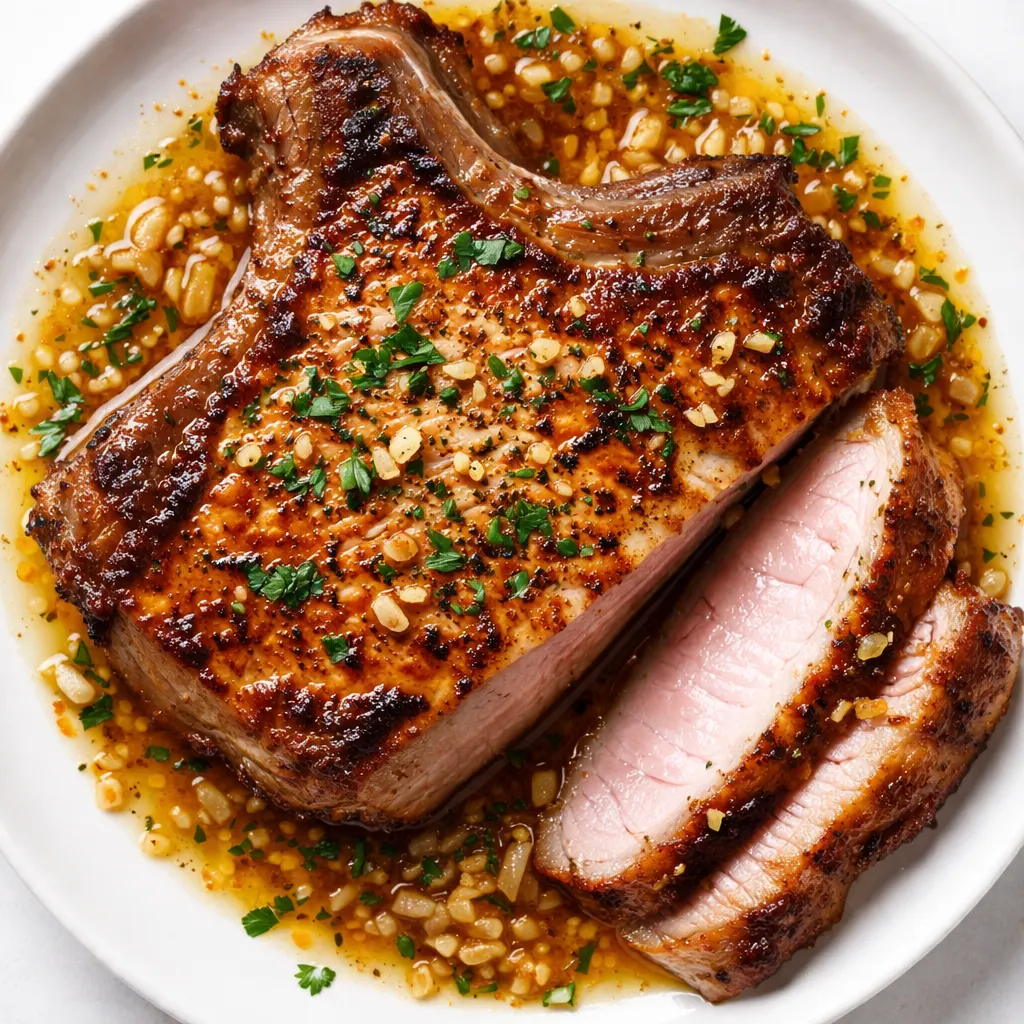
You don’t need a brine or a complicated marinade. What you need is a hot enough pan and an instant-read thermometer. Most people flip the chop too early and cook it over medium heat because they’re scared of burning the butter. The trick is to start with oil for the sear, then drop the heat and add the butter for the baste.
High heat for the crust, low heat for the flavor. The crust stays crisp, the center hits 135°F, and by the time it rests, it’s a perfect 145°F. I learned this after one too many chewy chops that I thought I had to cook until they were shoe leather. Never going back.
What Goes In — Plus My Honest Notes
- 4 bone-in pork chops (1.5 inches thick): Thickness is the whole game here. Thin chops cook through before the crust has a chance to form. Ask your butcher to cut them thick, or buy a rack and cut it yourself.
My kids can smell the difference between a thick chop and a thin one. I’m not joking. - 2 tbsp neutral oil (avocado or grapeseed): Butter burns on its own at the heat we need for the initial sear. The oil takes the heat, the butter adds the flavor later.
Don’t use olive oil here. The smoke point is too low. - 3 tbsp unsalted butter: European-style if you have it. It has a lower water content, which means it browns better and tastes richer.
Salted butter works fine in a pinch—just dial back the finishing salt. - 4 cloves garlic, smashed: Whole cloves, not minced. Mincing releases too many tiny pieces that burn in the hot butter. Smashed whole cloves toast and perfume the butter without turning bitter.
- 3 sprigs fresh thyme or rosemary: Thyme is more subtle and pairs with almost everything. Rosemary is louder, more piney. Both are excellent.
Dried herbs will burn. Fresh is not optional here. - Flaky salt and black pepper: The flaky salt at the end is doing real work—texture and a pop of salinity that makes the butter sing.
I use Maldon. It’s worth the hype.
What to Pull Out Before You Start
- 12-inch cast iron skillet (or a heavy stainless steel pan — just make sure it’s not nonstick, we need real browning)
- Spring-loaded tongs (the delicate salad tongs won’t cut it here)
- Instant-read thermometer (this is the only way to guarantee juicy pork. A meat thermometer is not optional)
Let’s Make It — No Fancy Skills Required
This goes fast, so have your butter and garlic ready before the pan gets hot. Read through once so you know what to expect.
Prep and rest: Take the pork out of the fridge 20 minutes before cooking. Pat dry with paper towels — seriously dry, until the towel comes away clean. Season generously on all sides with salt and pepper. Let it sit at room temperature.
- Get the pan screaming hot: Place your cast iron skillet over medium-high heat for a full 3 minutes. It should be hot enough that a drop of water sizzles and evaporates instantly. Add the oil. It should shimmer and ripple when you swirl the pan.
(📸 Photo tip: The oil should look like it’s flowing like water, not sitting still. If it’s not moving, the pan isn’t hot enough.) - Sear the first side: Lay the chops into the pan, laying them away from you so you don’t splash hot oil. Press down gently with the tongs to ensure full contact. Let them sit completely undisturbed for 3 minutes. A deep golden crust will form. Do not peek. Do not move them.
- Flip and sear again: Flip each chop. It should release easily from the pan. If it sticks, give it 30 more seconds. Cook for 2 minutes on the second side.
- Add the butter, garlic, and herbs: Drop the butter into one side of the pan. Add the smashed garlic and herbs. Tilt the pan slightly so the butter pools on the low side. Once it melts and starts foaming, use a spoon to baste the chops continuously for 1–2 minutes. Spoon the hot butter over the top of each chop.
(📸 Photo tip: The butter should be foamy and light brown, not dark brown. If it turns black, start over—burned butter is bitter.) - Take the temp: Insert the thermometer into the thickest part of the chop, avoiding the bone. You’re looking for 135°F. Pull the pan off the heat immediately. The carryover cooking will bring it to a perfect 145°F as it rests.
- Rest (non-negotiable): Transfer the chops to a cutting board. Spoon the pan butter, garlic, and herbs over the top. Let them rest for 5 full minutes. This step is what keeps the juices inside the meat instead of pooling on your plate.
- Serve: Spoon the garlic and butter from the pan over the top. Finish with another pinch of flaky salt and a few cracks of black pepper.
How I Make These Work for a Busy Week
I don’t cook these fully ahead since they’re so fast, but I prep everything in the morning. I smash the garlic, strip the herb leaves, and season the chops. Leave them covered in the fridge, then take them out 20 minutes before I start cooking. Dinner is on the table before anyone has time to ask what’s for dinner.
- Fridge: Cooked chops keep in an airtight container for up to 3 days. Slice them cold over salads or reheat gently in a covered pan.
- Freezer: Not my favorite for this recipe. The texture changes. But if you must, wrap tightly and freeze for up to 1 month. Thaw in the fridge overnight.
- Reheat: Low and slow in a covered pan with a splash of chicken broth. The microwave will dry them out completely. Don’t do it.
Things I Wish I’d Known the First Time
- Dry the surface like you mean it: Moisture is the enemy of a sear. Pat those chops dry with paper towels until they come away completely dry. If the surface is wet, the meat steams instead of searing. Gray meat instead of golden crust.
- Trust the thermometer — really trust it: “Pork needs to be well-done” is a myth from the 1990s that refuses to die. 145°F is safe, juicy, and slightly pink at the bone. Pull the chops at 135°F and let them rest. I know it’s scary the first time. I promise you it’s fine. My kids eat these without complaint.
- Don’t crowd the pan: If your skillet is small, cook in two batches. If the chops overlap or touch, they steam instead of sear. Steam means no crust. Give them room to breathe.
- Save the brown bits: When you’re basting, use the spoon to scrape up any browned bits stuck to the bottom of the pan. That’s concentrated flavor dissolving into the butter. Don’t leave it behind.
Make It Yours — Easy Swaps That Work
- Dairy-Free: Use ghee instead of butter. Ghee is technically dairy-free and browns beautifully. Or use a high-quality vegan butter.
This is the version I make for my friend who can’t do dairy — she always asks for the leftovers. - Spicy: Add a pinch of red pepper flakes to the butter with the garlic. Or swirl in a teaspoon of chili crisp during the baste for a deeper, umami heat.
- Herb Swap: Tarragon or sage instead of rosemary. Sage and brown butter is a classic combo for a reason. Tarragon has an anise note that’s incredible with pork.
- Company Version: After resting, slice the chop off the bone, fan it out over a smear of the garlic butter, and top with crispy fried shallots. It looks like a restaurant plate and takes about 30 extra seconds.
Questions I Get About This Recipe All the Time
Q: Why didn’t my crust form? It was just pale and sad.
A: Ugh, I’ve been there. The pan wasn’t hot enough, or you flipped it too early. Give it the full 3 minutes on the first side and resist the urge to peek. If it sticks to the pan, it’s not ready to flip. Let it release naturally.
Q: Can I use boneless pork chops?
A: Yes, but they cook faster because there’s no bone to insulate the center. Use 1-inch thick boneless chops and reduce the searing time by about a minute per side. Still pull at 135°F. And yes, they’re still juicy. I’ve tested it.
Q: How long do these keep? Can I freeze them?
A: 3 days in the fridge in an airtight container. I usually slice them cold over salads or reheat gently in a covered pan with a splash of broth. Freezing changes the texture a bit, so I don’t recommend it unless you absolutely have to.
Q: What do you serve with these?
A: A simple arugula salad with lemon and shaved Parmesan, roasted baby potatoes, or crusty bread to soak up the garlic butter. My kids go for buttered egg noodles with peas. We always do a vegetable on the side—broccolini or green beans work perfectly.
More Recipes My Family Makes on Repeat
If you liked these pork chops, here are a few others that get the same reaction at our table:
- Chicken Alfredo Gnocchi — Juicy, crispy, and ready in 30 minutes. The same pan technique but with chicken.
- Cajun Honey Butter Salmon — Rich, garlicky, and fast enough for a weeknight. My kids ask for it every other week.
- Garlic Steak Bites Potatoes — The same basic method, just with beef. Perfect for a Friday night treat.
This is the dinner you make when you want to feel like you actually know what you’re doing in the kitchen. No fancy marinade, no brining, just good technique and a hot pan. Plate it, spoon that brown butter over the top, and watch everyone at the table go quiet.
If you make it, drop a comment below and tell me how it went. I love hearing about the first time someone nails a perfect pork chop.
📌 Juicy garlic butter pork chops recipe that’s ready in 20 minutes — save it for the weeknight dinner that looks like a special occasion.
Garlic Butter Pan Seared Pork Chops That Stay Juicy — in 20 Minutes
Equipment
- 12-inch cast-iron skillet or heavy stainless steel pan
- Spring-loaded tongs
- Instant-Read Thermometer
Ingredients
- 4 bone-in pork chops (1.5 inches thick)
- 2 tbsp neutral oil (avocado or grapeseed)
- 3 tbsp unsalted butter (European-style preferred)
- 4 cloves garlic, smashed
- 3 sprigs fresh thyme or rosemary
- Flaky salt and black pepper
Instructions
- Take the pork out of the fridge 20 minutes before cooking. Pat dry with paper towels until completely dry. Season generously on all sides with salt and pepper. Let sit at room temperature.
- Place a cast iron skillet over medium-high heat for 3 minutes until very hot. Add the oil; it should shimmer and ripple.
- Lay the chops into the pan, laying them away from you. Press down gently with tongs. Cook undisturbed for 3 minutes until a deep golden crust forms.
- Flip the chops and cook for 2 minutes on the second side. They should release easily from the pan.
- Add butter to one side of the pan, then add smashed garlic and herbs. Tilt the pan so the butter pools. Once foaming, continuously baste the chops with the hot butter for 1-2 minutes.
- Insert an instant-read thermometer into the thickest part of a chop (avoiding bone). Pull the pan from heat when it reads 135°F. The carryover cooking will bring it to 145°F.
- Transfer chops to a cutting board, spoon pan butter over them, and let rest for 5 minutes. Serve topped with pan garlic and butter, plus a pinch of flaky salt and cracked pepper.
Notes
Related Recipes:
 Cheesy Hamburger Casserole Bake That’s Ready in 40 Minutes (No Canned Soup Here)
 Lemon Capellini Salad for Late Summer Evenings: Bright, Tangy, Ready in 20 Minutes
 Creamy Garlic Tagliatelle That Looks Like a Restaurant Dish in 20 Minutes
 Cucumber Shrimp Salad That Doesn’t Get Soggy — Finally
 Texas Roadhouse Style Baked Salmon with Sweet and Savory Glaze — Ready in Under 30 Minutes
 Grilled Chicken Wraps That Stay Crispy (Even the Next Day) — in 35 Minutes