
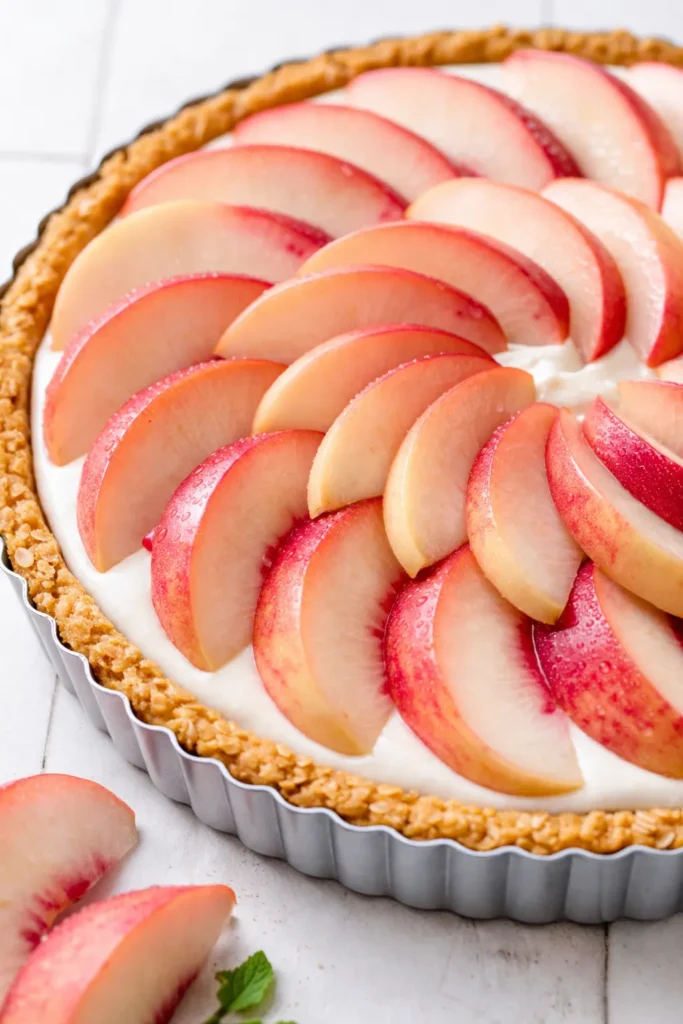
The first slice is always quiet. Not because the room goes silent — because everyone is too busy looking at the cross-section. A butter crust so thin and crisp it shatters under the fork. A mascarpone layer that is barely sweet and pale as fresh cream. And on top, the peaches, arranged in overlapping arcs so precise you almost hate to break them open. Almost. This is the summer dessert that looks like you spent three hours on it. You didn’t. You spent about 25 minutes of active work, and the only special equipment you needed was a tart pan and the patience to let it chill properly.
The short version: A press-in butter crust, a five-minute mascarpone filling, and fresh white peaches arranged like an art project. The trick is the almond flour in the crust — it keeps everything from going soggy while the tart sets in the fridge.
I started making this two summers ago when white peaches were suddenly everywhere at the Union Square Greenmarket and I needed something that traveled well to a friend’s dinner in Fort Greene. It has been in heavy rotation ever since. My picky nine-year-old asked for it three weeks in a row.
- Serves: 8 as a dessert
- Hands-On Time: 25 min | Total Time: 1 hr 30 min (plus 2-4 hrs chilling time)
- Difficulty: Easy — the crust is forgiving and the assembly is just arranging fruit
- Cost per serving: About $3.50
- Calories: ~320 per serving
- Dietary Notes: Vegetarian. Can be made Gluten-Free and Dairy-Free (see variations). Not naturally Nut-Free (contains almond flour).
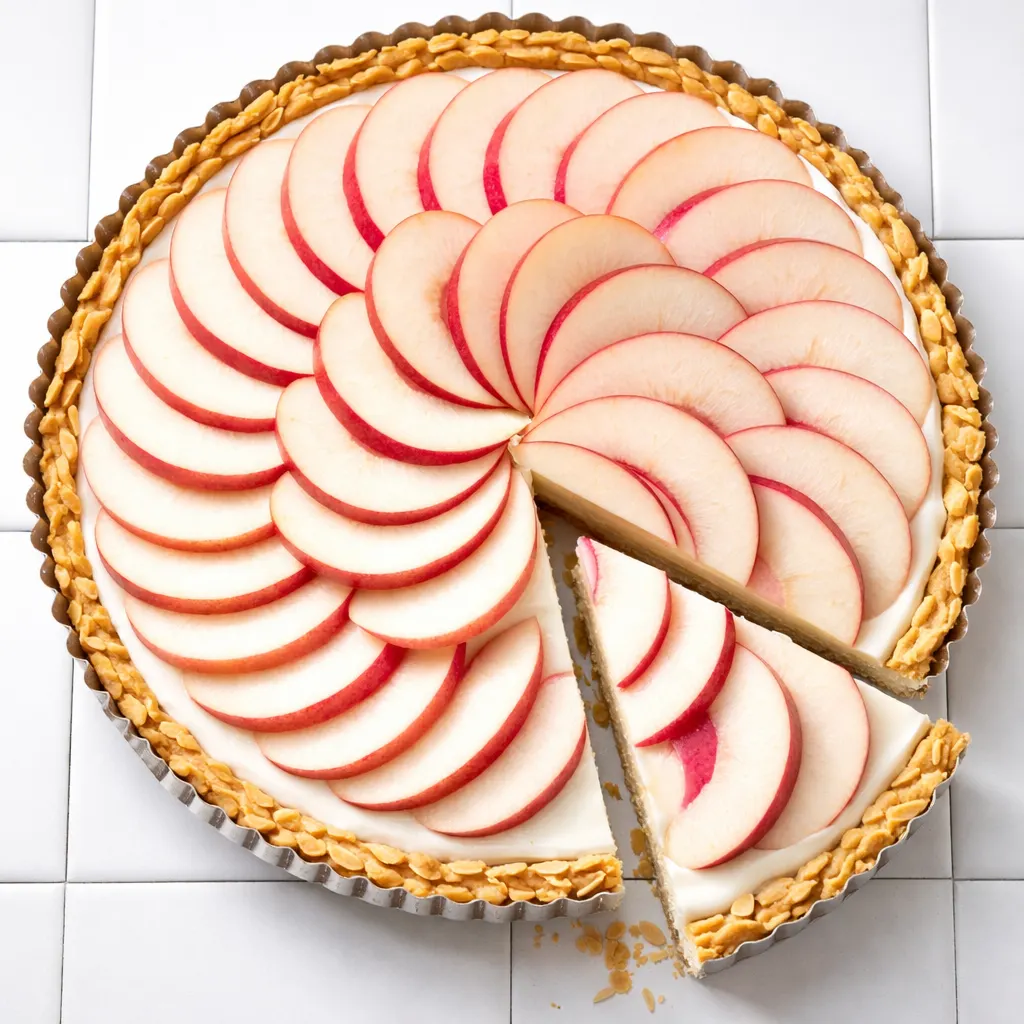
(Photo above: A straight-on, eye-level shot of the finished tart on a simple white ceramic stand, natural window light from the left hitting the glossy peach slices, a few fresh mint leaves scattered on the plate, one slice missing to reveal the clean layers of crust, cream, and fruit.)
The One Step That Keeps This Crust From Getting Soggy
Every no-bake fruit tart I have ever eaten has the same problem: a wet, sad bottom crust. The fruit releases moisture, the cream soaks in, and by the time you serve it, the texture is more “damp sand” than “butter pastry.” This version avoids that entirely for one specific reason — the almond flour.
Almond flour doesn’t absorb liquid the way all-purpose flour does. When you press it into the crust, it creates a barrier that the mascarpone cannot penetrate. The crust stays crisp. The filling stays silky. And the peaches stay exactly where you put them instead of sliding around on a layer of moisture.
I tested this with an all-butter crust the first time. It was delicious but it needed to be eaten within about four hours. This version? You can make it in the morning and serve it after dinner. No texture loss. That is the kind of win I build a whole recipe around.
Ingredients Worth Talking About
- White peaches (3-4, firm-ripe): White peaches are less acidic than yellow, which means they read as sweeter even when they aren’t fully peak season. They also hold their shape better when sliced thin. If you can only find yellow peaches, go for it — just add a teaspoon of honey to the mascarpone to balance the tartness. My kids actually prefer the yellow peach version in early July when the local ones start showing up.
- Mascarpone (8 oz, room temperature): Mascarpone is the structural MVP here. It is thick enough to slice cleanly but soft enough to spread into the crust without tearing it. Let it sit out for 15 minutes before mixing. Cold mascarpone seizes up and you will end up with lumps. I learned this the hard way at 10pm the night before a brunch.
- Almond flour (1/2 cup): This is doing two jobs: it keeps the crust crisp (see above) and it adds a subtle nuttiness that makes the peaches taste more like themselves. Do not use almond meal — it is too coarse and the crust won’t hold together. Bob’s Red Mill is my go-to.
- Butter (1/2 cup, melted and cooled): You want melted butter for a press-in crust, not softened. Melted butter coats the flour more evenly and gives you that shortbread-like crumble. Salted butter is fine here — the salt cuts the sweetness of the peaches and the cream.
- Vanilla bean paste (1 teaspoon): The specks are worth it visually. If you only have extract, it will taste fine but it won’t look as intentional. Up to you.
The Setup
- 9-inch tart pan with a removable bottom (this is non-negotiable — you need the ring to come off for clean slices)
- Food processor (for the crust — a bowl and pastry cutter works too, but the processor is faster and gives you a more even crumb)
- Sharp chef’s knife or mandoline (for slicing the peaches thin and even)
- Offset spatula (not required, but it makes spreading the mascarpone look effortless and that matters to me)
Making the Tart, Start to Finish
This goes faster than you think, so read through once before you start pulling out pans.
Preheat & Prep: Preheat the oven to 350°F. Lightly grease the tart pan with a little butter or spray.
- Make the crust: In a food processor, pulse the all-purpose flour, almond flour, powdered sugar, and salt until combined. Add the melted butter and vanilla. Pulse until the mixture looks like wet sand and holds together when you squeeze it. If it feels too dry to press into the pan, add a tablespoon of cold water. (📸 Photo tip: You should be able to pinch the mixture and have it hold its shape without crumbling.)
- Press the crust: Dump the mixture into the tart pan. Use your fingers or the bottom of a flat measuring cup to press it evenly across the bottom and up the sides. Don’t press too hard — a light, even hand is better. Prick the bottom with a fork a few times. I usually press the bottom first, then do the sides. It is not a science but it helps keep the thickness even.
- Chill and blind bake: Freeze the crust for 15 minutes (this prevents shrinking). Then bake it directly on the middle rack — no pie weights needed for this one — for 18-22 minutes, until the edges are golden and the bottom looks dry and set. Let it cool completely in the pan on a wire rack. Do not skip this. Warm crust plus mascarpone equals melted disaster. (📸 Photo tip: The crust is done when it smells like toasted shortbread and the edges have pulled slightly away from the pan.)
- Make the filling: While the crust cools, whisk the mascarpone, sugar, heavy cream, and vanilla bean paste together in a medium bowl until smooth. It should be thick but spreadable — like a very soft cream cheese. If it is too stiff, whisk in a tablespoon more cream. Taste it. It should be barely sweet, with the richness of the mascarpone leading the flavor.
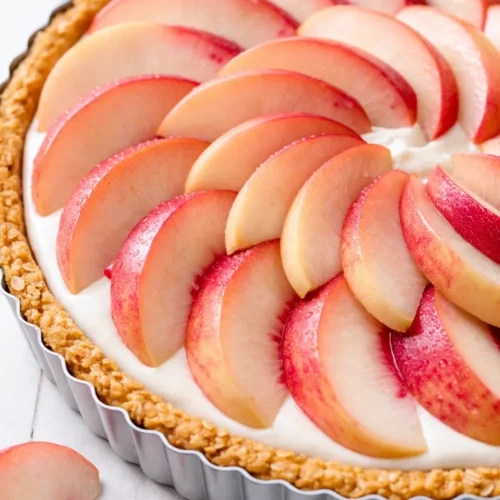
- Assemble: Spread the mascarpone mixture evenly into the cooled crust. Use the offset spatula if you have one — it makes the top look like a pond that hasn’t been disturbed. Slice the peaches thin (about 1/4-inch), and arrange them in overlapping circles starting from the outside edge and working inward. The visual trick: overlap each slice by half so you cannot see the cream underneath. It looks like a flower.
- Chill for texture: Refrigerate the tart for at least 2 hours, ideally 4. This isn’t just for serving temperature — it is for structure. The mascarpone needs to firm up enough that the slices come out clean. If you are in a rush, 45 minutes in the freezer works, but don’t tell anyone I said that.
Make-Ahead Notes (Because Summer Doesn’t Wait)
This is one of the rare desserts that gets better as it sits — up to a point. I make the crust a day ahead sometimes, keep it in the pan at room temperature wrapped in plastic, and do the rest the morning of. It saves the stress of doing everything at once, especially if you are hosting.
- Fridge: The fully assembled tart keeps for up to 2 days in the fridge. Cover it loosely with plastic wrap once the mascarpone is fully set (after about 4 hours). The peaches will start to release moisture after 24 hours, so the crust won’t stay as crisp on day two — still delicious, just less shattery.
- Freezer: I don’t recommend freezing this one. The mascarpone gets grainy when thawed, and the peaches turn into mush.
- Reheat: You don’t. This is a cold tart. Take it out of the fridge about 20 minutes before serving to take the chill off the cream.
Things I Learned After Making This Six Times
- Use firm-ripe peaches, not soft ones: Soft peaches are great for eating over the sink. They are not great for slicing into thin, even arcs. You want peaches that give slightly under pressure but still hold their shape. If the only option is soft peaches, slice them a little thicker (1/2-inch) and handle them gently.
- Don’t rush the cooling: I know it is hard. The crust smells incredible. But if you put warm mascarpone into a warm crust, you will get a puddle. Let the crust cool to room temperature — about 30 minutes — before you add the filling. I usually make the crust first, then let it cool while I set the table or do the dishes.
- The arrangement matters more than you think: This is the Tiffany Walker rule of plating — if you take the time to lay the peaches in an intentional pattern, the tart reads as “bakery” instead of “I put peaches on top of cream.” It takes an extra two minutes. It changes everything about how the dessert is received.
- Glaze it for shine (optional but worth it): Warm a tablespoon of apricot jam with a teaspoon of water, and brush it over the peaches right before serving. It gives them a lacquered look that makes the whole tart look like it belongs in a pastry case. My sister-in-law calls this “the pro move.”
Make It Yours
- Dairy-Free: Use a high-quality vegan butter (like Miyoko’s) in the crust and a cashew-based cream cheese mixed with a little coconut cream in place of the mascarpone. The texture won’t be identical — it will be a bit softer — but the flavor is still excellent. I tested this for a friend who is dairy-free and she said it was the first fruit tart she had had in years that didn’t feel like a compromise.
- Gluten-Free: Use a 1:1 gluten-free flour blend in place of the all-purpose flour. Bob’s Red Mill 1:1 works perfectly. The almond flour already does a lot of the structural work, so the swap is almost seamless. My gluten-free neighbor brings her own slice over now whenever I make this.
- Other fruits: This works beautifully with nectarines, plums, or a mix of berries. If using berries, arrange them in a single layer — don’t pile them — so the mascarpone stays visible around the edges. The visual rule: you want the fruit to look placed, not poured.
- Kid-Friendly: My kids prefer this with a drizzle of honey over the peaches before serving. It adds a little extra sweetness and makes the fruit look even glossier.
Questions People Keep Asking About This Tart
Q: Why did my crust turn out greasy instead of crisp?
A: Ugh, I have been there. The most common cause is overworking the butter into the flour. When you pulse it in the food processor, stop as soon as it looks like wet sand. If you keep going, the butter separates and the crust bakes up greasy instead of crumbly. The second cause: not chilling the crust before baking. That 15 minutes in the freezer is non-negotiable — it re-solidifies the butter so the crust holds its structure in the oven.
Q: Can I make this with reduced-fat mascarpone or cream cheese?
A: You can, but the texture won’t be as lush. Reduced-fat mascarpone has a higher water content, which means it doesn’t set up as firmly and can make the crust soggy faster. If you use cream cheese, add an extra tablespoon of cream to loosen it, and expect a slightly tangier flavor. I tested it with Neufchatel and it worked okay — not as smooth, but fine for a weekday version.
Q: How far ahead can I make this? Will it last overnight?
A: Yes, it lasts overnight beautifully — up to 24 hours in the fridge. The crust will stay crisp for the first 12 hours, then start to soften slightly after that. For best results, make it in the morning for an evening event. If you need to make it a full day ahead, wait to slice the peaches until the morning of. Store the crust with the filling in the fridge and add the fruit the day of serving.
Q: What do you serve with this tart?
A: Nothing — it is self-sufficient. But if you want to glam it up, a dollop of lightly sweetened whipped cream and a few fresh mint leaves is my standard move. For a more adult version, a glass of dry Vermentino or a barely-sweet Prosecco is the perfect pairing. My husband likes it with a shot of espresso on the side, which is honestly a great call for cutting through the richness of the mascarpone.
More Summer Desserts From My Kitchen
If you liked this one, here is what else gets made on repeat at our place:
- [INTERNAL LINK PLACEHOLDER: Salted Honey & Fig Galette] — Same energy, different fruit. Free-form, zero stress, looks like you tried.
- [INTERNAL LINK PLACEHOLDER: Classic Lemon Basil Sorbet] — The dessert that tastes like summer in a bowl. No ice cream maker required.
- Brown Butter Peach Cobbler — What happens when you take the crunchiest part of the tart and turn it into a topping. My kids fight over the corner pieces.
The first time I made this, I set it on the table and watched three people pull out their phones before anyone picked up a fork. That is the moment you are aiming for — the pause before the first bite, when the tart is still pristine and the peaches are catching the light. Make it for a late-summer dinner party. Make it for a Tuesday when you need to feel like you have your life together. It works for both.
If you make this one (and you should), leave a comment below or tag me on Instagram — I genuinely love seeing how the peaches look in your kitchen light.
📌 White peach mascarpone tart that stays crisp for hours — save it for peak peach season when you need a dessert that looks like a pastry case but takes under an hour to put together.
The White Peach Mascarpone Tart That Doesn’t Turn Soggy — Finally
Equipment
- 9-inch tart pan with removable bottom
- Food Processor
- Offset spatula
- Sharp chef’s knife or mandoline
- Mixing bowl
- Whisk
Ingredients
Crust
- 1 cup all-purpose flour
- 1/2 cup almond flour (not almond meal)
- 3 tablespoons powdered sugar
- 1/4 teaspoon salt
- 1/2 cup unsalted butter, melted and cooled
- 1 teaspoon vanilla extract or vanilla bean paste
Filling & Topping
- 8 ounces mascarpone, at room temperature
- 3 tablespoons granulated sugar
- 2 tablespoons heavy cream
- 1 teaspoon vanilla bean paste
- 3-4 firm-ripe white peaches, sliced 1/4-inch thin
- 1 tablespoon apricot jam (optional, for glaze)
Instructions
- Preheat & Prep: Preheat oven to 350°F. Lightly grease a 9-inch tart pan with a removable bottom.
- Make the crust: In a food processor, pulse all-purpose flour, almond flour, powdered sugar, and salt until combined. Add melted butter and vanilla. Pulse until the mixture looks like wet sand and holds together when squeezed. If too dry, add 1 tablespoon cold water.
- Press the crust: Dump mixture into tart pan. Use fingers or flat measuring cup to press evenly across bottom and up sides. Prick bottom with a fork. (Don’t press too hard – a light, even hand is better.)
- Chill and blind bake: Freeze crust for 15 minutes (prevents shrinking). Bake directly on middle rack – no pie weights needed – for 18-22 minutes, until edges are golden and bottom looks dry and set. Let cool completely in pan on a wire rack. Do not skip this step.
- Make the filling: While crust cools, whisk mascarpone, sugar, heavy cream, and vanilla bean paste until smooth. It should be thick but spreadable – like very soft cream cheese. If too stiff, whisk in another tablespoon of cream. Taste: it should be barely sweet, with mascarpone leading.
- Assemble: Spread mascarpone mixture evenly into cooled crust. Use an offset spatula for a smooth top. Slice peaches thin (about 1/4-inch) and arrange in overlapping circles starting from outside edge working inward, overlapping each slice by half so no cream shows underneath. It should look like a flower.
- Chill for texture: Refrigerate tart for at least 2 hours, ideally 4. This firms the mascarpone for clean slices. (In a rush? 45 minutes in the freezer works, but don’t tell anyone.)
- Optional glaze: Before serving, warm 1 tablespoon apricot jam with 1 teaspoon water and brush over peaches for a lacquered, professional look.
Notes
Related Recipes:
 Twice Baked Breakfast Potatoes for a Lazy Sunday: The Only Brunch Dish You Actually Want to Make
 The Perfectly Pillowy Chocolate Chip Milk Buns (Tangzhong Method)
 Baked Protein Pancake Bowls That Are Fluffy, Golden, and Ready in 25 Minutes (Hands-Free)
 Bagel Breakfast Sliders That Taste Like a Diner Breakfast — in 25 Minutes
 Cheesy Hamburger Casserole Bake That’s Ready in 40 Minutes (No Canned Soup Here)
 Lemon Capellini Salad for Late Summer Evenings: Bright, Tangy, Ready in 20 Minutes