
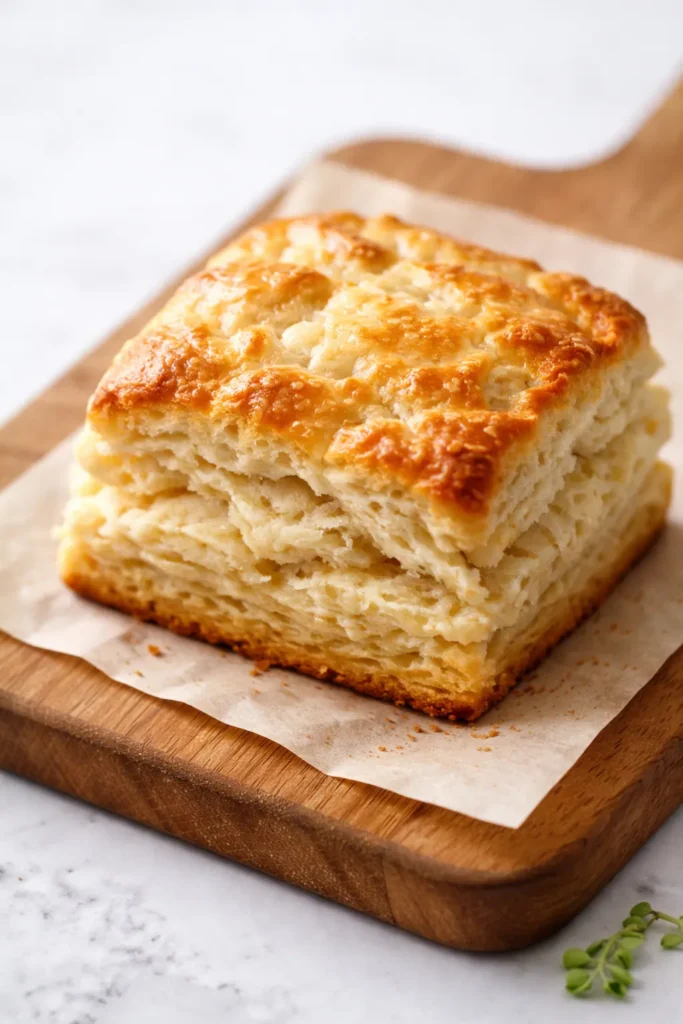
The first time I made scones that actually flaked — instead of crumbling into a dry dust — I texted my sister a photo before I even took them out of the pan. They were golden, craggy, and the layers peeled apart like a good biscuit. The secret wasn’t a special ingredient or a fancy technique. It was one simple trick that takes about thirty seconds and changes everything about the texture.
The short version: Buttermilk scones that are buttery, tender, and actually flaky — made with one technique that takes 30 seconds.
I’ve tested this recipe about fifteen times across three different ovens. This version works every single time, and my family has never once left a leftover on the plate.
- Serves: 8 scones
- Hands-On Time: 15 min | Total Time: 35 min
- Difficulty: Easy, even for a weekend morning
- Cost per serving: ~$0.75
- Calories: ~320 per scone
- Dietary Notes: Vegetarian. Adaptable for gluten-free.
(Photo above: Overhead shot of the finished scones cooling on a wire rack, one scone broken open to show the flaky layers, with a small bowl of jam and a dish of flaky salt nearby, warm morning light from the window.)
The One Step Everyone Skips—Don’t Skip It

The trick is grating frozen butter directly into your flour mixture. Those tiny flat shards of butter melt into steam pockets in the oven, which is what gives you those distinct layers. I learned this the hard way after a string of sad, dense scones that barely deserved the name.
Most recipes tell you to cut the butter into the flour. That works. But grating it? That distributes the fat in thin, even sheets throughout the dough, so when it hits the heat, you get dozens of tiny layers instead of a few big ones. The result is a scone that’s golden on the outside, tender on the inside, and actually peels apart in layers.
What Goes In—Plus My Honest Notes
- 2 cups (260g) all-purpose flour: The base. Don’t use self-rising here—it’s too soft. If you only have bread flour, it makes them slightly chewier, which my husband actually prefers.
- 1/2 cup (113g) unsalted butter, frozen: The star. The freezing and grating is the whole game. I keep a few sticks in the freezer just for scones and biscuits now.
- 1/2 cup (120ml) cold buttermilk: The acid in buttermilk tenderizes the gluten and gives that signature tang. No buttermilk? Add 1 tbsp vinegar to regular milk and let it sit for 5 minutes—it works perfectly.
- 1/3 cup (65g) granulated sugar: Just enough sweetness. For savory scones, drop this to 1 tbsp and add cheddar and chives.
- 1 large egg: For structure and the wash for browning.
- Flaky salt (Maldon or similar): The finish that makes people ask what you did. Don’t skip this step. It’s not just decoration—it’s a textural and flavor counterpoint to the sweet, buttery scone.
What to Pull Out Before You Start
- Box grater (for the frozen butter)
- Pastry blender or two forks (or your hands, if you work fast)
- Baking sheet lined with parchment paper
- Bench scraper or sharp knife (for clean cuts)
Let’s Make It (Step by Step)
This comes together fast, so read through once before you start. The oven needs to be hot—425°F.
- Preheat and prep: Set your oven to 425°F and line a baking sheet with parchment. Grate the frozen butter on the large holes of a box grater. (📸 Photo tip: You should see thin, flat shreds of butter—like cheese, but it’s butter.)
- Mix the dry ingredients: Whisk the flour, sugar, baking powder (2 1/2 tsp), and salt (1/2 tsp) together in a large bowl.
- Add the butter: Toss the grated butter into the flour mixture. Use your fingertips or a pastry blender to distribute it until the mixture looks like coarse meal with some pea-sized bits remaining. Work quickly—you want the butter to stay cold.
- Add the wet ingredients: Make a well in the center. Pour in the cold buttermilk and 1 tsp vanilla extract. Stir with a fork until just combined—a shaggy dough is what you’re after. (📸 Photo tip: Stop when there are no dry pockets left. Overmixing = tough scones.)
- Bring it together: Turn the dough out onto a lightly floured surface. Gently bring it together into a rectangle about 1-inch thick. Fold it over itself once or twice (this creates the layers!), then pat it into an 8-inch circle.
- Cut the scones: Use a bench scraper or sharp knife to cut the circle into 8 wedges. Place them on the prepared baking sheet, spaced about 2 inches apart.
- Egg wash and bake: Whisk the egg with 1 tbsp water and brush it over the tops. Sprinkle generously with flaky salt. Bake for 18–22 minutes, until golden brown and the bottoms sound hollow when tapped.
Sunday Prep = Stress-Free Weekend Mornings
I make a double batch of the dry mix and keep the frozen butter pre-grated in a bag. On Saturday morning, all I have to do is add the buttermilk and bake. My kids have started requesting them by name on Friday nights.
- Fridge: Unbaked scones can be refrigerated on the pan for up to 12 hours. Bake straight from the fridge (add a minute or two).
- Freezer: Flash freeze the cut scones on a baking sheet, then transfer to a freezer bag. Bake from frozen, adding 3-5 minutes. This has saved me more than once when friends texted they’re stopping by.
- Reheat: A 300°F oven for 5-7 minutes brings back the crisp exterior better than a microwave ever could.
Things I Wish I’d Known the First Time
- Keep everything cold: If your kitchen is warm, pop the flour bowl and the grated butter into the fridge for 10 minutes before adding the buttermilk. Cold ingredients are the only thing standing between you and a flat scone.
- Don’t twist the cutter: If you’re using a round cutter (I prefer wedges for ease), press straight down without twisting. Twisting seals the edges and prevents rising. Even if you mess this part up a little, it’ll still taste good—I’ve done it.
- Trust the shaggy dough: It will look dry and messy. That’s exactly right. If it looks smooth and homogenous, you’ve overworked it, and the scones will be tough. I’ve done this. I was sad. Learn from me.
- Flaky salt is non-negotiable: Even for sweet scones. That tiny crunch of salt against the tender, buttery crumb is what makes people reach for a second one without thinking.
Make It Yours: Easy Variations
- Blueberry Lemon: Add 1 cup fresh or frozen blueberries (don’t thaw) and 1 tbsp lemon zest to the dry mix. My kids fight over the blue one every time.
- Cheddar & Chive (Savory): Reduce sugar to 1 tbsp. Add 1 cup shredded sharp cheddar, 1/4 cup chopped fresh chives (cut on a bias, as you know I insist), and a pinch of black pepper.
- Gluten-Free: Substitute the all-purpose flour with a 1:1 gluten-free baking blend that contains xanthan gum. The texture is slightly more tender, but the flavor is all there. This is the version I make for my friend who can’t do gluten—she never leaves without the recipe.
Questions I Get About This Recipe All the Time
Q: Why did my scones turn out dry?
A: Ugh, the curse of the dry scone! Two likely culprits: 1) You overmixed the dough, which makes it tough. 2) You baked them a minute or two too long. Start checking at 18 minutes. You’ve got this next time.
Q: Can I make these dairy-free?
A: Yes! Substitute the butter with frozen grated coconut oil or a high-quality vegan butter (like Miyoko’s). Use full-fat oat milk or canned coconut milk mixed with 1 tsp lemon juice in place of buttermilk. I’ve tested this and it works!
Q: How long do these last? Can I freeze them?
A: They’re best the day they’re made, but they’ll keep in an airtight container at room temperature for up to 2 days. To freeze, wrap baked scones tightly in plastic wrap and foil, then freeze for up to 3 months. Reheat in a 300°F oven to bring back the crispness.
Q: What do you serve with these?
A: For sweet: really good jam (raspberry is my favorite), clotted cream (if you’re feeling fancy), or a simple lemon curd. For savory: a soft scrambled egg or just a pat of good salted butter. My family always does a big spread on Sunday mornings—these are the anchor.
More Recipes My Family Makes on Repeat
If you liked this one, here are a few others that get the same reaction at our table:
- Flaky Biscuits With Brown Butter Honey — [INTERNAL LINK PLACEHOLDER: Flaky Biscuits With Brown Butter Honey] — Even flakier than these scones, if you can believe it.
- No-Knead Focaccia With Rosemary & Flaky Salt — [INTERNAL LINK PLACEHOLDER: No-Knead Focaccia With Rosemary & Flaky Salt] — The other carb that disappears in 10 minutes.
- Simple Strawberry Jam (No Pectin Needed) — [INTERNAL LINK PLACEHOLDER: Simple Strawberry Jam (No Pectin Needed)] — The perfect partner for these scones.
These scones have saved more weekend mornings than I can count. They look like you tried hard, but secretly they’re one of the easiest things you can bake. If you make them, drop a comment below and let me know how they turned out—I genuinely love hearing about it.
📌 Buttermilk scones recipe that actually stays flaky and tender — save it for your next lazy Sunday morning baking session.

The Buttermilk Scones You’d Never Guess Are This Flaky (and Easy)
Equipment
- Large Mixing Bowl
- Box grater
- Pastry Blender or Two Forks
- Baking Sheet
- Parchment Paper
- Bench Scraper or Sharp Knife
Ingredients
For the Scones
- 2 cups all-purpose flour
- 1/2 cup unsalted butter, frozen
- 1/2 cup cold buttermilk
- 1/3 cup granulated sugar
- 1 large egg (for dough)
- 2 1/2 tsp baking powder
- 1/2 tsp salt
- 1 tsp vanilla extract
For the Egg Wash
- 1 large egg
- 1 tbsp water
For Finishing
- flaky salt (like Maldon)
Instructions
- Set your oven to 425°F and line a baking sheet with parchment. Grate the frozen butter on the large holes of a box grater.
- Whisk the flour, sugar, baking powder, and salt together in a large bowl.
- Toss the grated butter into the flour mixture. Use your fingertips or a pastry blender to distribute until it looks like coarse meal with some pea-sized bits remaining. Work quickly to keep the butter cold.
- Make a well in the center. Pour in the cold buttermilk and vanilla extract. Stir with a fork until just combined—a shaggy dough is what you want.
- Turn the dough out onto a lightly floured surface. Gently bring together into a rectangle about 1-inch thick. Fold over once or twice, then pat into an 8-inch circle.
- Use a bench scraper or sharp knife to cut into 8 wedges. Place on the prepared baking sheet, spaced 2 inches apart.
- Whisk the egg with 1 tbsp water and brush over the tops. Sprinkle generously with flaky salt. Bake for 18–22 minutes, until golden brown and the bottoms sound hollow when tapped.
Notes
Related Recipes:
 Apple Rose Pastry Blooms That Look Like a Patisserie Display (With Zero Fancy Skills Needed)
 The Only Strawberry Shortcake Recipe That Works Every Time
 Strawberry Shortcake Muffins That Taste Like Summer (With a Crunchy Sugar Lid)
 Cottage Cheese Flagels That Are Actually Chewy (Not Spongy) — in 35 Minutes
 Easy Zucchini Cake Mix Bread That Actually Stays Moist (Not Soggy) — 15 Minutes Prep
 Fudgy Zucchini Brownies You’d Never Guess Are Hiding a Vegetable