
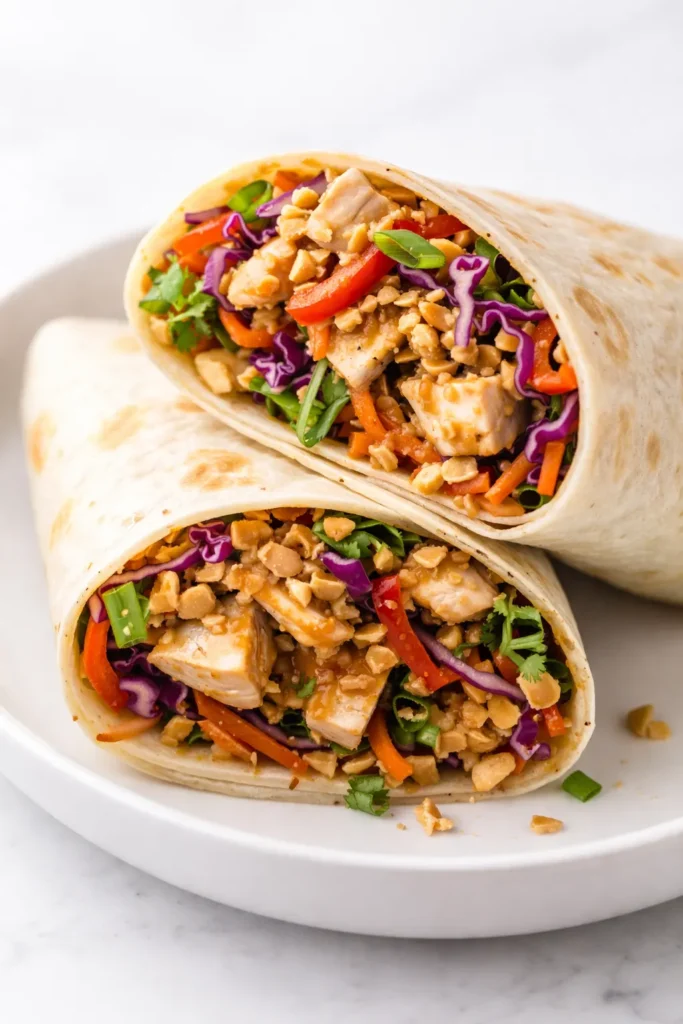
I have a very specific memory of the first time I made this wrap. It was a Tuesday, I was staring down a container of leftover roasted chicken, and I wanted something that didn’t taste like a Tuesday. I wanted the kind of lunch that makes you look forward to taking a break. The kind that feels like you cheated the system.
The enemy of a good wrap is sogginess. You know the one — the bottom tears, the filling spills out, and you’re left eating the components with a fork while standing over the sink. This version doesn’t do that. The peanut sauce is engineered to cling to the chicken and noodles without saturating the bread. The chicken is seared, so it has actual texture. And the herbs are treated like a vegetable, not an afterthought.
The short version: Crunchy, salty, sweet, and ready in 25 minutes. This is the lunch that makes people at the table ask what you’re eating.
I’ve made this exact wrap about forty times. I’ve tweaked the sauce ratio, swapped proteins, and tested it with every brand of tortilla at the bodega. This version is the one that holds up.
- Serves: 2 as a meal / 4 as a snack
- Hands-On Time: 25 min | Total Time: 25 min
- Difficulty: Easy. You can absolutely do this.
- Cost per serving: ~$4.50
- Calories: ~485 per serving
- Dietary Notes: Naturally dairy-free. Easily adaptable for gluten-free.
(Photo above: A cross-section of the wrap on a wooden board, the filling spilling out just slightly, a small bowl of extra peanut sauce for dipping on the side. A few sesame seeds scattered on the board, a lime wedge in the corner.)
The Architecture of a Good Wrap
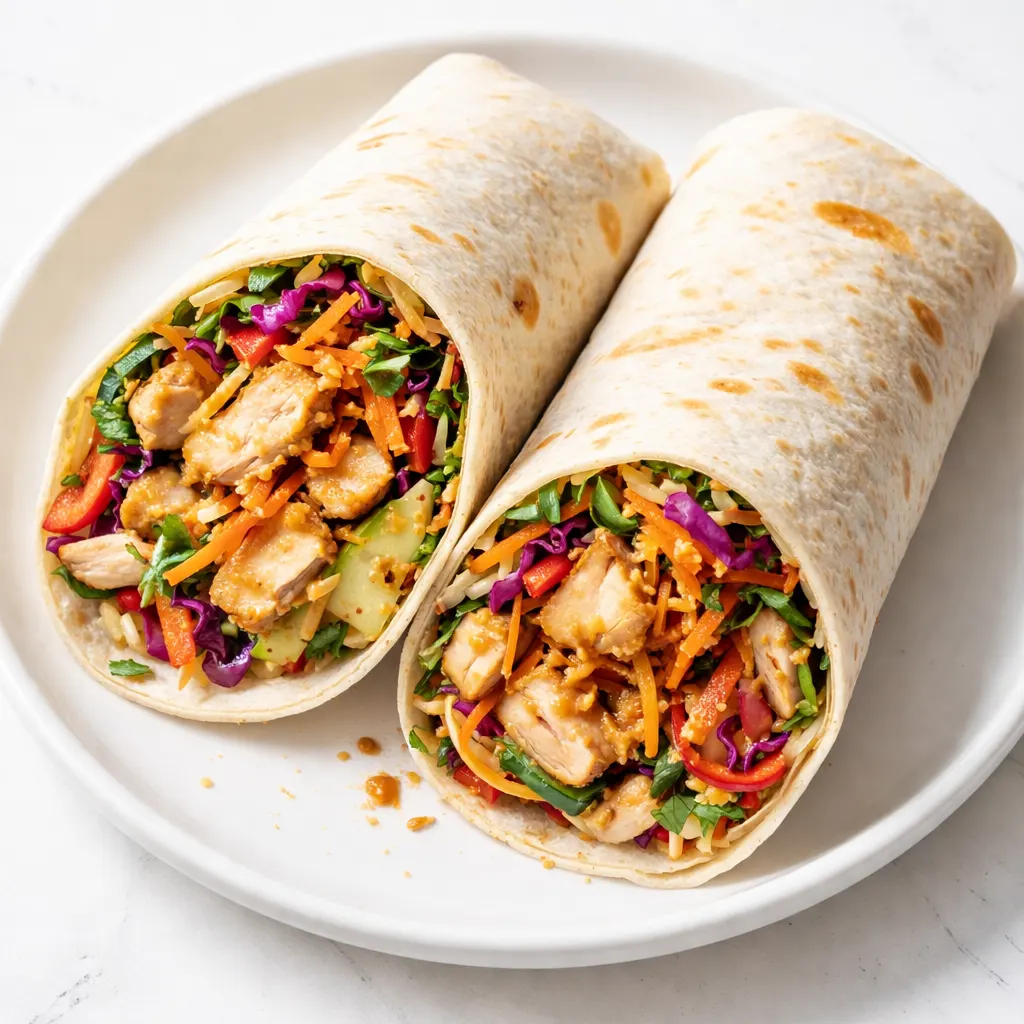
A great wrap is a structural project. Everything needs to stay in its lane, and there are three things I do to make sure this one doesn’t fall apart on you.
First, the sauce is a coating, not a dressing. It’s thick. It clings to the chicken and the noodles so the tortilla stays dry. I use creamy peanut butter (the processed kind, not the natural stuff that separates) because it emulsifies better and creates a velvety base that actually adheres to the ingredients instead of pooling at the bottom.
Second, the chicken is seared, not shredded. Sliced thighs with a golden crust provide actual chew. They give the wrap structure and texture. Shredded chicken releases too much moisture and turns everything into a paste. We’re not making chicken salad. We’re making a wrap with presence.
Third, the herbs are treated like a vegetable. A handful of cilantro and mint doesn’t just garnish the wrap — it fills it. It provides a layer of freshness that cuts through the richness of the peanut sauce and makes the whole thing taste like it came from a restaurant, not a meal prep container.
What to Pick Up at the Store
- 1/3 cup creamy peanut butter: Skippy or Jif. I know the natural stuff feels virtuous, but it separates and makes the sauce grainy. Trust the processed stuff here. It emulsifies perfectly.
- 2 tablespoons soy sauce: I use low-sodium tamari because I like the cleaner finish, but regular soy sauce works. If you’re gluten-free, make sure it’s tamari or coconut aminos.
- 1 tablespoon rice vinegar: This is the acid that cuts through the fat. Don’t skip it. White wine vinegar in a pinch, but rice vinegar is better.
- 1 tablespoon sesame oil: A little goes a long way. It’s the “smells like takeout” secret. Toast the bottle next to your stove.
- 1-2 teaspoons sriracha: Adjust to your tolerance. I do a heaping teaspoon for myself and a scant one when I’m sharing with people who don’t chase heat.
- 1 lb boneless, skinless chicken thighs: Thighs stay juicier. Breasts work too, but watch them closely so they don’t dry out.
- 4 oz rice vermicelli noodles: Thai Kitchen brand is my go-to. The chewy texture is non-negotiable.
- 1 large cucumber, julienned: English cucumber is best. Regular works fine. Just seed it first so you’re not introducing extra water into the wrap.
- 1 large carrot, julienned: Adds color and crunch. Pre-shredded works in a pinch, but fresh julienne looks better and stays crisper.
- 1 cup fresh cilantro leaves: Do not chop them. Leave them whole. They layer better and look more intentional.
- 1/2 cup fresh mint leaves: This is not optional. Mint is what makes the whole thing taste like Southeast Asia. Thai basil if you can find it, but mint is the priority.
- 2 burrito-size flour tortillas: At least 10 inches. The big ones from the bodega or Mexican grocery. If you go smaller, you’ll struggle to close them.
The Tools (Nothing Fancy)
- A 10-inch skillet (non-stick or cast iron — I use cast iron for the sear)
- A mixing bowl for the sauce
- A sharp knife and a cutting board
- A pot for boiling the noodles
- Tongs for flipping the chicken
That’s it. No mandoline required, though it does make the julienne faster. I use a knife because I’m stubborn and I like the practice.
Let’s Build It (My Exact Process)
Everything comes together fast, so I like to have my components ready before I start assembling. Read through once, then let’s go.
Step 1: Make the sauce. Whisk together the peanut butter, soy sauce, rice vinegar, sesame oil, and sriracha in a small bowl. Add a tablespoon of warm water and whisk until it’s smooth and thick but spreadable. It should look like a slightly loose frosting. Set it aside.
- Sear the chicken: Season the chicken thighs generously with salt and white pepper (black pepper is fine, I just prefer white here — it blends in better). Heat your skillet over medium-high heat. Add a drizzle of oil — just enough to coat the bottom. Sear the chicken for 5-6 minutes per side, until the skin is deeply golden and the internal temperature hits 165°F. Let the chicken rest on a cutting board for 5 minutes. This is crucial — if you slice it immediately, all the juice runs out and makes the wrap wet. After resting, slice it against the grain into thick strips.
(📸 Photo tip: The chicken should be amber and crisp on the outside, not pale and steamed. If your pan is smoking, turn it down slightly — you want a steady sizzle, not a fire alarm.) - Cook the noodles: Boil a pot of water. Cook the rice noodles according to the package directions — usually 4-5 minutes. Drain them, rinse with cold water to stop the cooking, and toss them with a tiny drizzle of sesame oil so they don’t clump together. Set them aside.
(📸 Photo tip: Rinsing the noodles with cold water also removes excess starch, which helps prevent the noodles from getting gummy.) - Prep the veggies: Julienne the cucumber and carrot into long, thin strips. If the cucumber is seedy, cut out the center seeds first. Pat the strips dry with a paper towel. Wet veggies are the enemy of a tight wrap.
- Warm the tortillas: In a dry skillet over medium heat, warm each tortilla for 15-20 seconds per side. If you have a gas stove, you can do it directly over the flame — just watch it closely. Warming makes them pliable and less likely to tear when you roll.
- Assemble the wrap: Lay a tortilla flat on your board. Spread a generous tablespoon of peanut sauce across the entire surface, leaving a 2-inch border at the top and bottom. The key here is to go edge to edge — if you leave dry patches, you’ll have bland bites. Lay a quarter of the noodles down the center of the tortilla. Top with the sliced chicken, cucumber, carrot, cilantro, and mint. Fold the sides in towards the center, then roll tightly from the bottom, tucking the filling as you go. Roll it like a burrito — snug but not so tight that the tortilla tears.
- Toast the wrap: Wipe out the skillet and set it over medium heat. Place the wrap seam-side down. Toast for 2-3 minutes per side, until golden brown and crisp. This step is non-negotiable. It locks everything in and gives you that diner-style crust that makes the wrap satisfying to bite into.
- Slice and serve: Let the wrap sit for one minute after toasting. Slice it cleanly on a bias with a serrated knife — this gives you the beautiful cross-section that makes everyone jealous. Serve with lime wedges and the extra peanut sauce on the side for dipping.
How to Meal Prep These Wraps
I make a double batch of the components almost every Sunday. It saves me from ordering expensive delivery when I’m tired and hungry around noon.
- Fridge: Keep the sauce in a jar (it lasts a week). Store the sliced chicken and cooked noodles in separate containers. Julienne the veggies and store them in a paper-towel-lined container to keep them crisp. Assemble the wraps the morning you plan to eat them — it takes 5 minutes.
- Freezer: I do not freeze assembled wraps. The veggies release water when they thaw. Freeze the chicken and sauce separately — they’ll keep for 2 months.
- Reheat: If you assemble the wrap ahead of time, toast it in a dry skillet or toaster oven right before eating. The microwave makes the tortilla rubbery — please don’t do it.
Mistakes I’ve Made So You Don’t Have To
- Don’t oversaturate the wrap. A thin, even layer of sauce is all you need. If you glop it on, the tortilla will disintegrate. This is a wrap, not a dip.
- Dry your herbs and veggies. Wet herbs = soggy wrap. Use a salad spinner for the herbs and pat the cucumber dry with paper towels. This one step makes the difference between a wrap that holds and a wrap that collapses.
- Let the chicken rest. I’ve said it twice, but it matters. Hot meat creates steam inside the wrap, which turns into condensation, which turns into sadness. Let it rest on the cutting board for five minutes.
- Don’t overfill. It’s tempting to stuff it to the brim, but you won’t be able to close it. If you’re hungry, make two wraps. A well-rolled wrap with modest filling is infinitely better than a bursting one that falls apart.
Swaps That Still Taste Amazing
- Vegetarian: Swap the chicken for extra-firm tofu. Press it, cube it, and pan-sear it until golden and crisp on all sides. The texture is similar and it absorbs the peanut sauce beautifully.
- Gluten-Free: Use gluten-free tamari and rice paper wraps instead of flour tortillas. Dip the rice paper in warm water, lay it flat, fill it, and roll it like a spring roll. It’s a different texture — lighter, chewier — but genuinely good.
- Spicy: Add a drizzle of chili crisp to the wrap before rolling, or slice a fresh bird’s eye chili into the filling. The chili crisp also adds a crunchy texture that plays well with the soft noodles.
- Nut-Free: Sunflower seed butter works surprisingly well here. It turns a little green from a chemical reaction with the acid (it’s fine, it’s just chlorophyll), but the taste is still rich and savory.
- Kid-Friendly: Skip the sriracha and add a teaspoon of honey to the sauce. The sweet-salty combo is universally appealing, and my friends’ kids have given it the official stamp of approval.
The Questions People Always Ask
Q: Why did my wrap get soggy? I followed the recipe.
A: A soggy wrap is almost always from too much sauce or hot ingredients. Make sure you’re spreading the sauce thinly and letting the chicken cool completely before wrapping. Also check that your veggies are dry — wet cucumber is the #1 culprit.
Q: Can I make this with leftover rotisserie chicken?
A: Yes, but pat it dry with paper towels before you slice it. Rotisserie chicken tends to be more moist than pan-seared, and that moisture has to go somewhere. Drying it first prevents the dreaded sog.
Q: How long do these last in the fridge once assembled?
A: About one day. The veggies start leaching water after 24 hours. If you need them to last longer, store the components separately and assemble fresh. The sauce alone keeps for over a week.
Q: What do you serve with this wrap?
A: I keep it simple. A handful of kettle chips on the side for crunch, or a cold sesame cucumber salad if I want something refreshing. The wrap is the star — the sides are just there to keep it company.
More Recipes My Kitchen Keeps Making
If this wrap is your speed, here are a few other meals that have saved my lunch hour more times than I can count:
- Grilled Chicken Wraps — “The pickled daikon is worth the five extra minutes.”
- Asian Cucumber Salad — “Perfect cold straight from the fridge in July.”
- Cajun Honey Butter Salmon — “My go-to when I want a 15-minute dinner that looks like I tried.”
This is the wrap that makes you look forward to lunch. It’s bright, it’s filling, and it costs a fraction of what you’d pay for delivery. If you make it — and you should — let me know how it turns out. Drop a comment below or tag me so I can see your beautiful cross-sections.
📌 The Thai Peanut Chicken Wrap that actually stays crunchy — save this for your next meal prep Sunday and watch your coworkers get jealous at lunch.
The Thai Peanut Chicken Wrap That Actually Stays Crunchy (No Soggy Wraps Here)
Equipment
- 10-inch skillet (non-stick or cast iron)
- Mixing bowl
- Sharp knife and cutting board
- Pot for boiling noodles
- Tongs
Ingredients
For the Peanut Sauce
- 1/3 cup creamy peanut butter (Skippy or Jif)
- 2 tablespoons soy sauce (low-sodium tamari works)
- 1 tablespoon rice vinegar
- 1 tablespoon sesame oil
- 1-2 teaspoons sriracha (adjust to taste)
For the Chicken
- 1 lb boneless skinless chicken thighs
- Salt and white pepper (or black)
- Neutral oil for searing
For the Noodles and Veggies
- 4 oz rice vermicelli noodles
- 1 large English cucumber, julienned and seeded
- 1 large carrot, julienned
- 1 cup fresh cilantro leaves (whole)
- 1/2 cup fresh mint leaves (whole)
For Assembly
- 2 burrito-size flour tortillas (10-inch)
- Lime wedges for serving
- Extra peanut sauce for dipping
Instructions
- Make the sauce: In a small bowl, whisk together peanut butter, soy sauce, rice vinegar, sesame oil, and sriracha. Add 1 tablespoon warm water and whisk until smooth and thick but spreadable. Set aside.
- Sear the chicken: Season chicken thighs generously with salt and white pepper. Heat a skillet over medium-high heat with a drizzle of oil. Sear chicken 5-6 minutes per side until golden and internal temp reaches 165°F. Let rest 5 minutes on a cutting board, then slice against the grain into thick strips.
- Cook the noodles: Boil water and cook rice noodles according to package directions (about 4-5 minutes). Drain, rinse with cold water, and toss with a tiny drizzle of sesame oil to prevent sticking.
- Prep the veggies: Julienne cucumber and carrot into long thin strips. Pat dry with paper towels to remove excess moisture.
- Warm the tortillas: In a dry skillet over medium heat, warm each tortilla 15-20 seconds per side until pliable.
- Assemble the wrap: Lay a tortilla flat. Spread a generous tablespoon of peanut sauce across the entire surface, leaving a 2-inch border at top and bottom. Layer noodles, sliced chicken, cucumber, carrot, cilantro, and mint down the center. Fold sides inward, then roll tightly from the bottom, tucking filling as you go.
- Toast the wrap: Wipe skillet clean and set over medium heat. Place wrap seam-side down and toast 2-3 minutes per side until golden and crisp. Let rest 1 minute, then slice on a bias with a serrated knife. Serve with lime wedges and extra peanut sauce.
Notes
Related Recipes:
 Cheesy Hamburger Casserole Bake That’s Ready in 40 Minutes (No Canned Soup Here)
 Lemon Capellini Salad for Late Summer Evenings: Bright, Tangy, Ready in 20 Minutes
 Creamy Garlic Tagliatelle That Looks Like a Restaurant Dish in 20 Minutes
 Texas Roadhouse Style Baked Salmon with Sweet and Savory Glaze — Ready in Under 30 Minutes
 Easy Italian Meatloaf That’s Actually Juicy (Not Dry) — in 1 Hour
 The Biscuits and Gravy Casserole That’s Actually Crispy on Top (And Ready in 40 Minutes)